We have added the ability to create a Single Sign-On system for Bitrix24 enterprise plans. Add all colleagues to Bitrix24 account and manage their access from Microsoft Azure Active Directory. Employees will log in to Bitrix24 without entering a password.
To connect Single Sign-On, you need to do the following steps:
- An account administrator needs to run the setup in Bitrix24, register the application with Azure AD, and configure SSO and SCIM.
- After that, employees will be able to use their Azure AD accounts to log in to Bitrix24.
What is Microsoft Azure Active Directory, SSO and SCIM:
- Microsoft Azure Active Directory (Azure AD) is a system for managing access to applications and services in the cloud. You can set up a single sign-on entry point for users so that they can access multiple applications and services from a single account.
- Single sign-on (SSO) is a technology that allows users to log in to several different applications or sites. Employees do not need to remember passwords for each application. They can quickly access services using just one name and one password.
- System for Cross-domain Identity Management (SCIM) is a standard protocol that allows you to manage user accounts and their access to resources in applications and systems. With SCIM, administrators can quickly and easily create, modify, and delete user accounts and manage access to resources in applications and systems.
In this article:
- Configure single sign-on for employees
- Create a SAML application in the Microsoft Azure and configure ACS URL/SP Entity ID
- Enter the service URL and run validation
- Validate employee email domain
- Configure mobile platforms: iOS and Android
- Test single sign-on and enable it for all employees
Configure Single Sign-On for employees
Open Bitrix24 profile and click the Security tab > SSO and SCIM > Configure now.
When a user is deactivated, it signifies their dismissal from your account. Activating a user corresponds to hiring them in Bitrix24. If you dismiss an administrator, they will lose their admin rights. You will need to re-grant them if you decide to rehire this user.
Create a SAML application in the Microsoft Azure and configure ACS URL / SP Entity ID
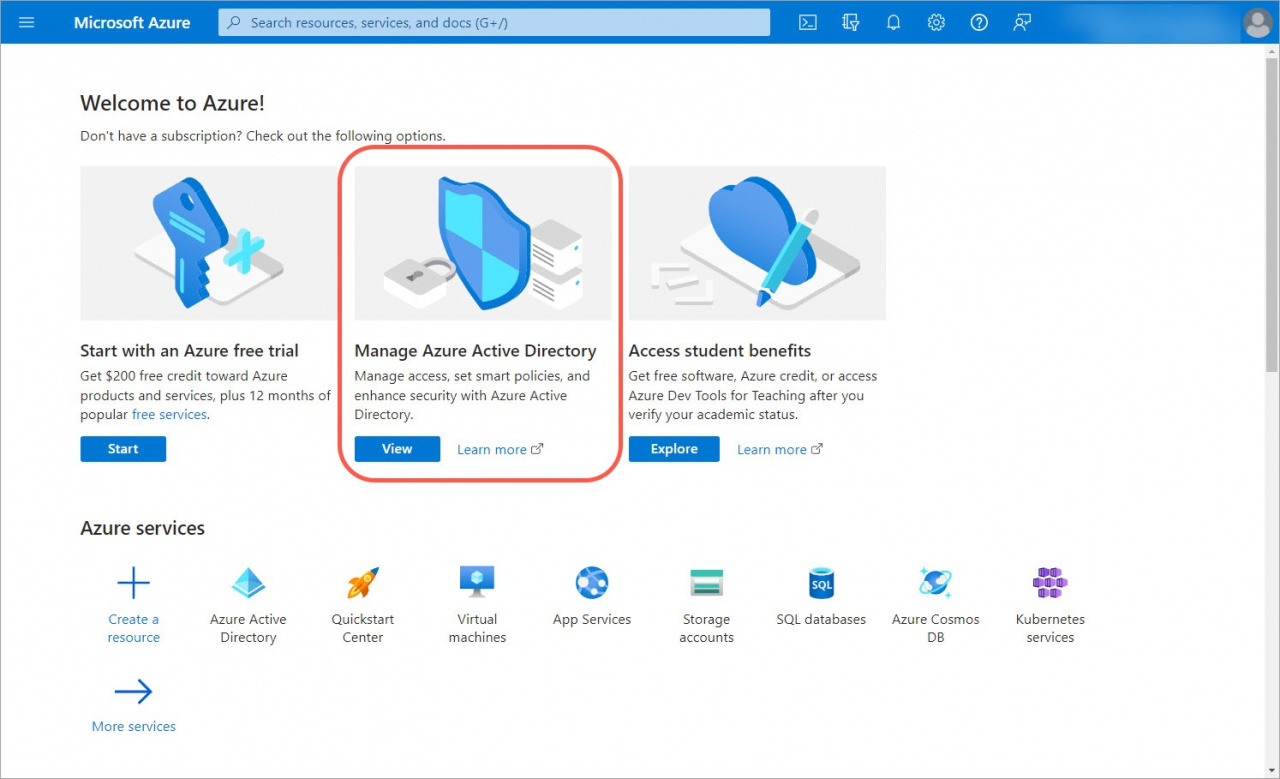
1. Go to your Microsoft Azure account or create a new one. Open the Azure Active Directory section.
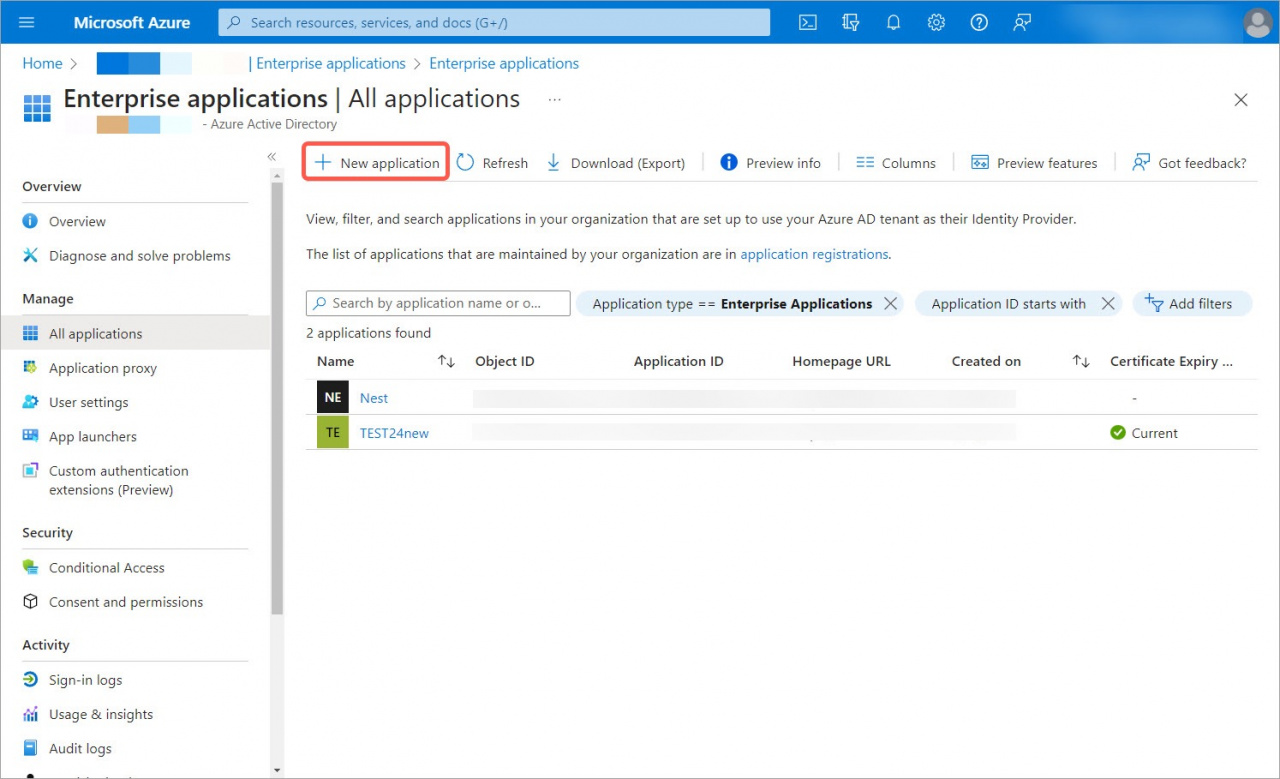
2. Open the Enterprise applications tab and click New Application.
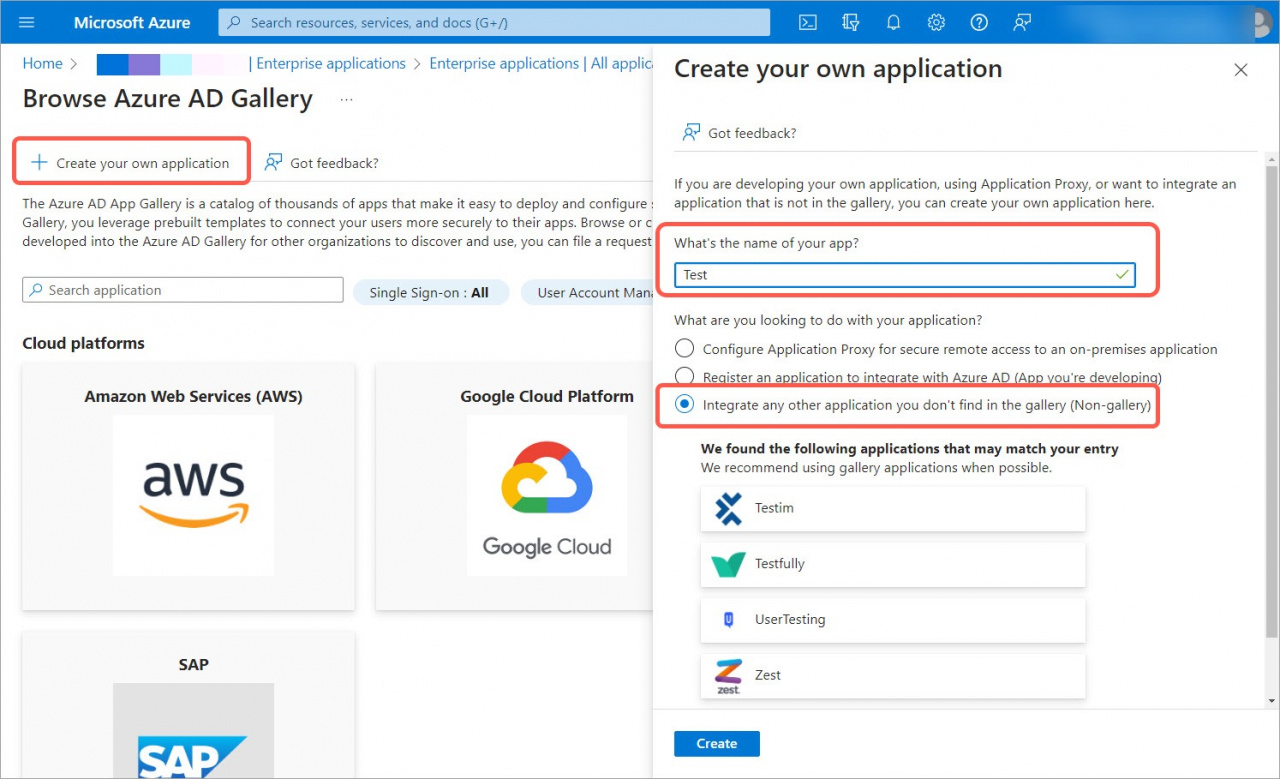
3. Create your own application, specify a name, select the Integrate any other application you don't find in the gallery (Non-gallery) option and click Create.
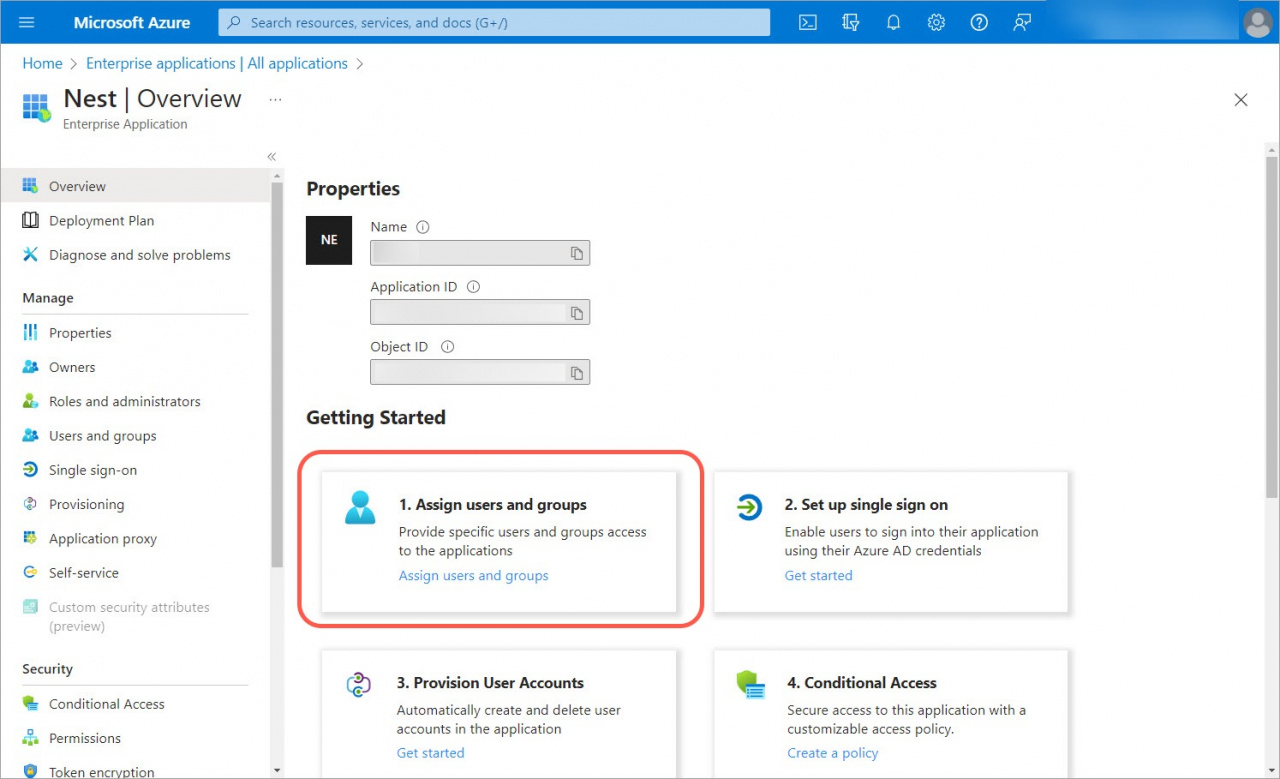
4. When the application is created, go to the Assign users and groups section.
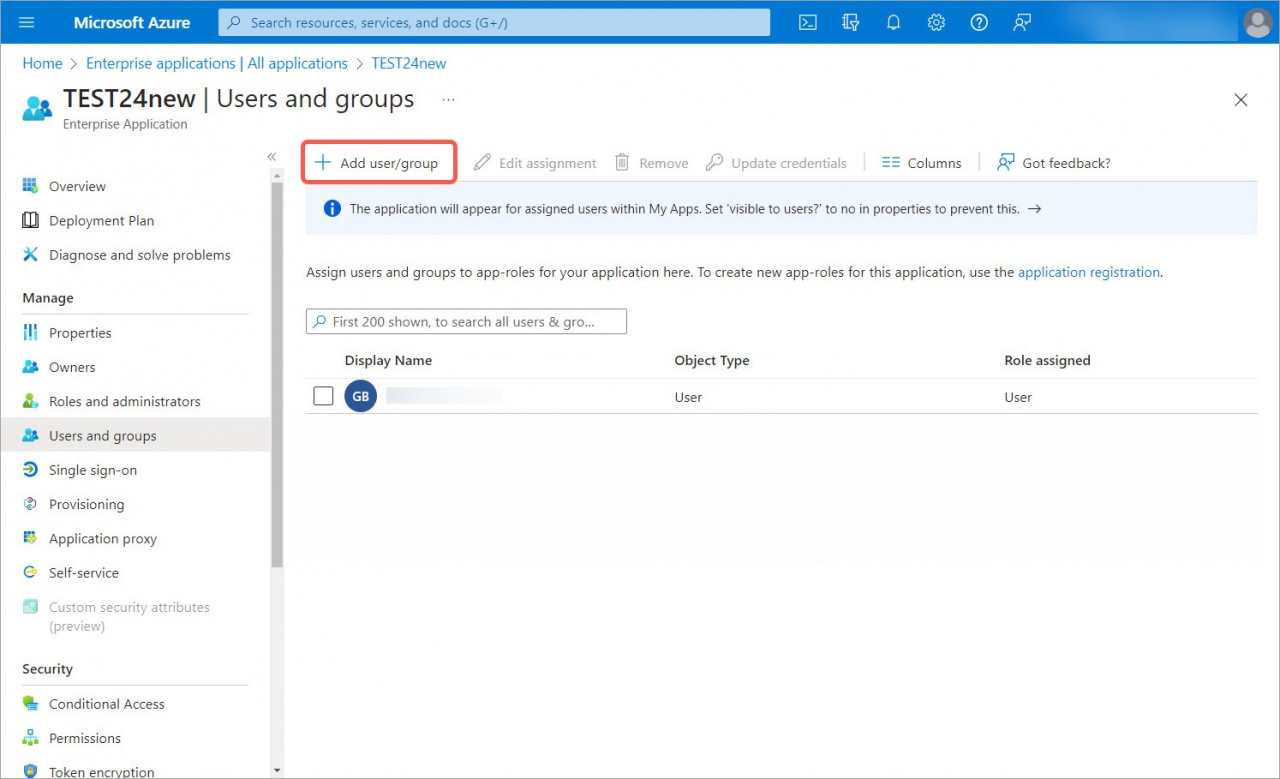
5. Click Add user/group and specify yourself as a user.
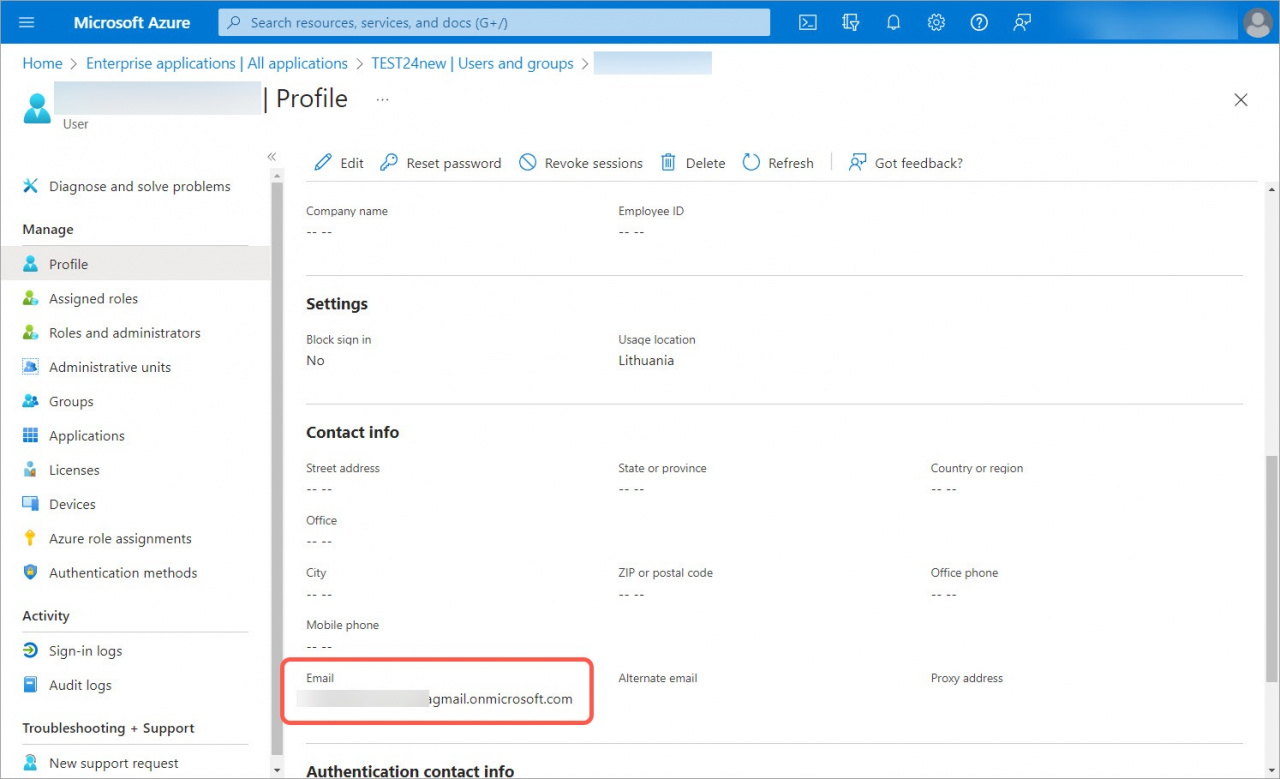
6. Open your profile and make sure that you have your email address listed in the Contact info section. Otherwise, you may have problems logging in to the account.
Add or delete users using Azure Active Directory
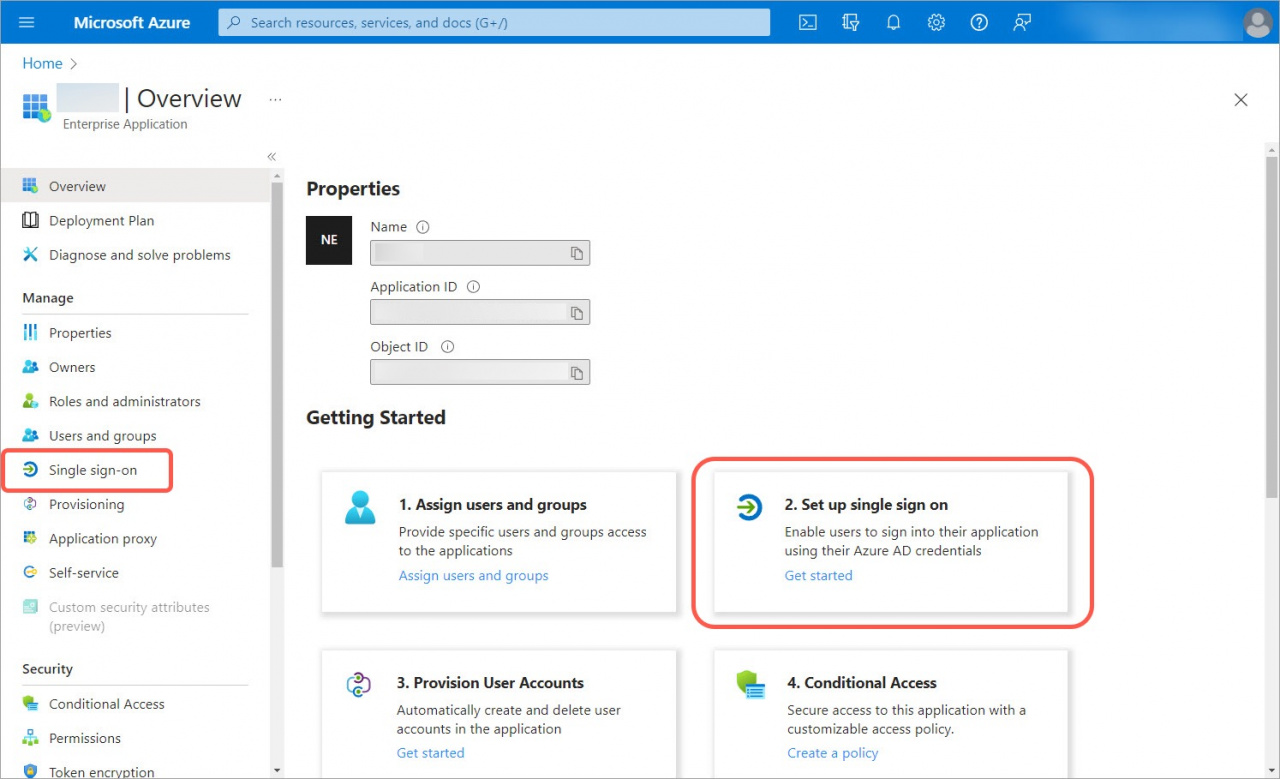
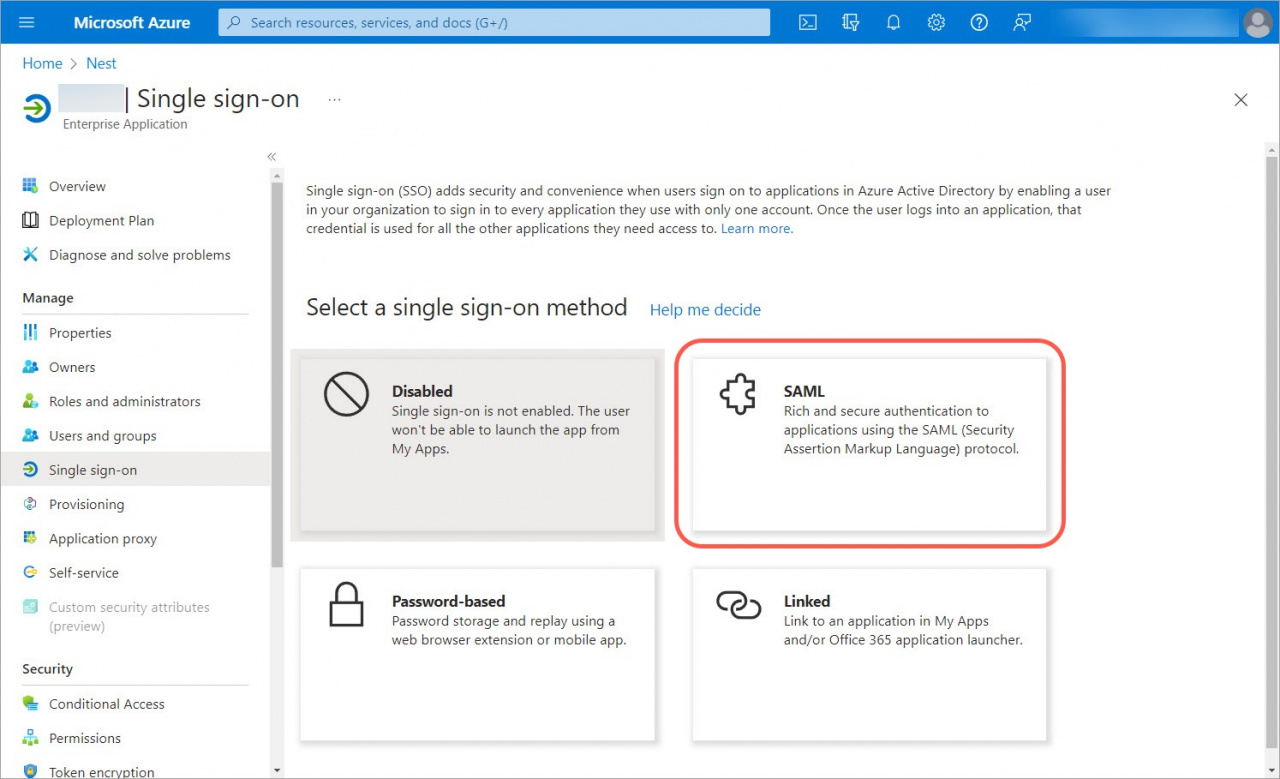
7. Then go to the Single Sign-On section.
8. Select the SAML Single Sign-On method.
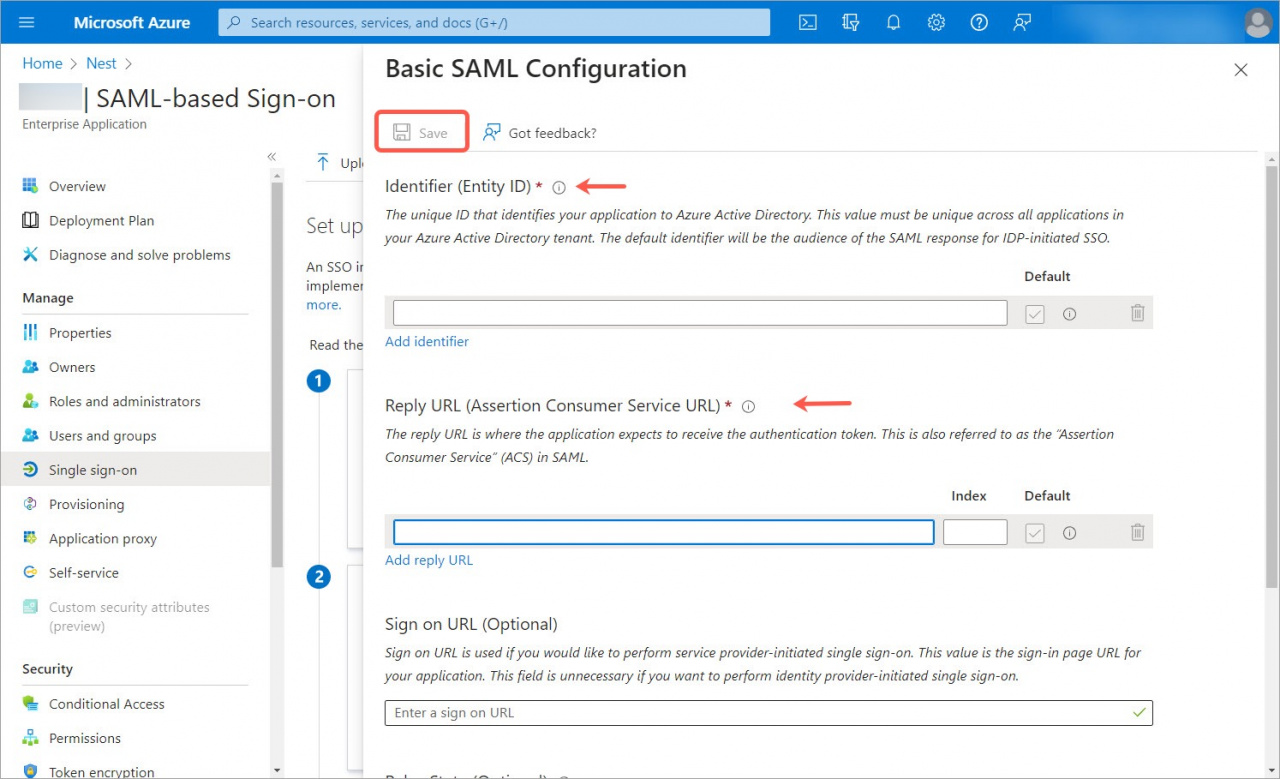
9. Click Edit in the SAML Basic Configuration block.
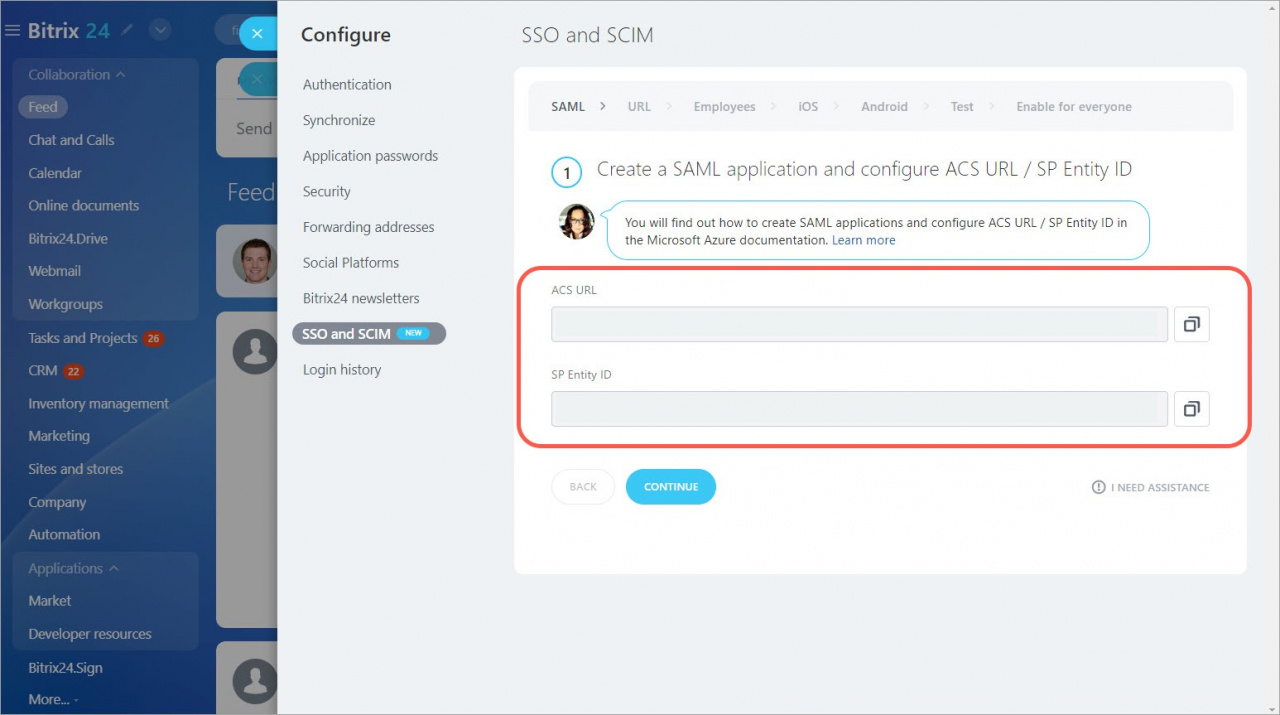
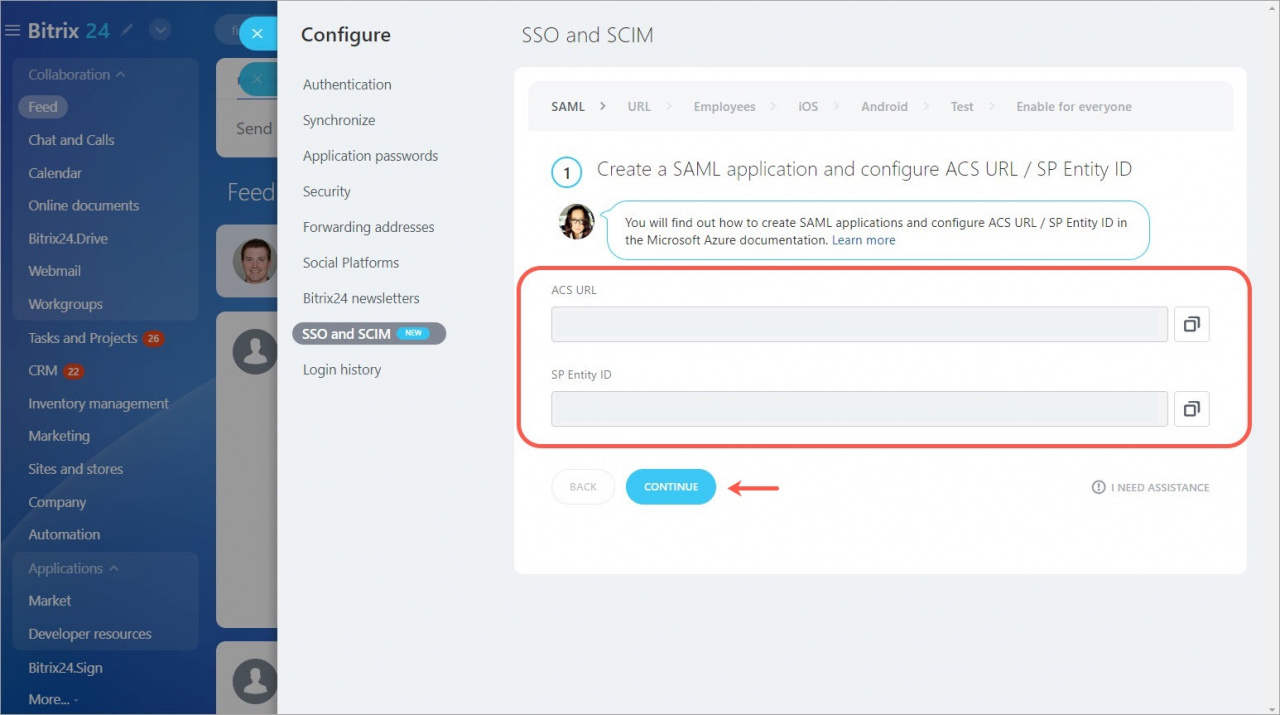
10. Then open the Bitrix24 account and copy the ACS URL and SP Entity ID fields.
11. Go back to Microsoft Azure and add the ACS URL value into the Reply URL (Assertion Consumer Service URL) field and SP Entity ID into the Identifier (Entity ID) field. Then click Save.
12. Then go back to the Bitrix24 account and click Continue.
Enter the service URL and run validation
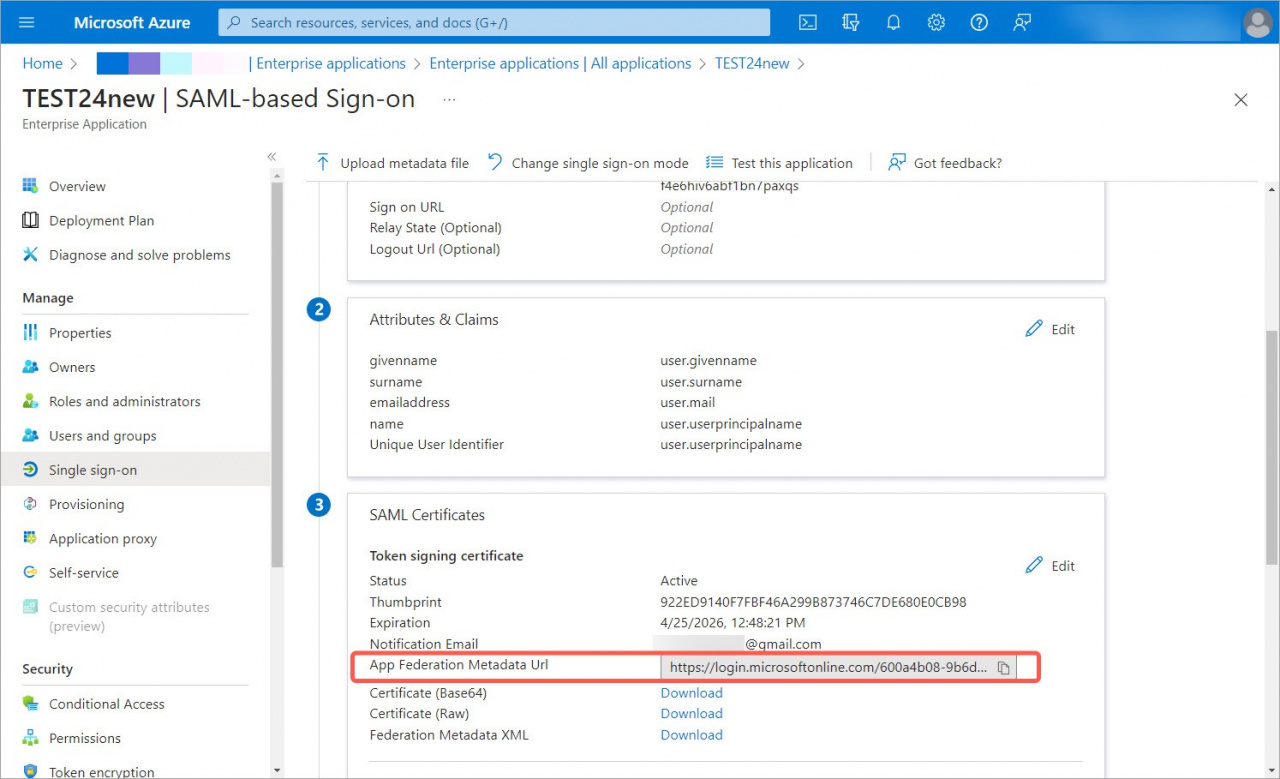
1. Copy the App Federation Metadata URL field on the Microsoft Azure side.
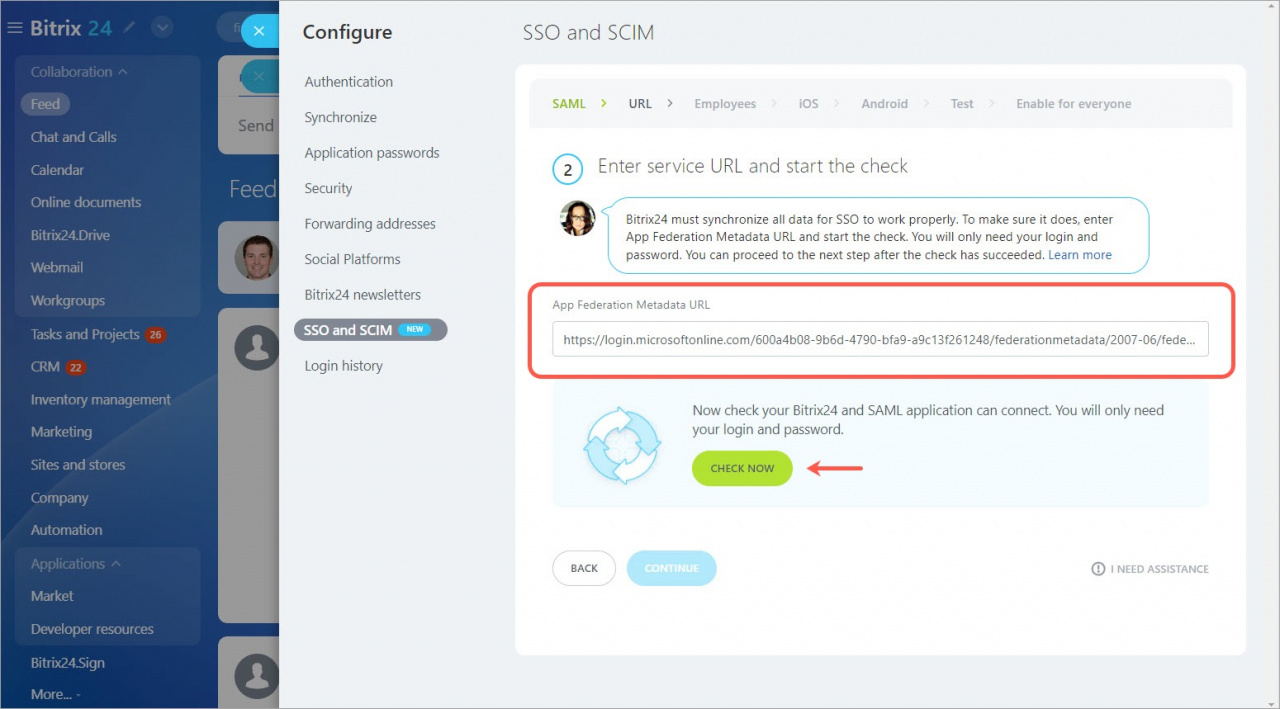
2. Enter the App Federation Metadata URL for Bitrix24 to synchronize all data for proper SSO operation and click the Check now button.
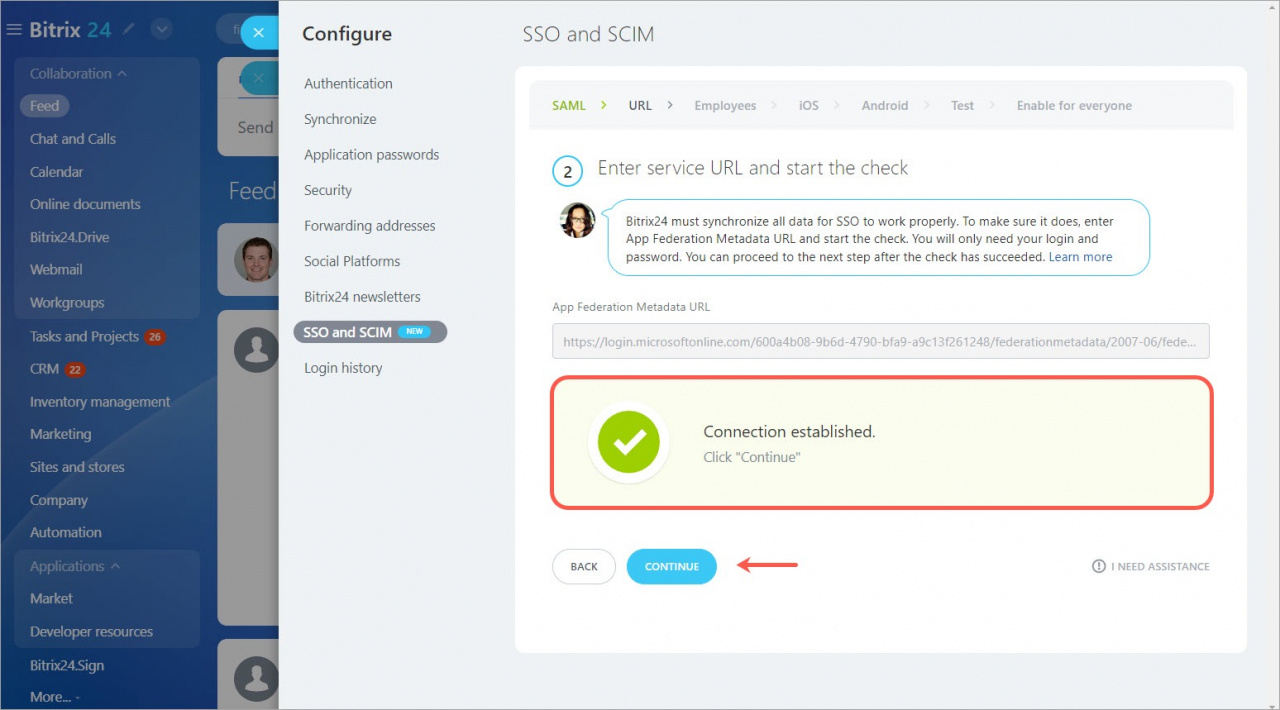
3. The Connection established message will appear. If you configure SSO and SCIM in the incognito mode or in a different browser, you will need to re-enter Microsoft Azure.
Possible errors
You cannot log in. If you get this error during the check, make sure that you have added yourself as an application user.
Checking employee email domains
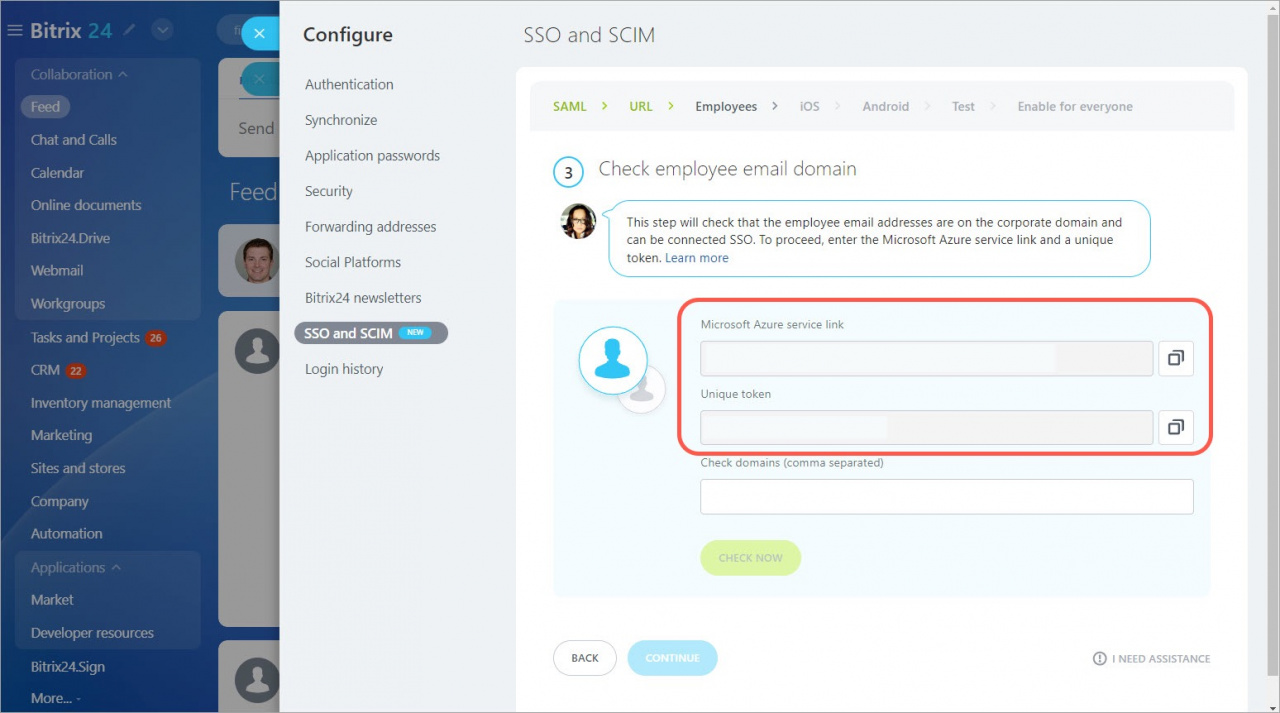
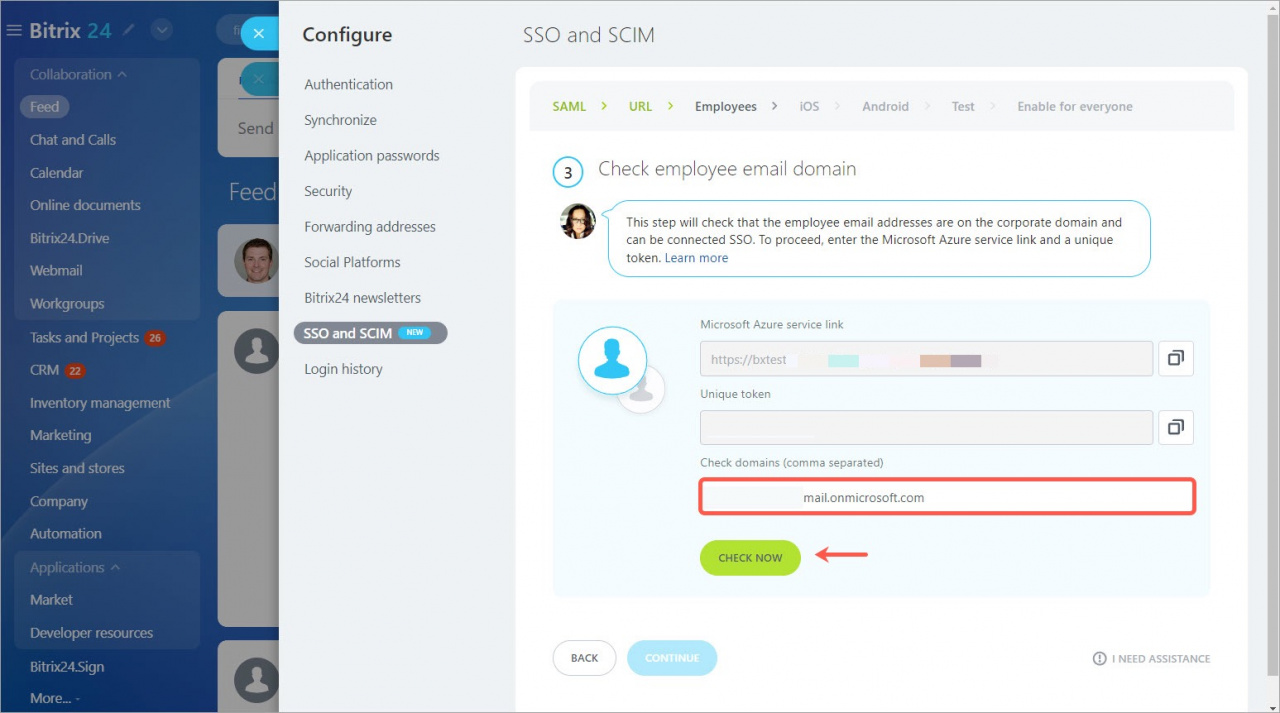
You should configure synchronization of users from Microsoft Azure. Copy the Microsoft Azure service link and the Unique Token.
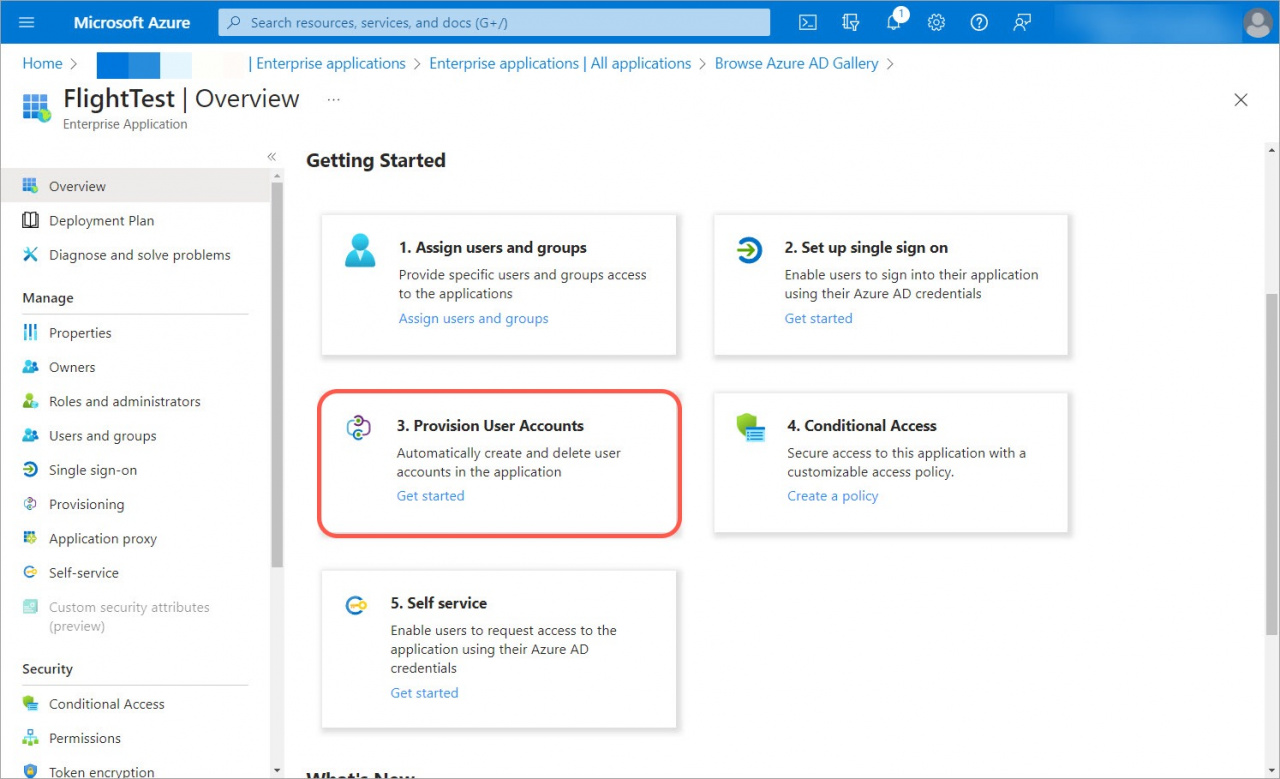
1. Open the Provision User Accounts tab in the app.
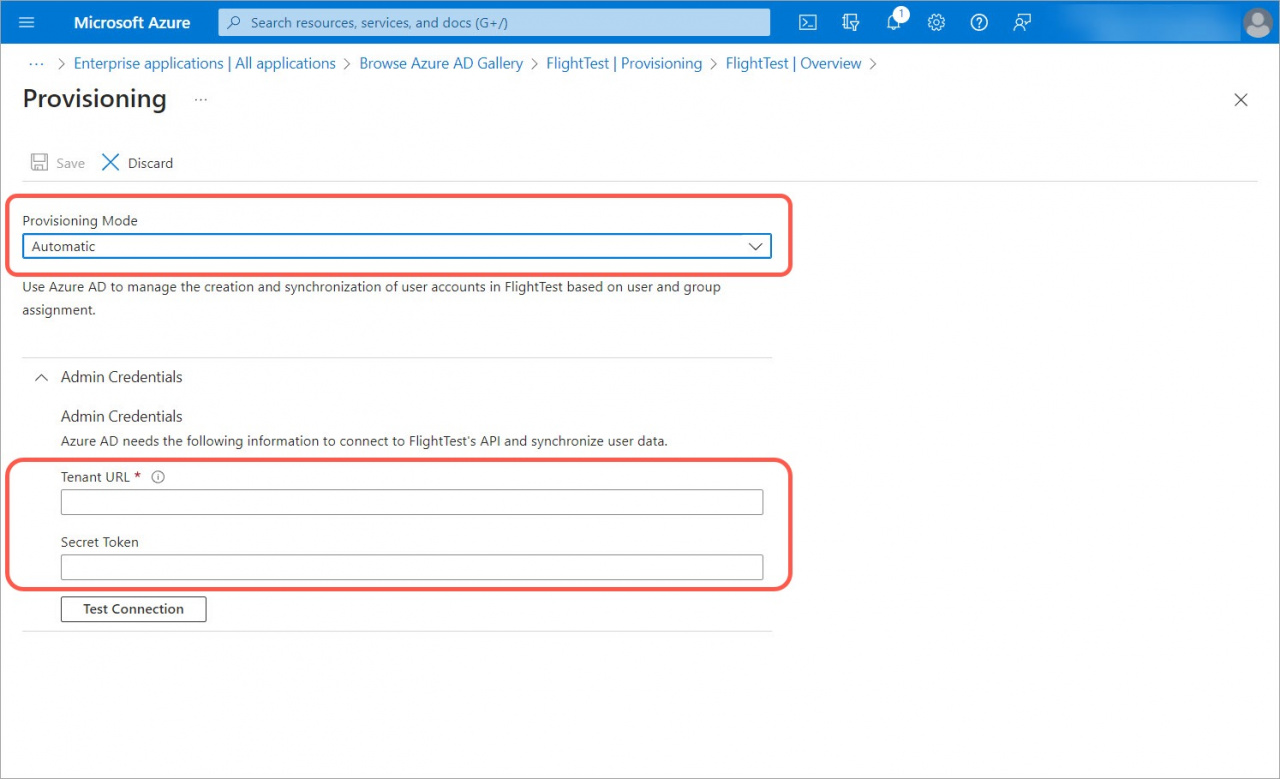
2. Select Automatic Provisioning Mode and enter the administrator credentials.
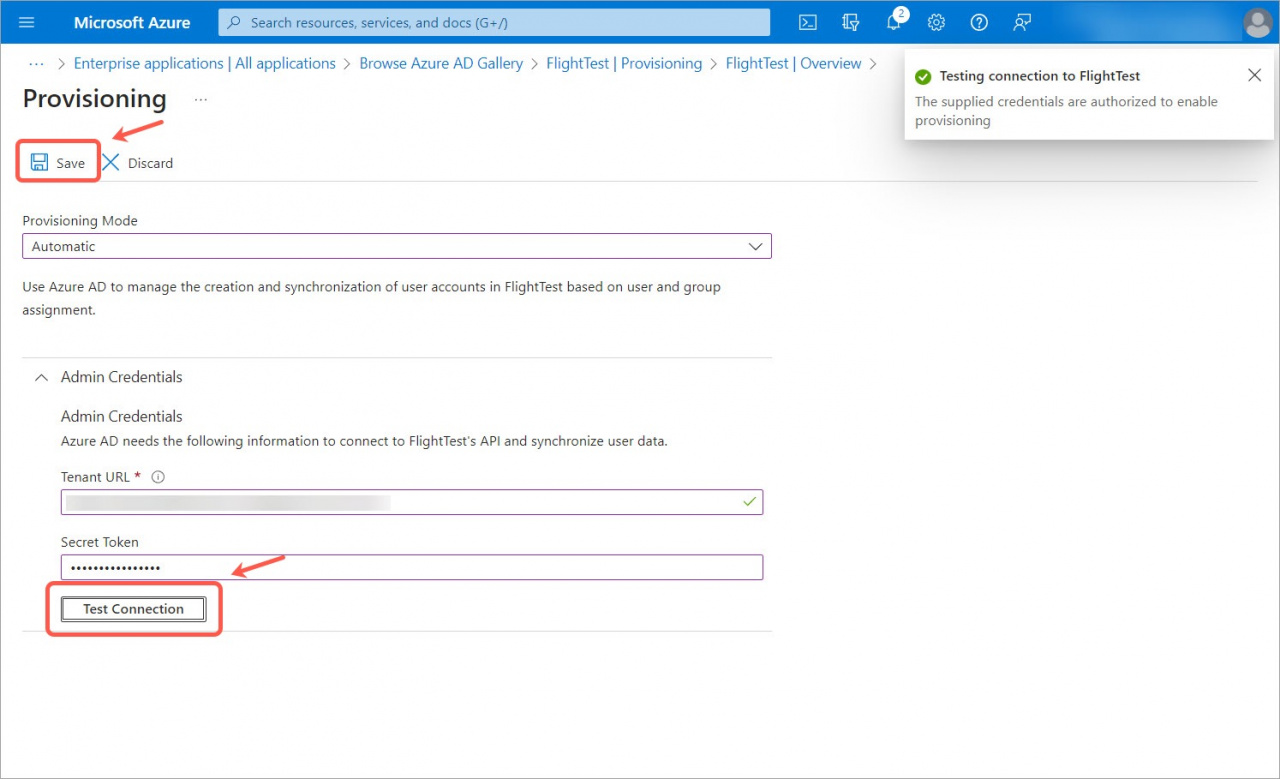
3. After that, click the Test Connection button and Save the settings.
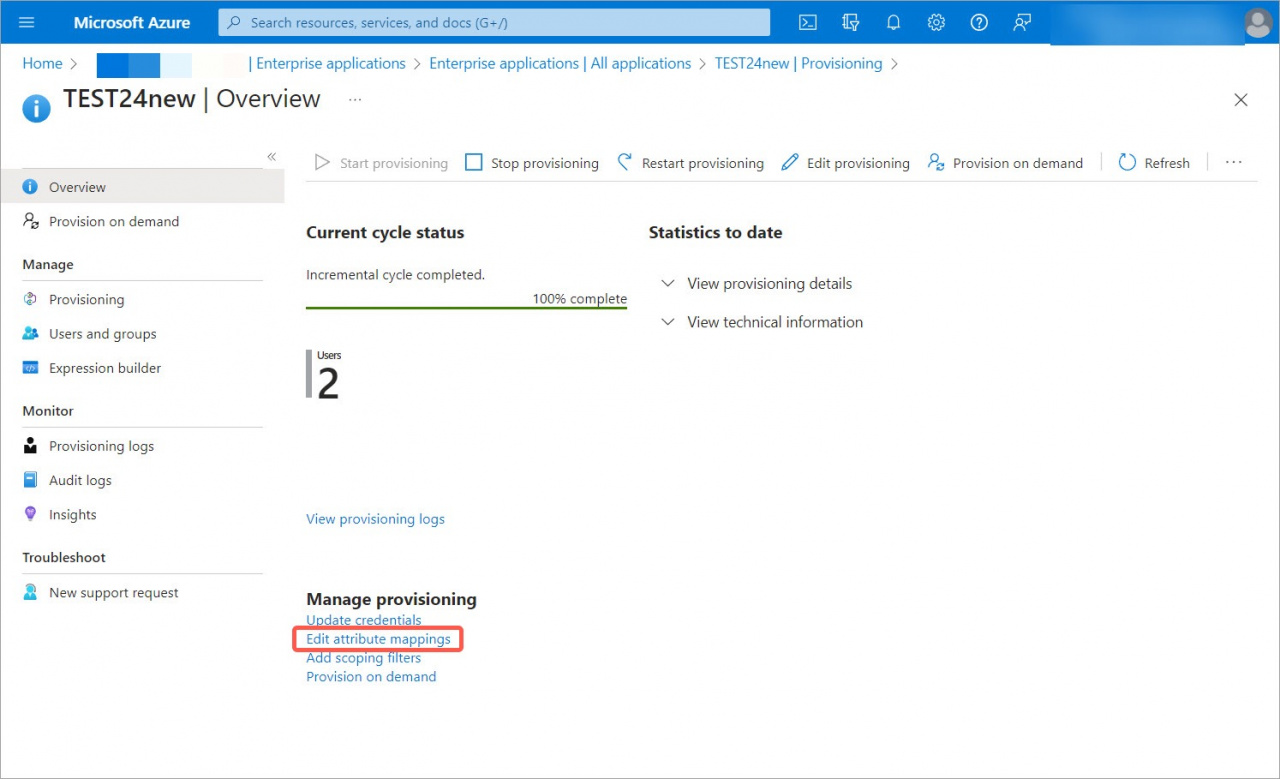
4. Select Edit attribute mappings in the Manage provisioning section.
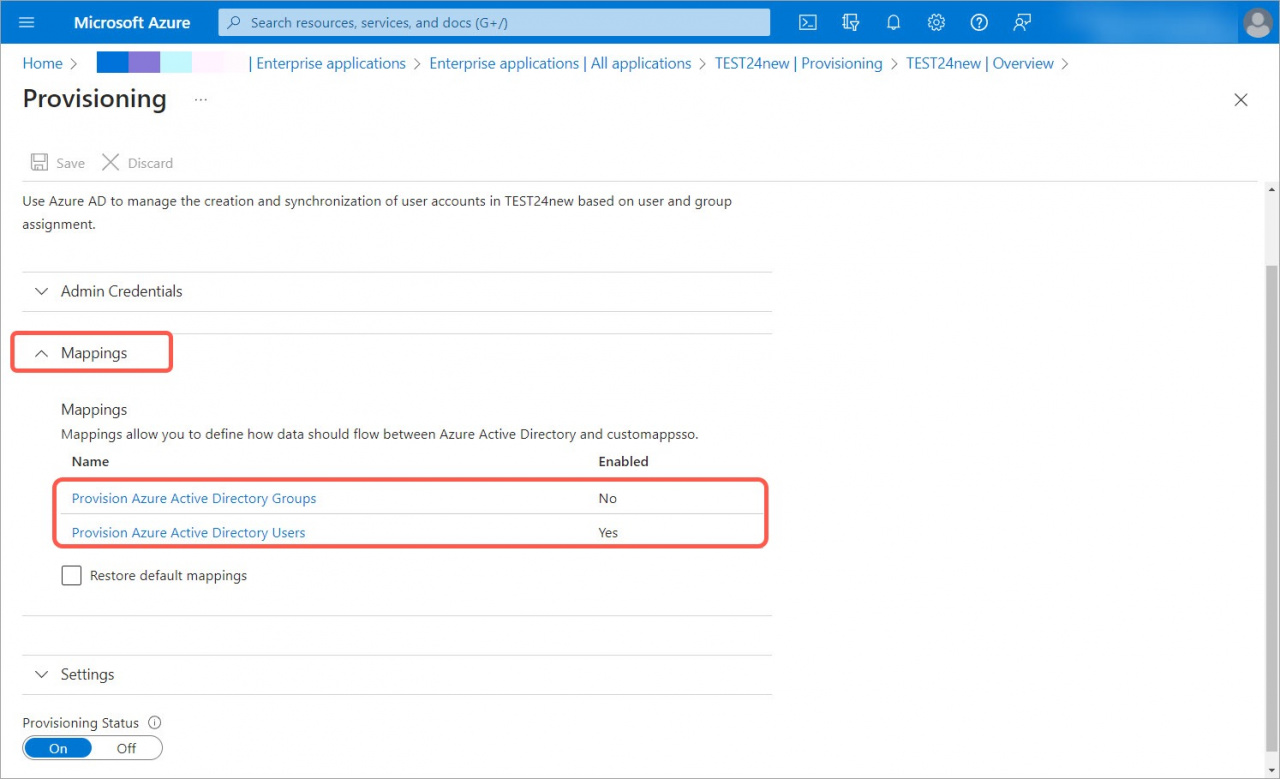
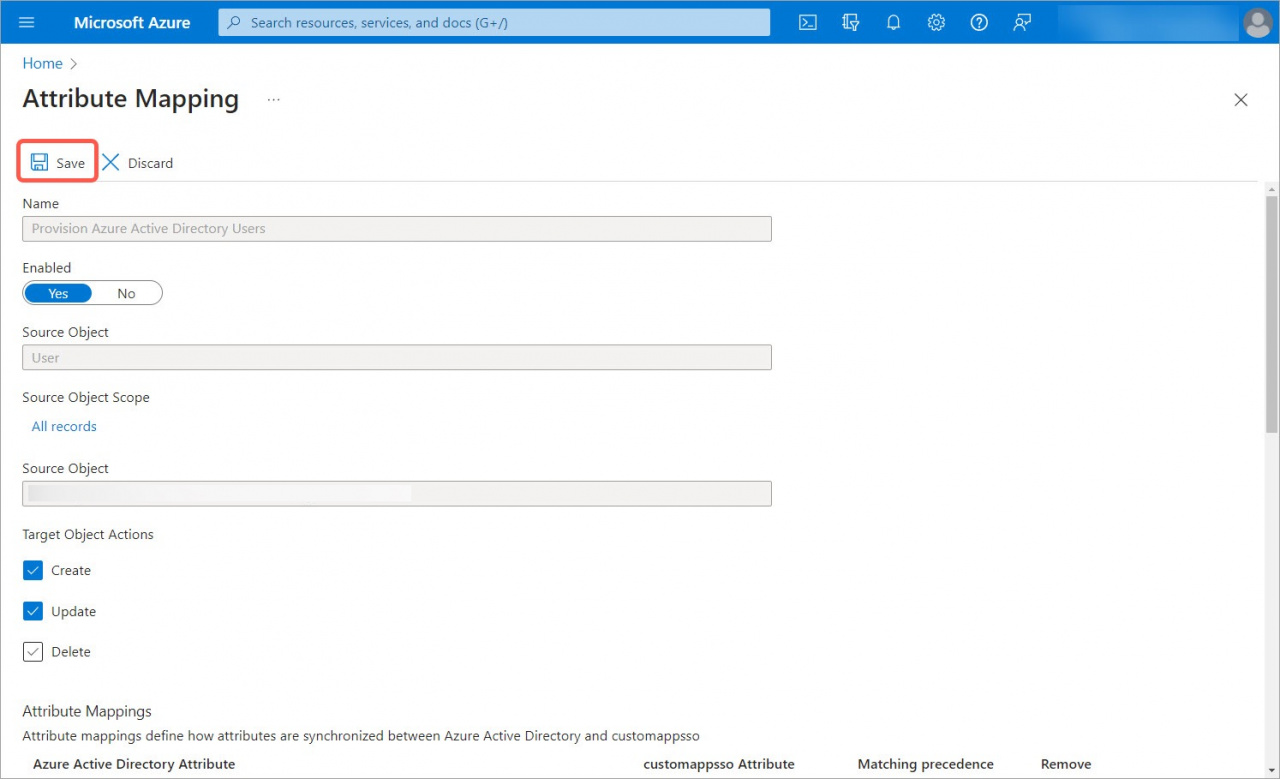
5. Disable Provision Azure Active Directory Groups and enable Provision Azure Active Directory Users in the Mappings section.
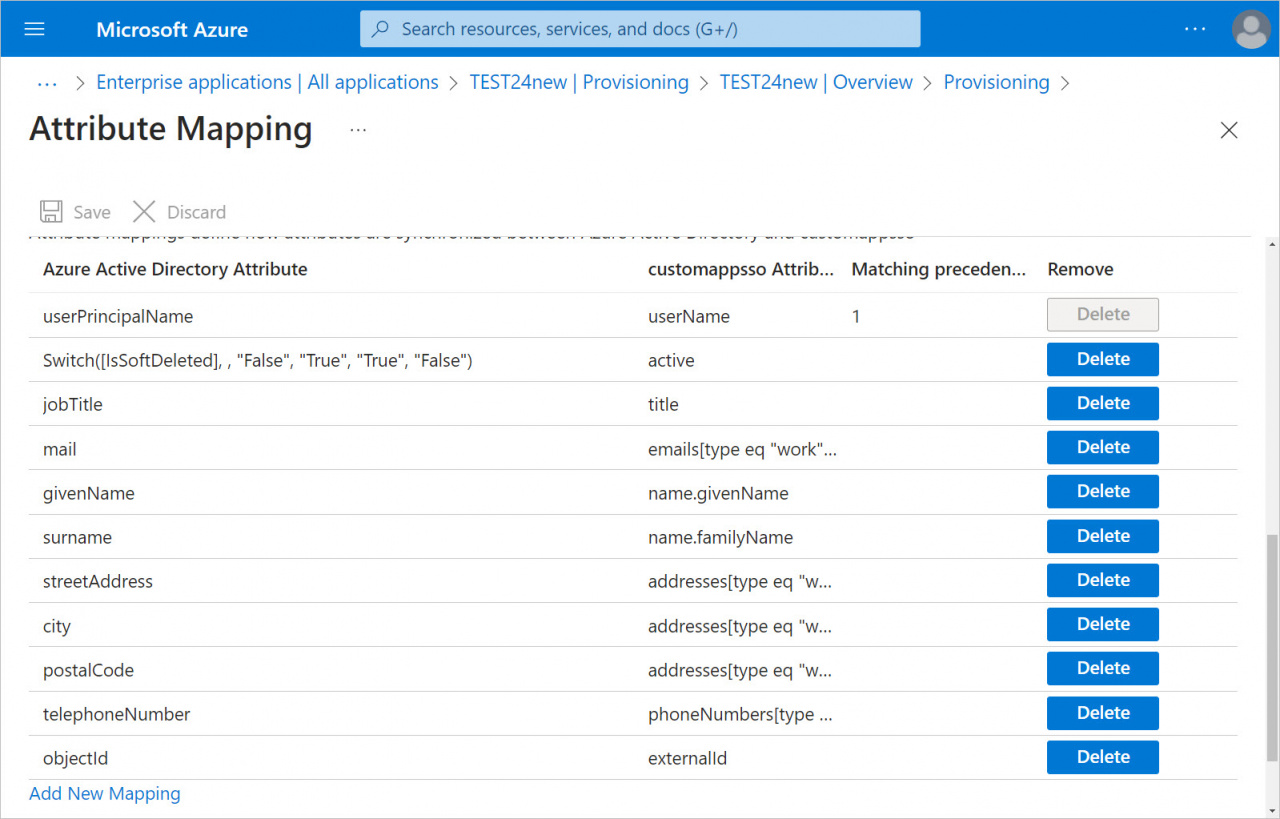
6. Remove unnecessary fields in the user settings.
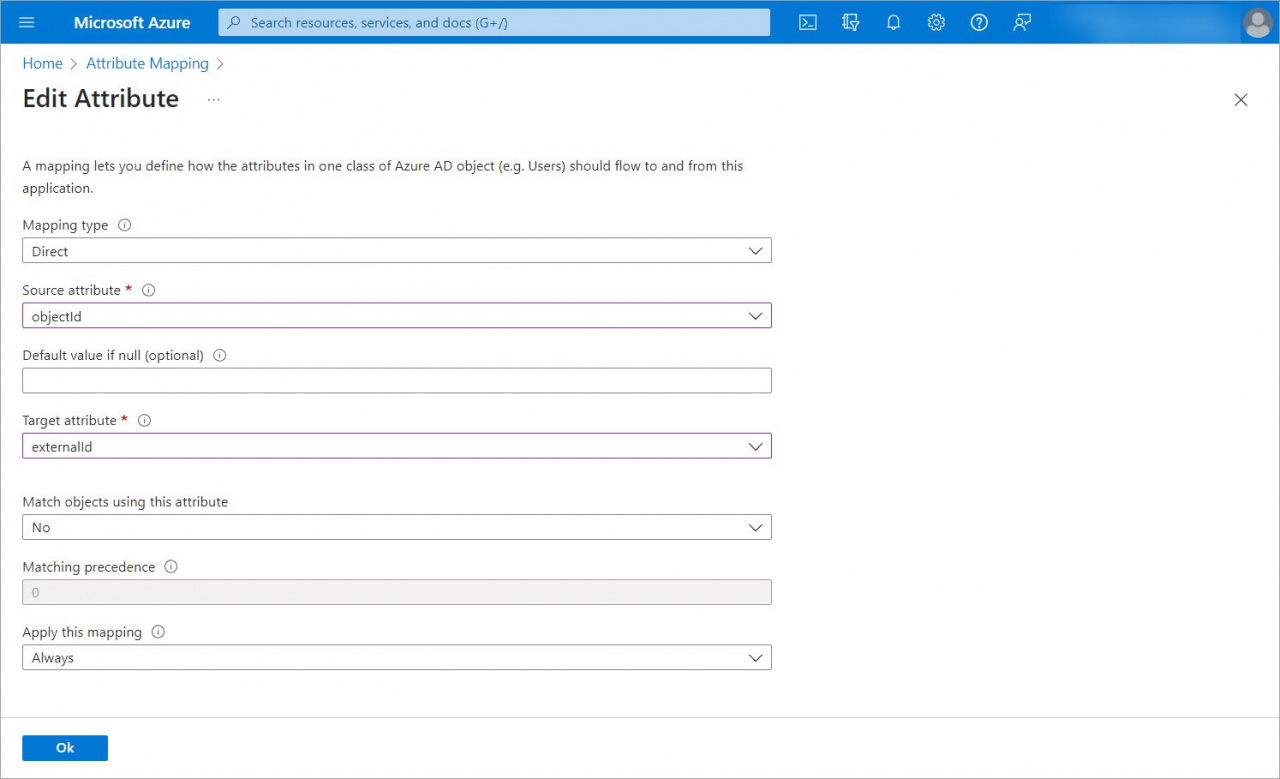
7. Click the Add New Mapping button to add a new objectId field.
8. Save the changes.
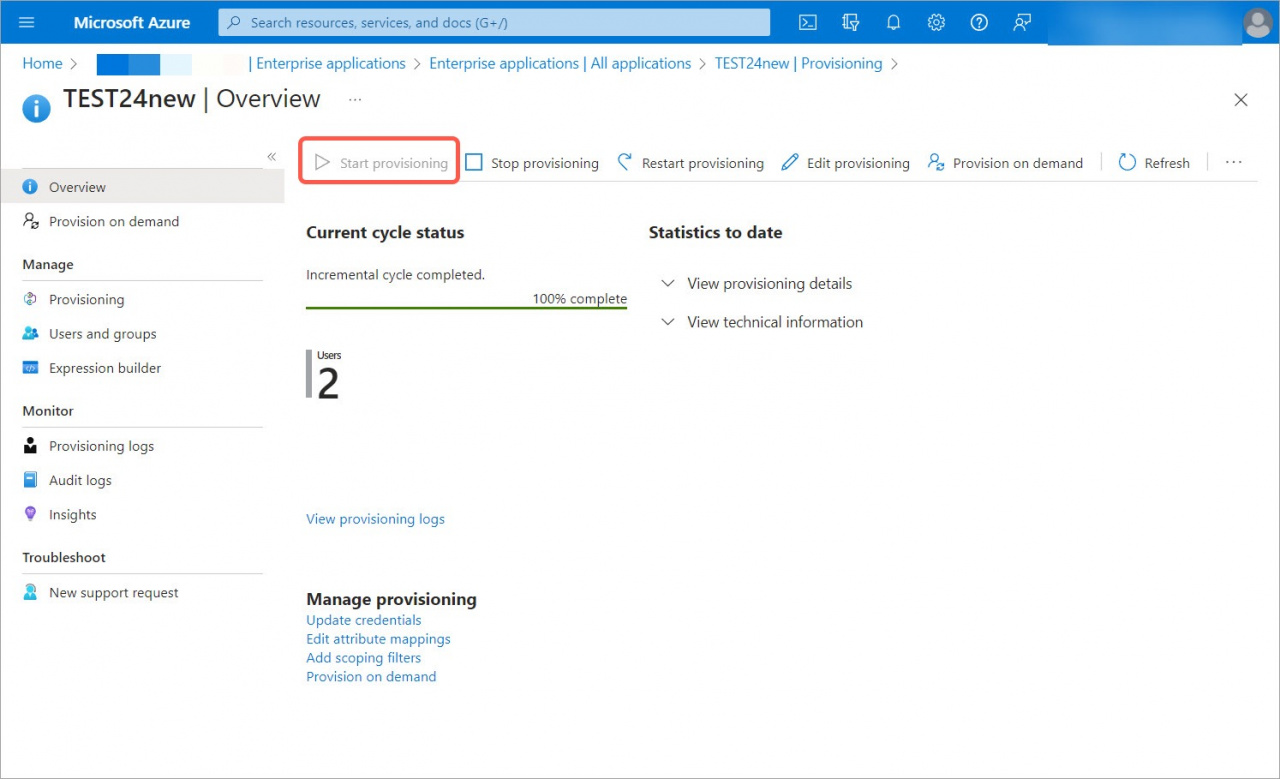
9. Return to the Provision User Accounts section and click the Start Provisioning button to enable synchronization and automatically add new users to the account.
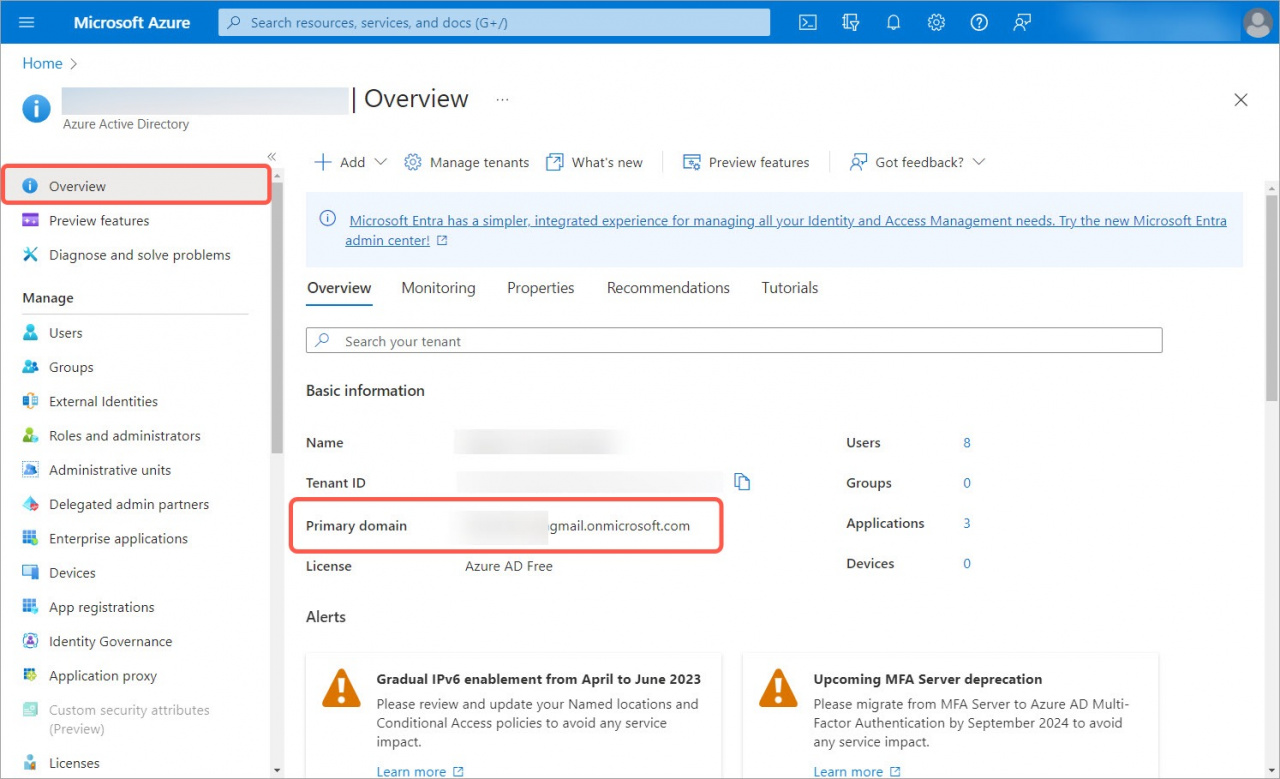
10. Go back to the Bitrix24 account, enter domains to check and start checking.
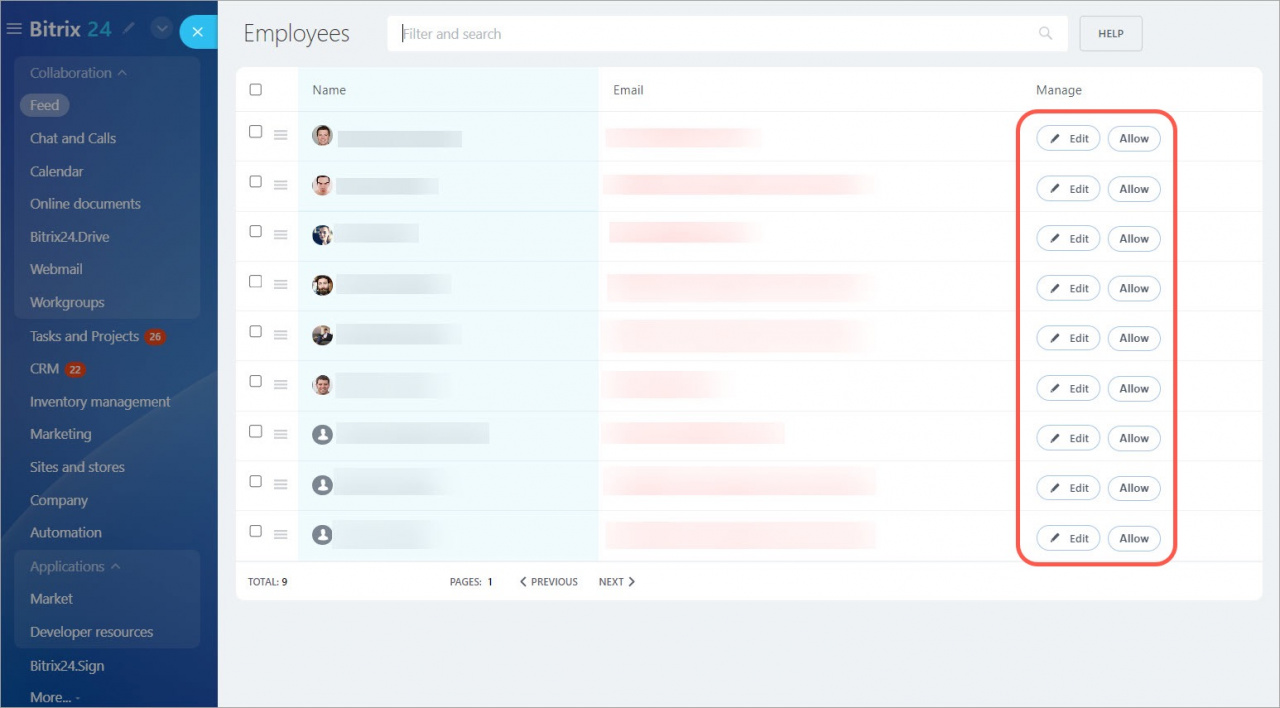
11. You may see a notification that some employees have emails not in the corporate domain. In this case, you need to tell employees in advance about the new Single Sign-On system and correct emails. To do this, click the View button.
12. You will see a list of all employees who need to correct their emails. Click Edit to open the profile and edit the email. Click the Allow button, if you are sure that this employee no longer works with you and does not need access to the account.
13. When you change the email domain, click Next.
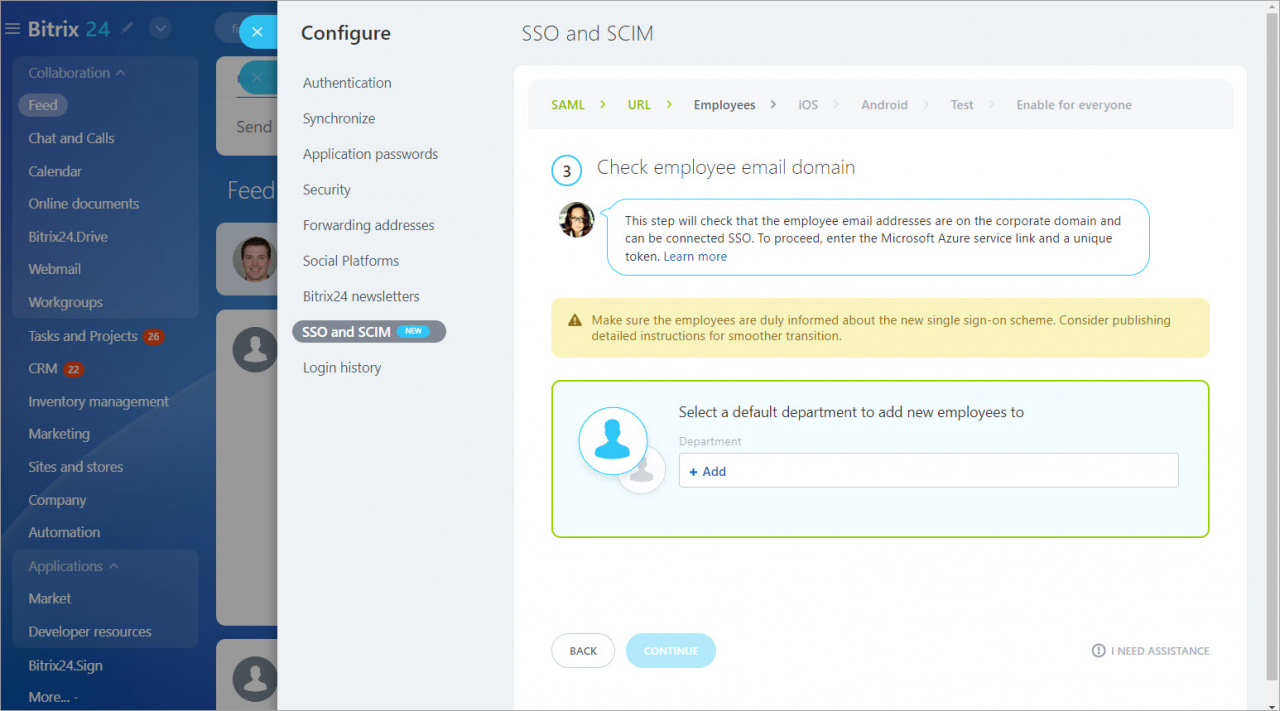
14. Select a department to add new employees to when you create new profiles in Microsoft Azure.
Configure mobile platforms: iOS and Android
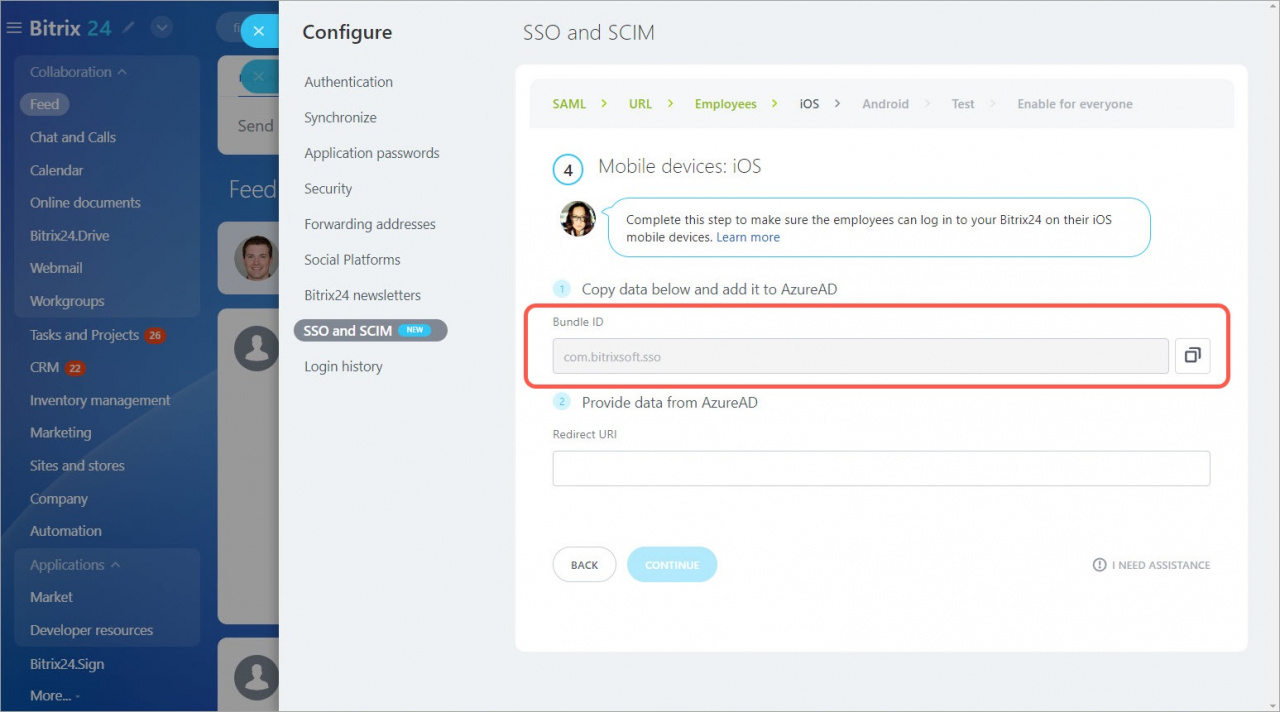
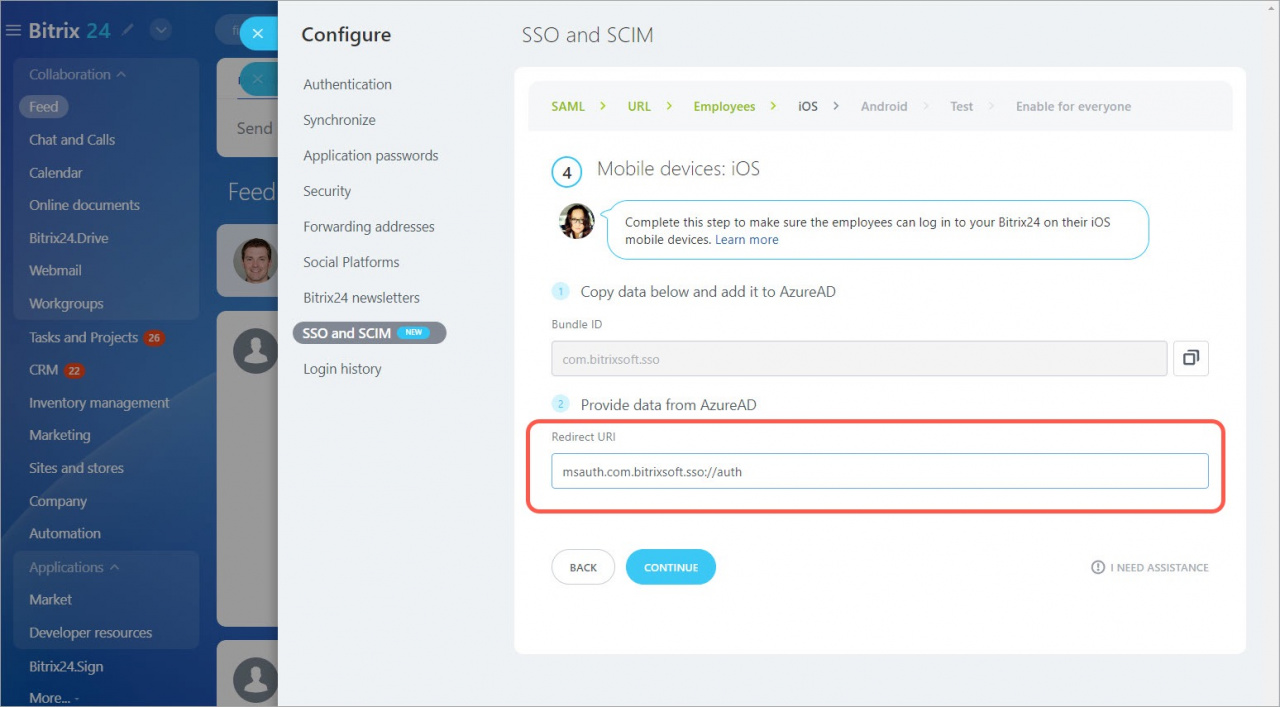
At this step, you need to configure the ability to log in to Bitrix24 via the mobile application. First, copy the Bundle ID field.
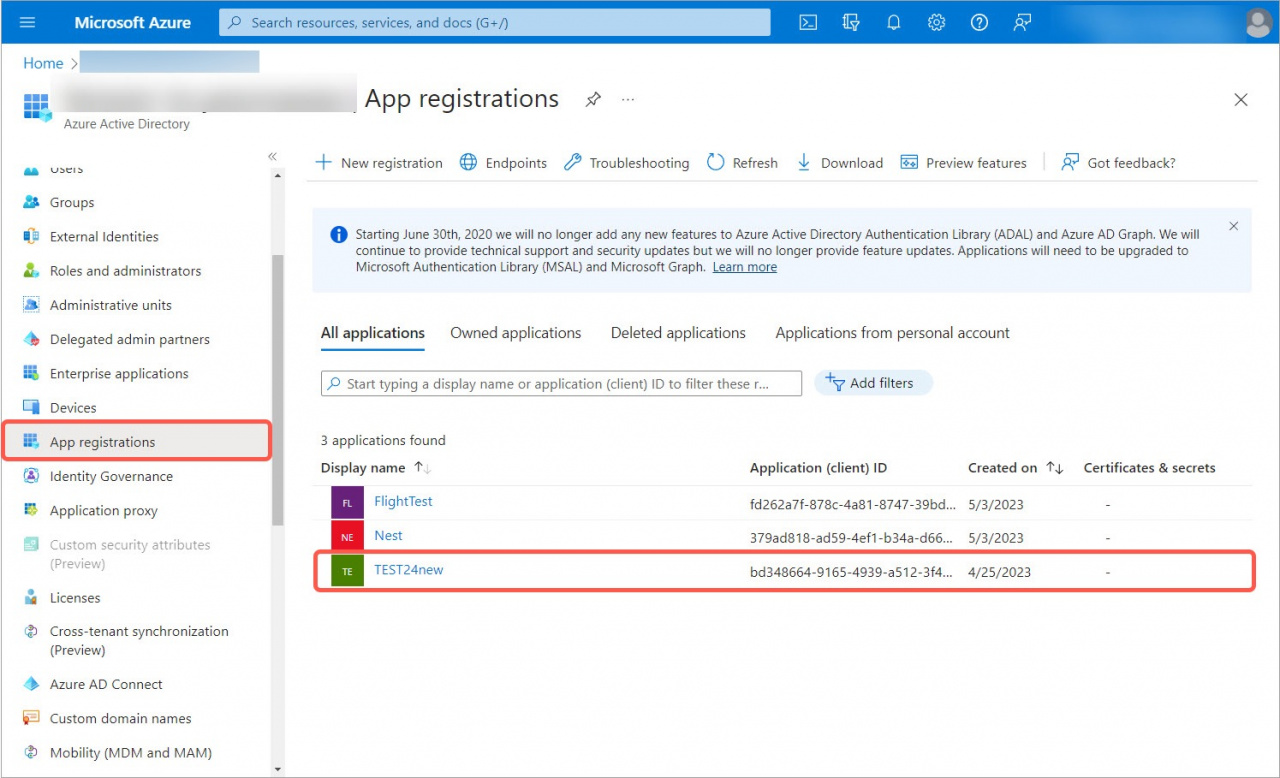
Then go back to Microsoft Azure, open the App registrations section - All Applications, and open your app.
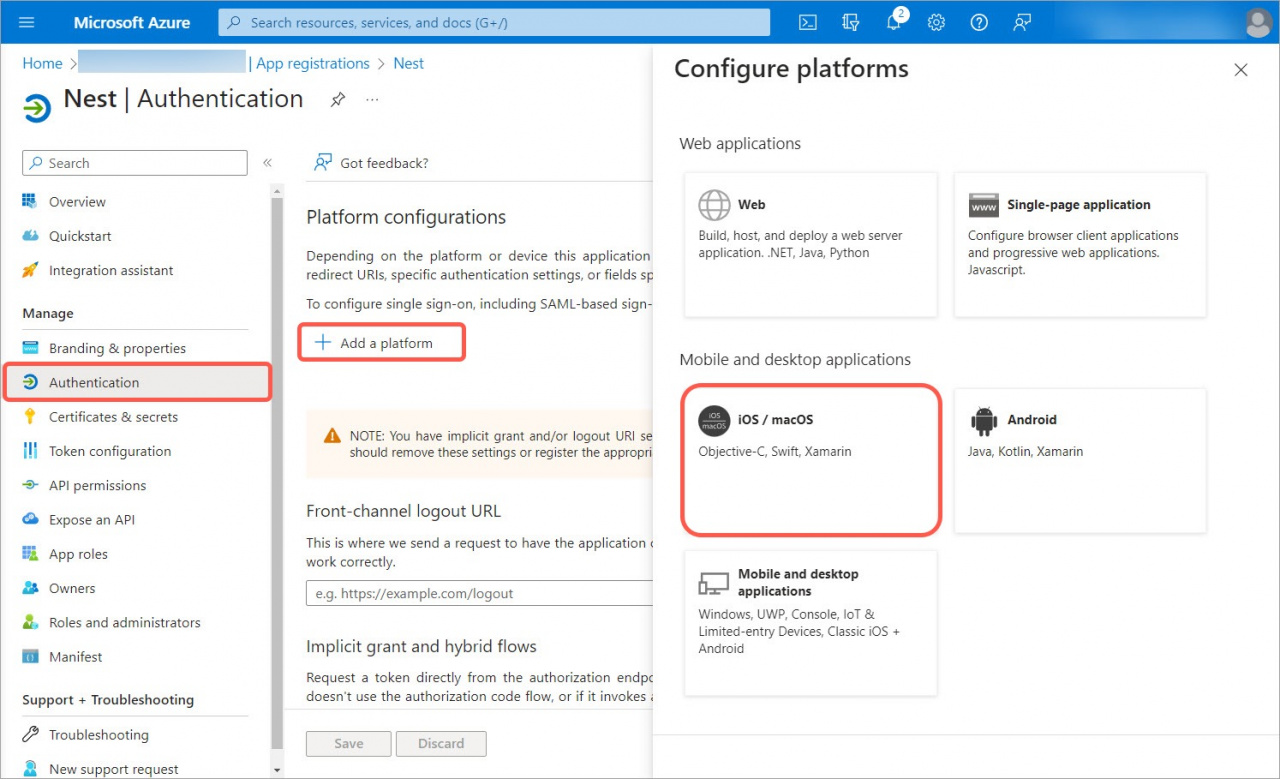
Go to the Authentication section, click Add a platform, and select iOS or macOS.
Fill in the Bundle ID field and click Configure.
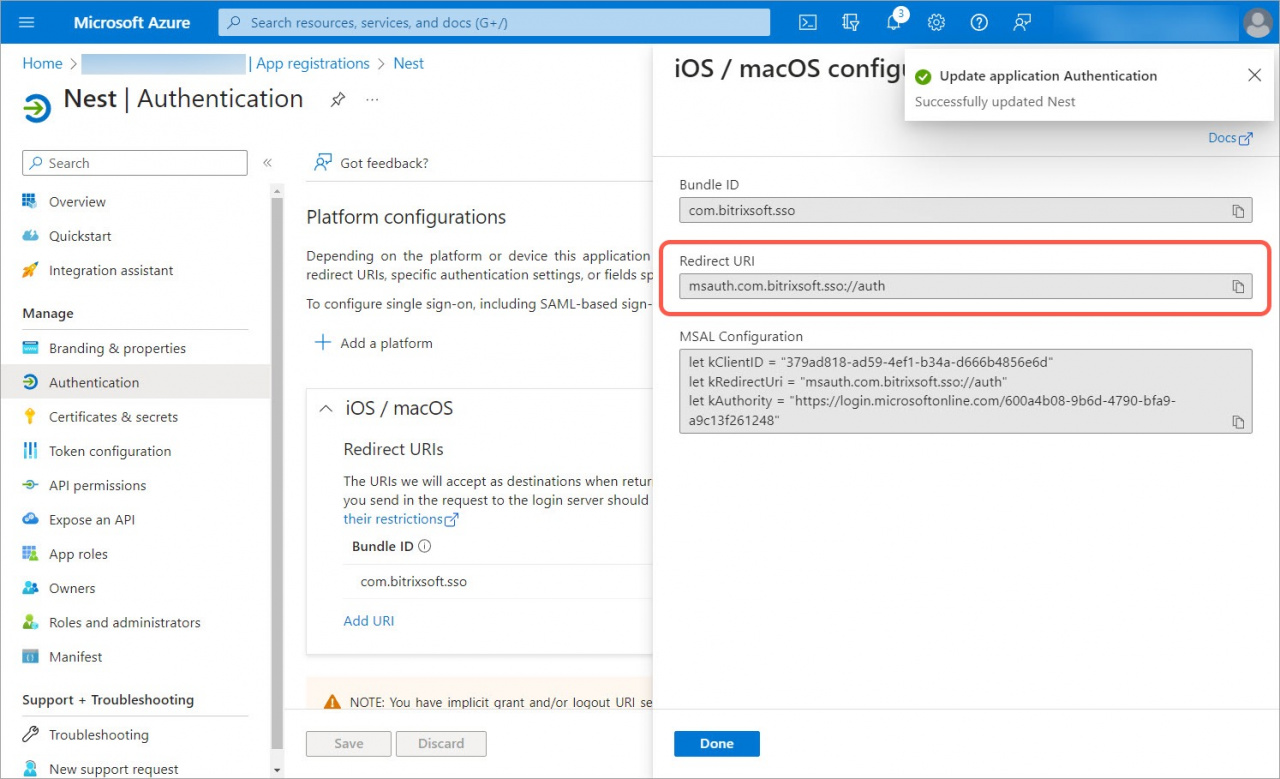
Then copy the Redirect URI.
Go back to the Bitrix24 account, fill in the Redirect URI field and click Continue.
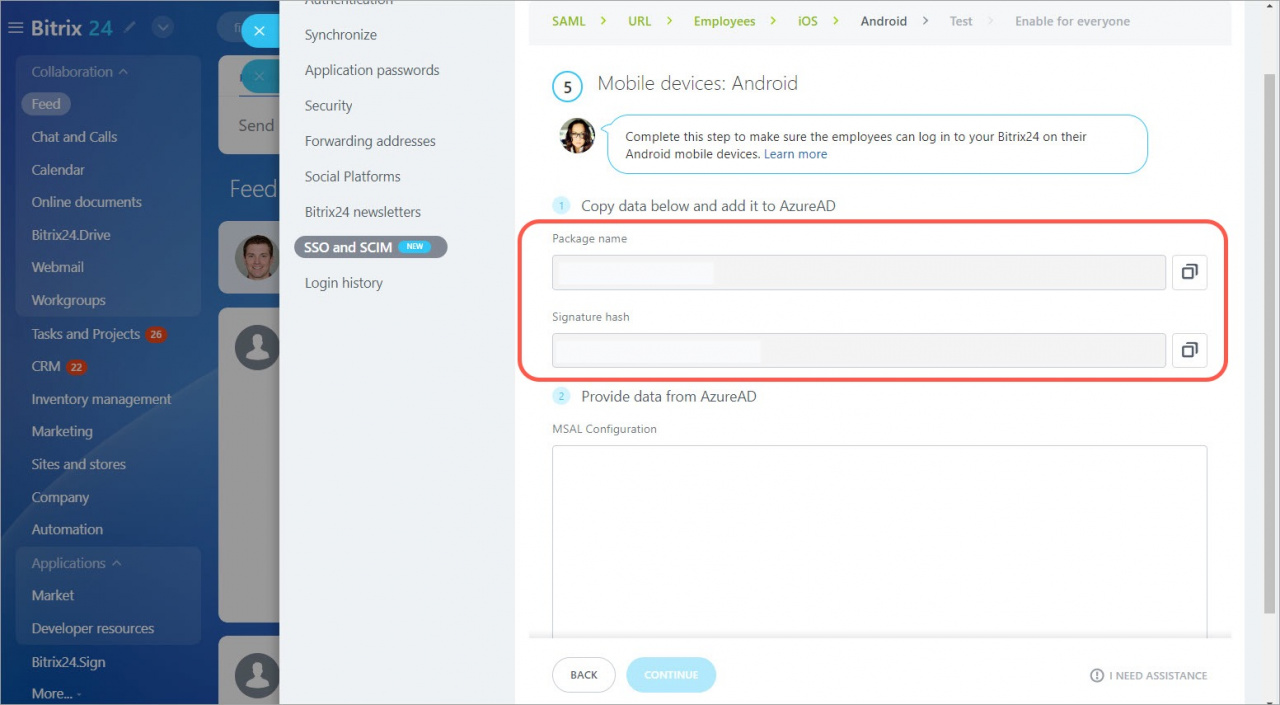
Copy the Package name and Signature hash fields. Open Microsoft Azure and repeat the steps to configure the Android app.
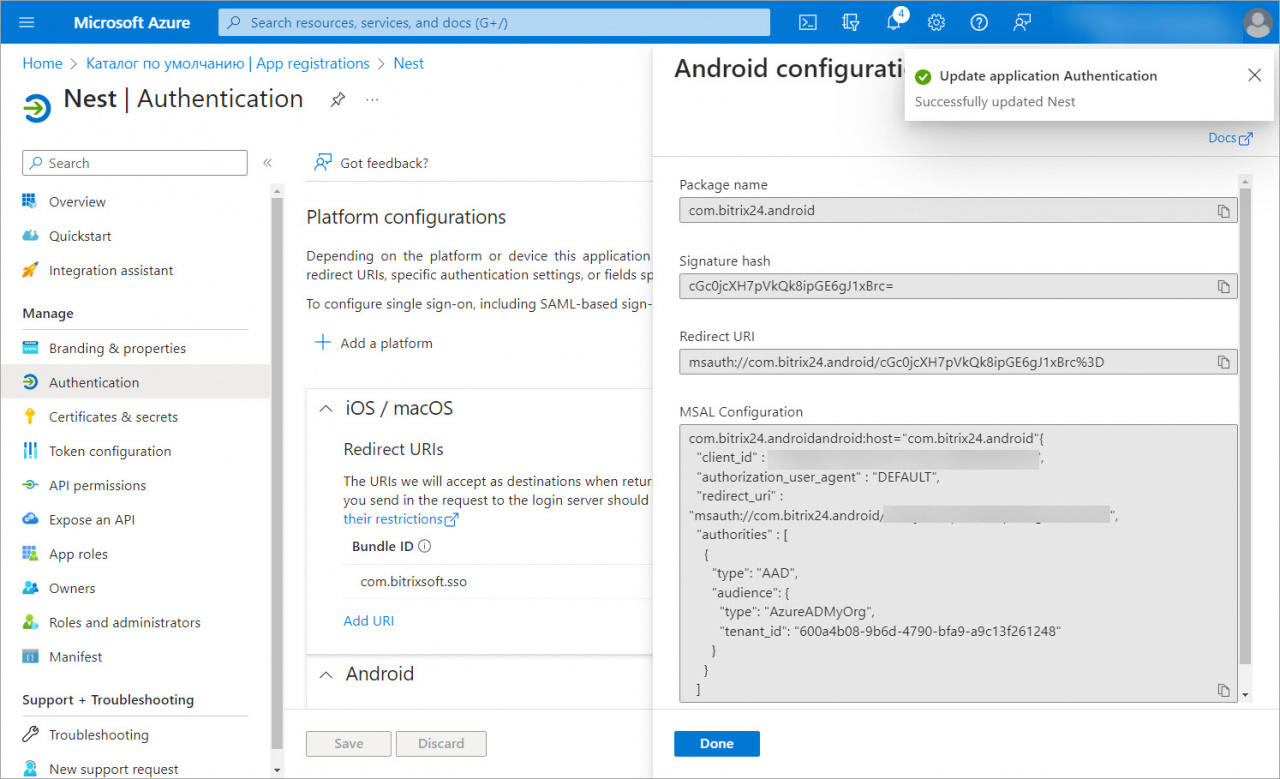
Fill in the Packet name and Signature hash fields with data from Bitrix24 and click Configure.
Copy the MSAL Configuration field.
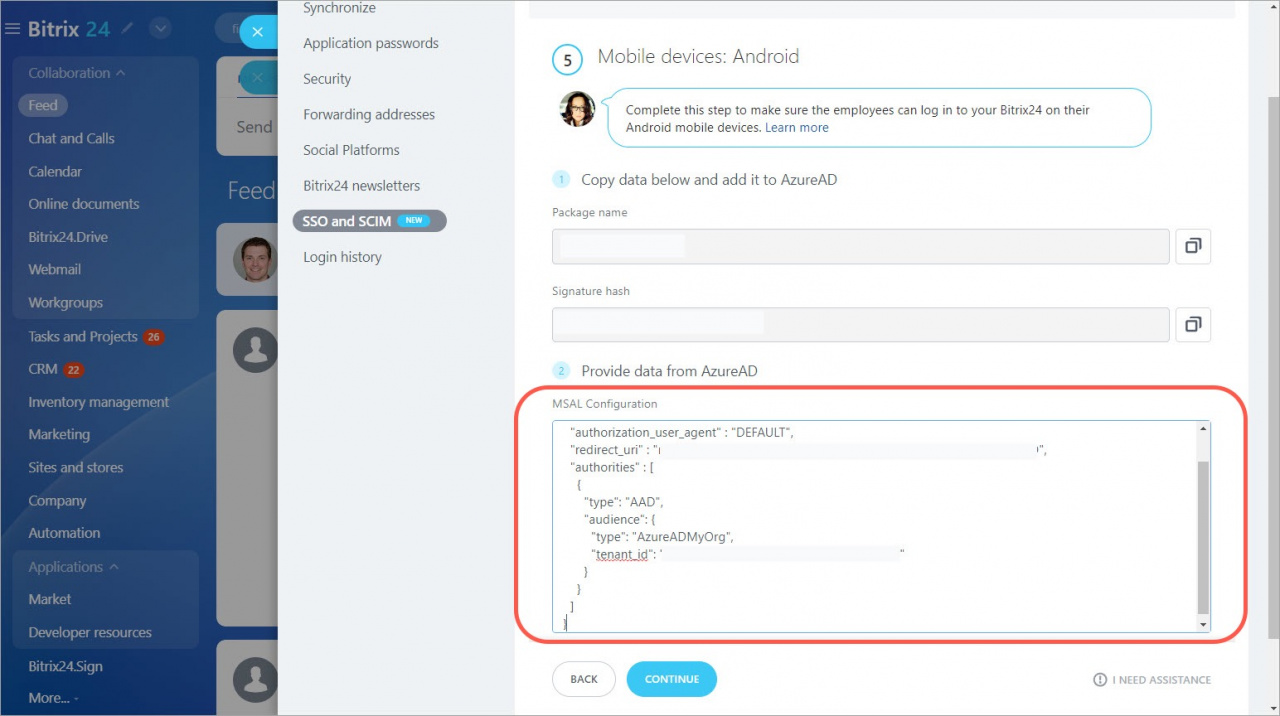
Go back to the Bitrix24 account and paste the data from AzureAD into the MSAL Configuration field.
Test single sign-on and enable it for all employees
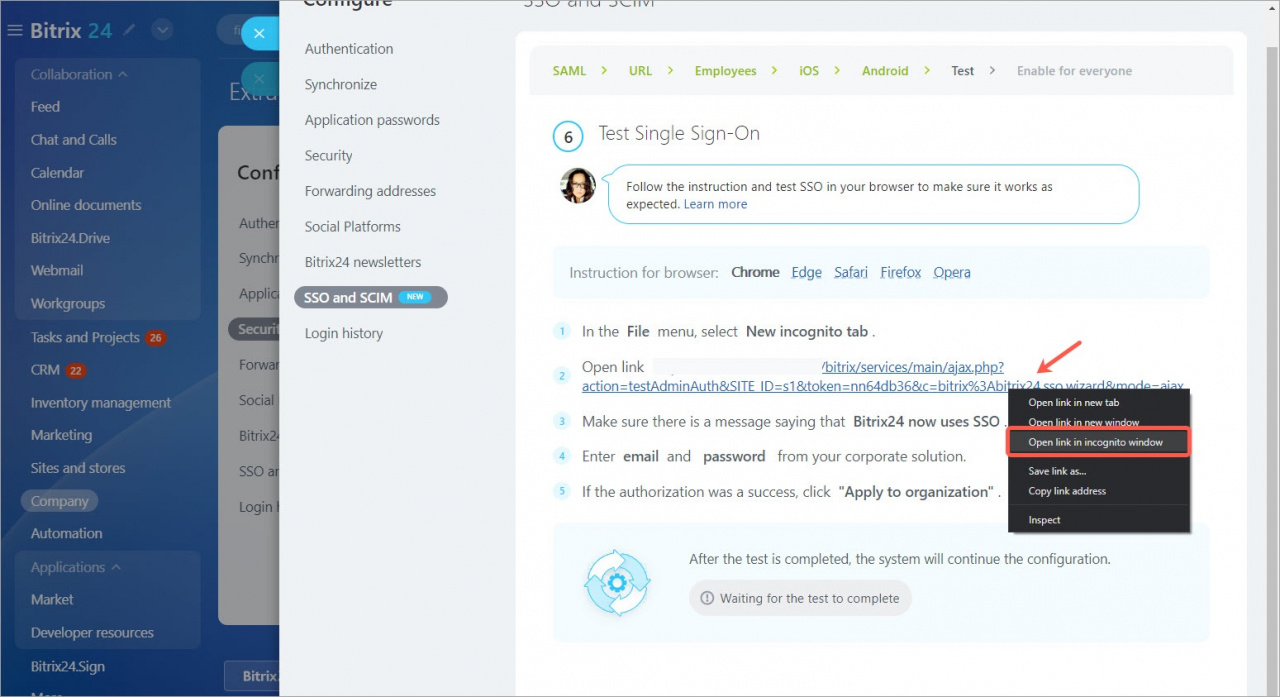
To make sure that the single sign-on works correctly, perform a self-check in your browser according to the instructions.
First, open the link in the incognito mode.
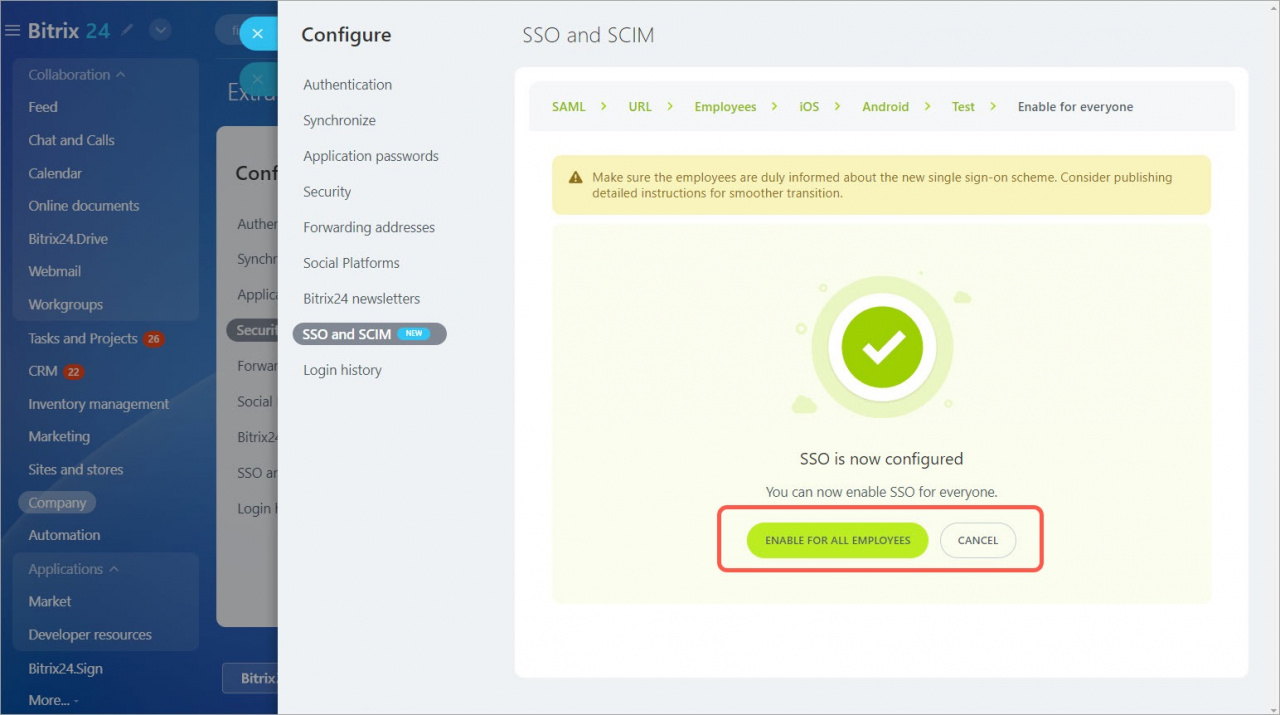
Note that Bitrix24 has been migrated to SSO and log in with the new data. You will see a message that the test was successful.
You can enable single sign-on for all employees or cancel the setting.
Once you enable SSO, you cannot disable it on your own. So if you need to disable SSO, we recommend that you contact technical support for help.


