Canned responses are message templates that help agents quickly respond to common customer questions.
With canned responses, you can:
- Save time: Avoid retyping the same answers repeatedly.
- Ensure consistent communication: Give customers clear and standardized replies.
- Respond faster: Ideal for managing large volumes of inquiries.
Bitrix24 plans and pricing
In this article:
Create canned responses
You can create canned responses directly in your customer chats. To keep things organized, group them into sections like Welcome messages, Payments, Delivery, and more.
Click the  icon to open the canned response library.
If you haven’t added any responses yet, Bitrix24 will prompt you to:
- Save your message as a canned response.
- Create a new response from scratch.
- Open detailed settings.
Save your message as a canned response.
- Type and send your message to the customer.
- Click the arrow icon next to the message.
- Select Save as canned response.
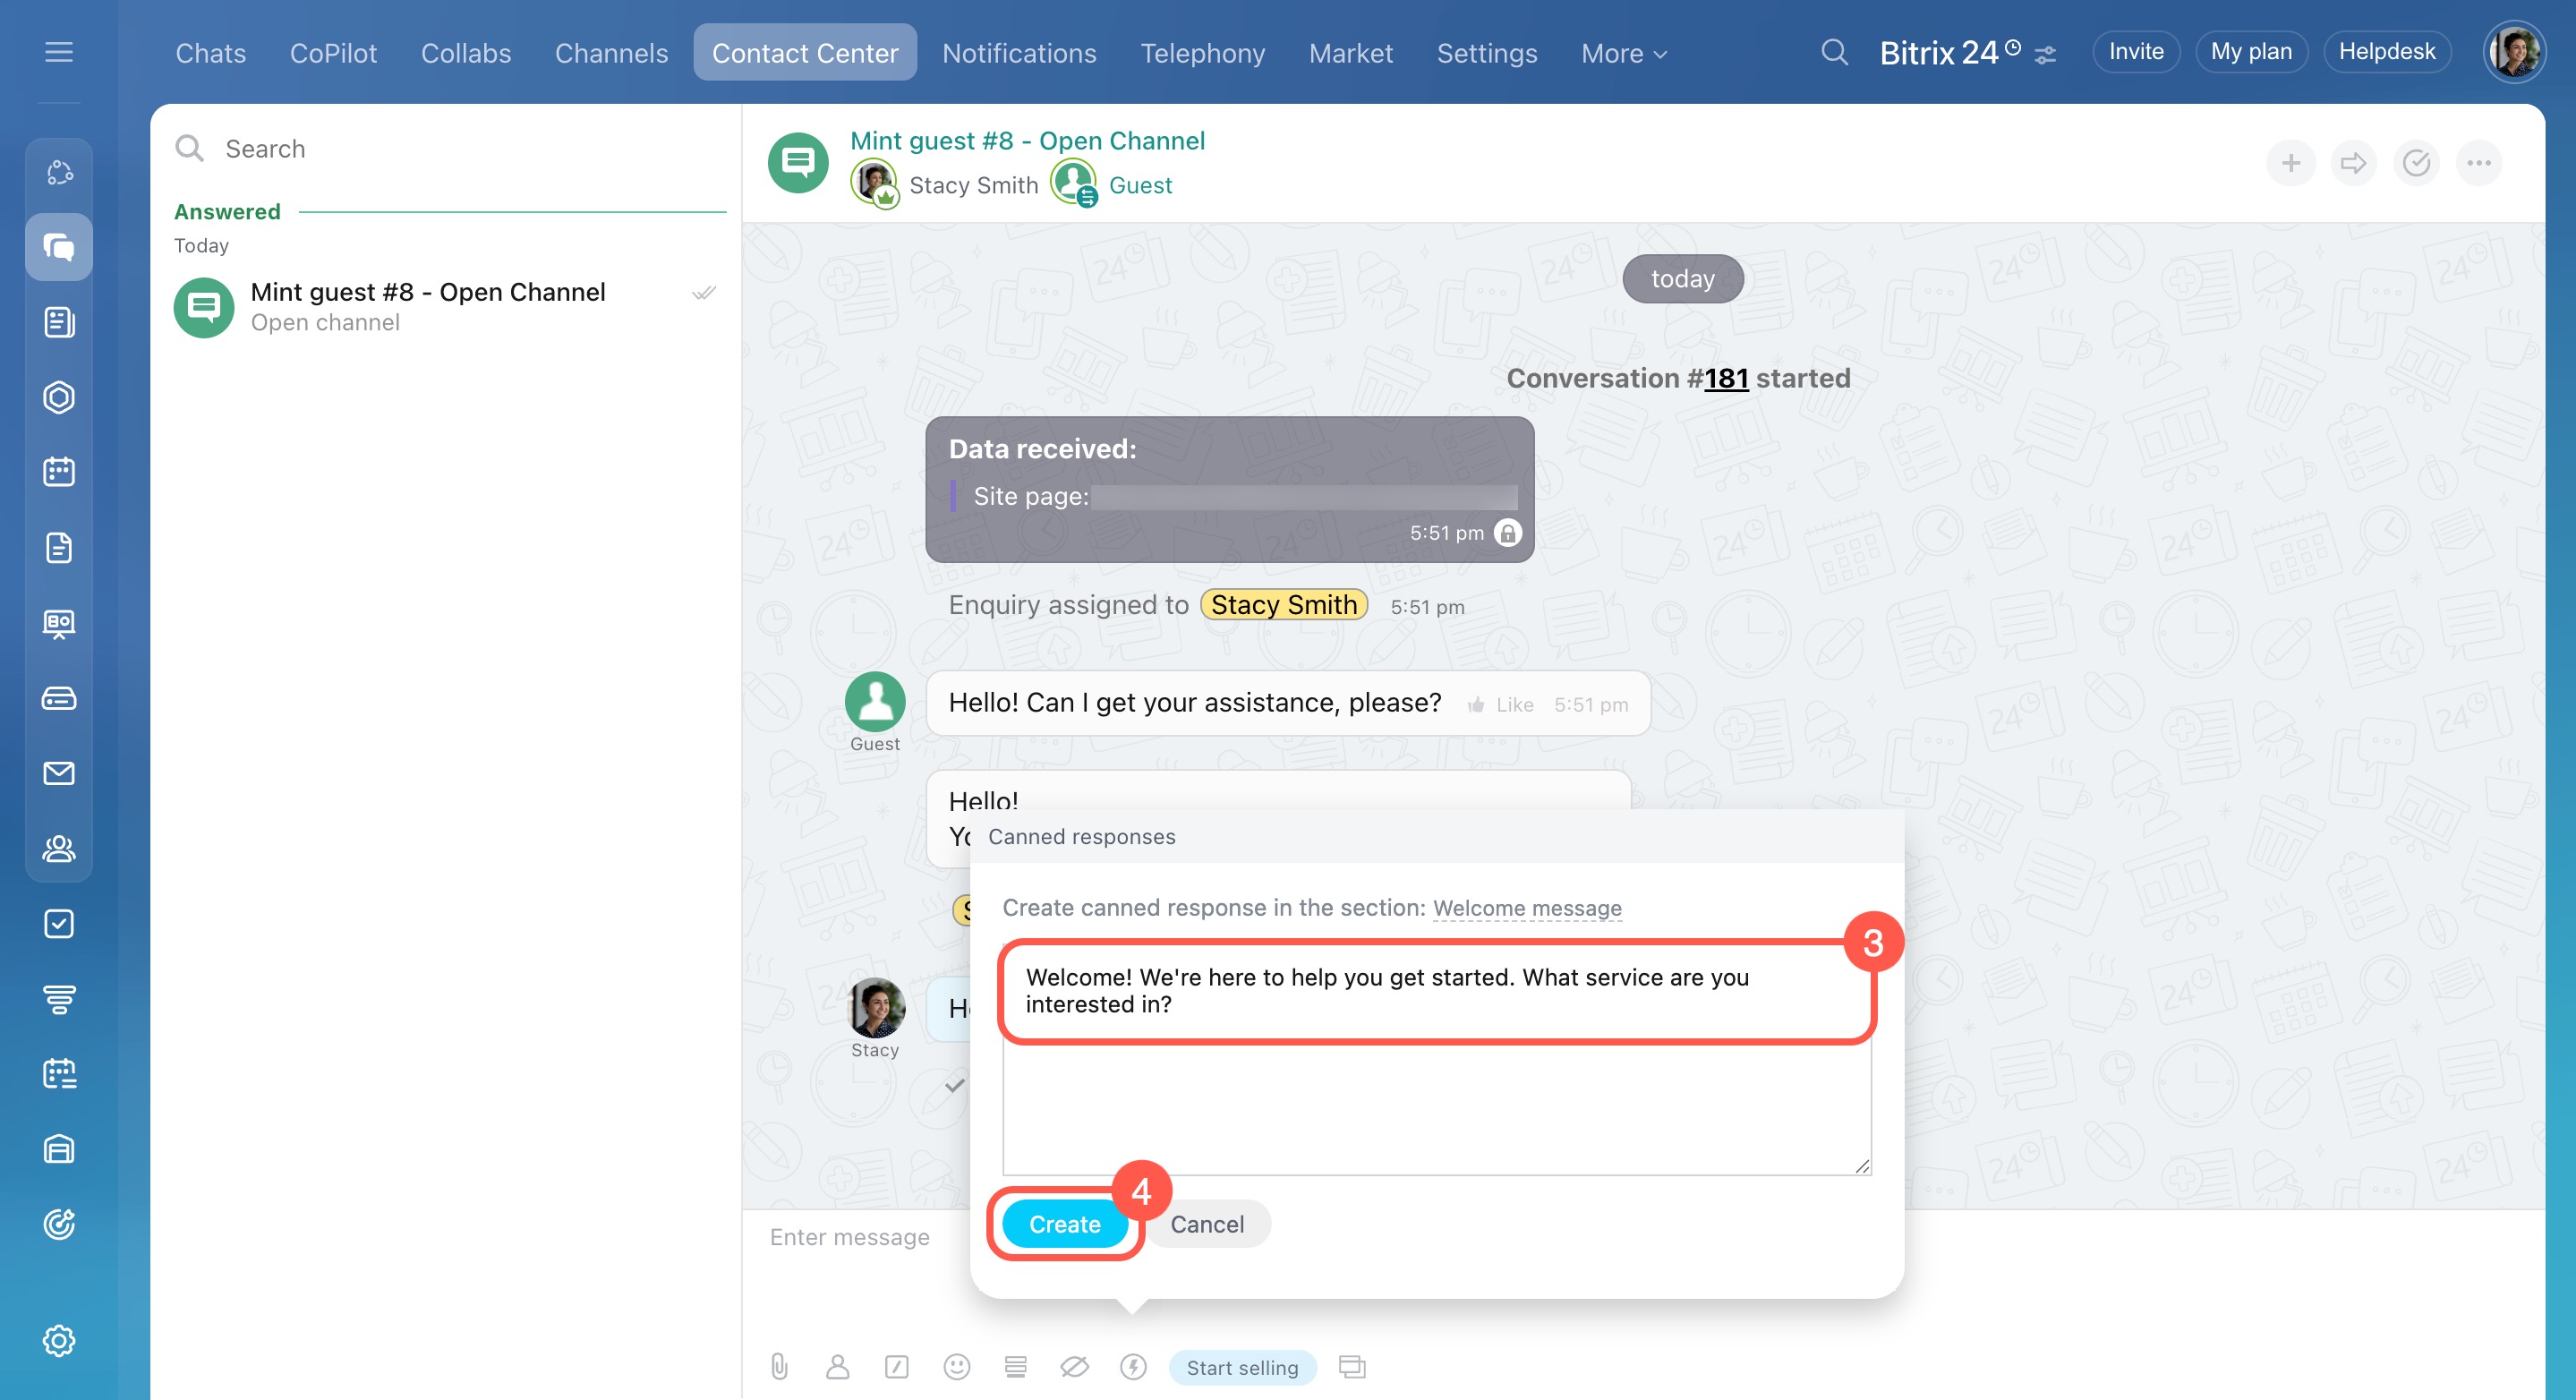
Create a new response manually.
If it’s your first response:
- Choose a section to save your response in.
- Type your message.
- Click Create.
If you already have other responses:
- Choose a section to save your response in.
- Click Plus (+).
- Type your message.
- Click Create.
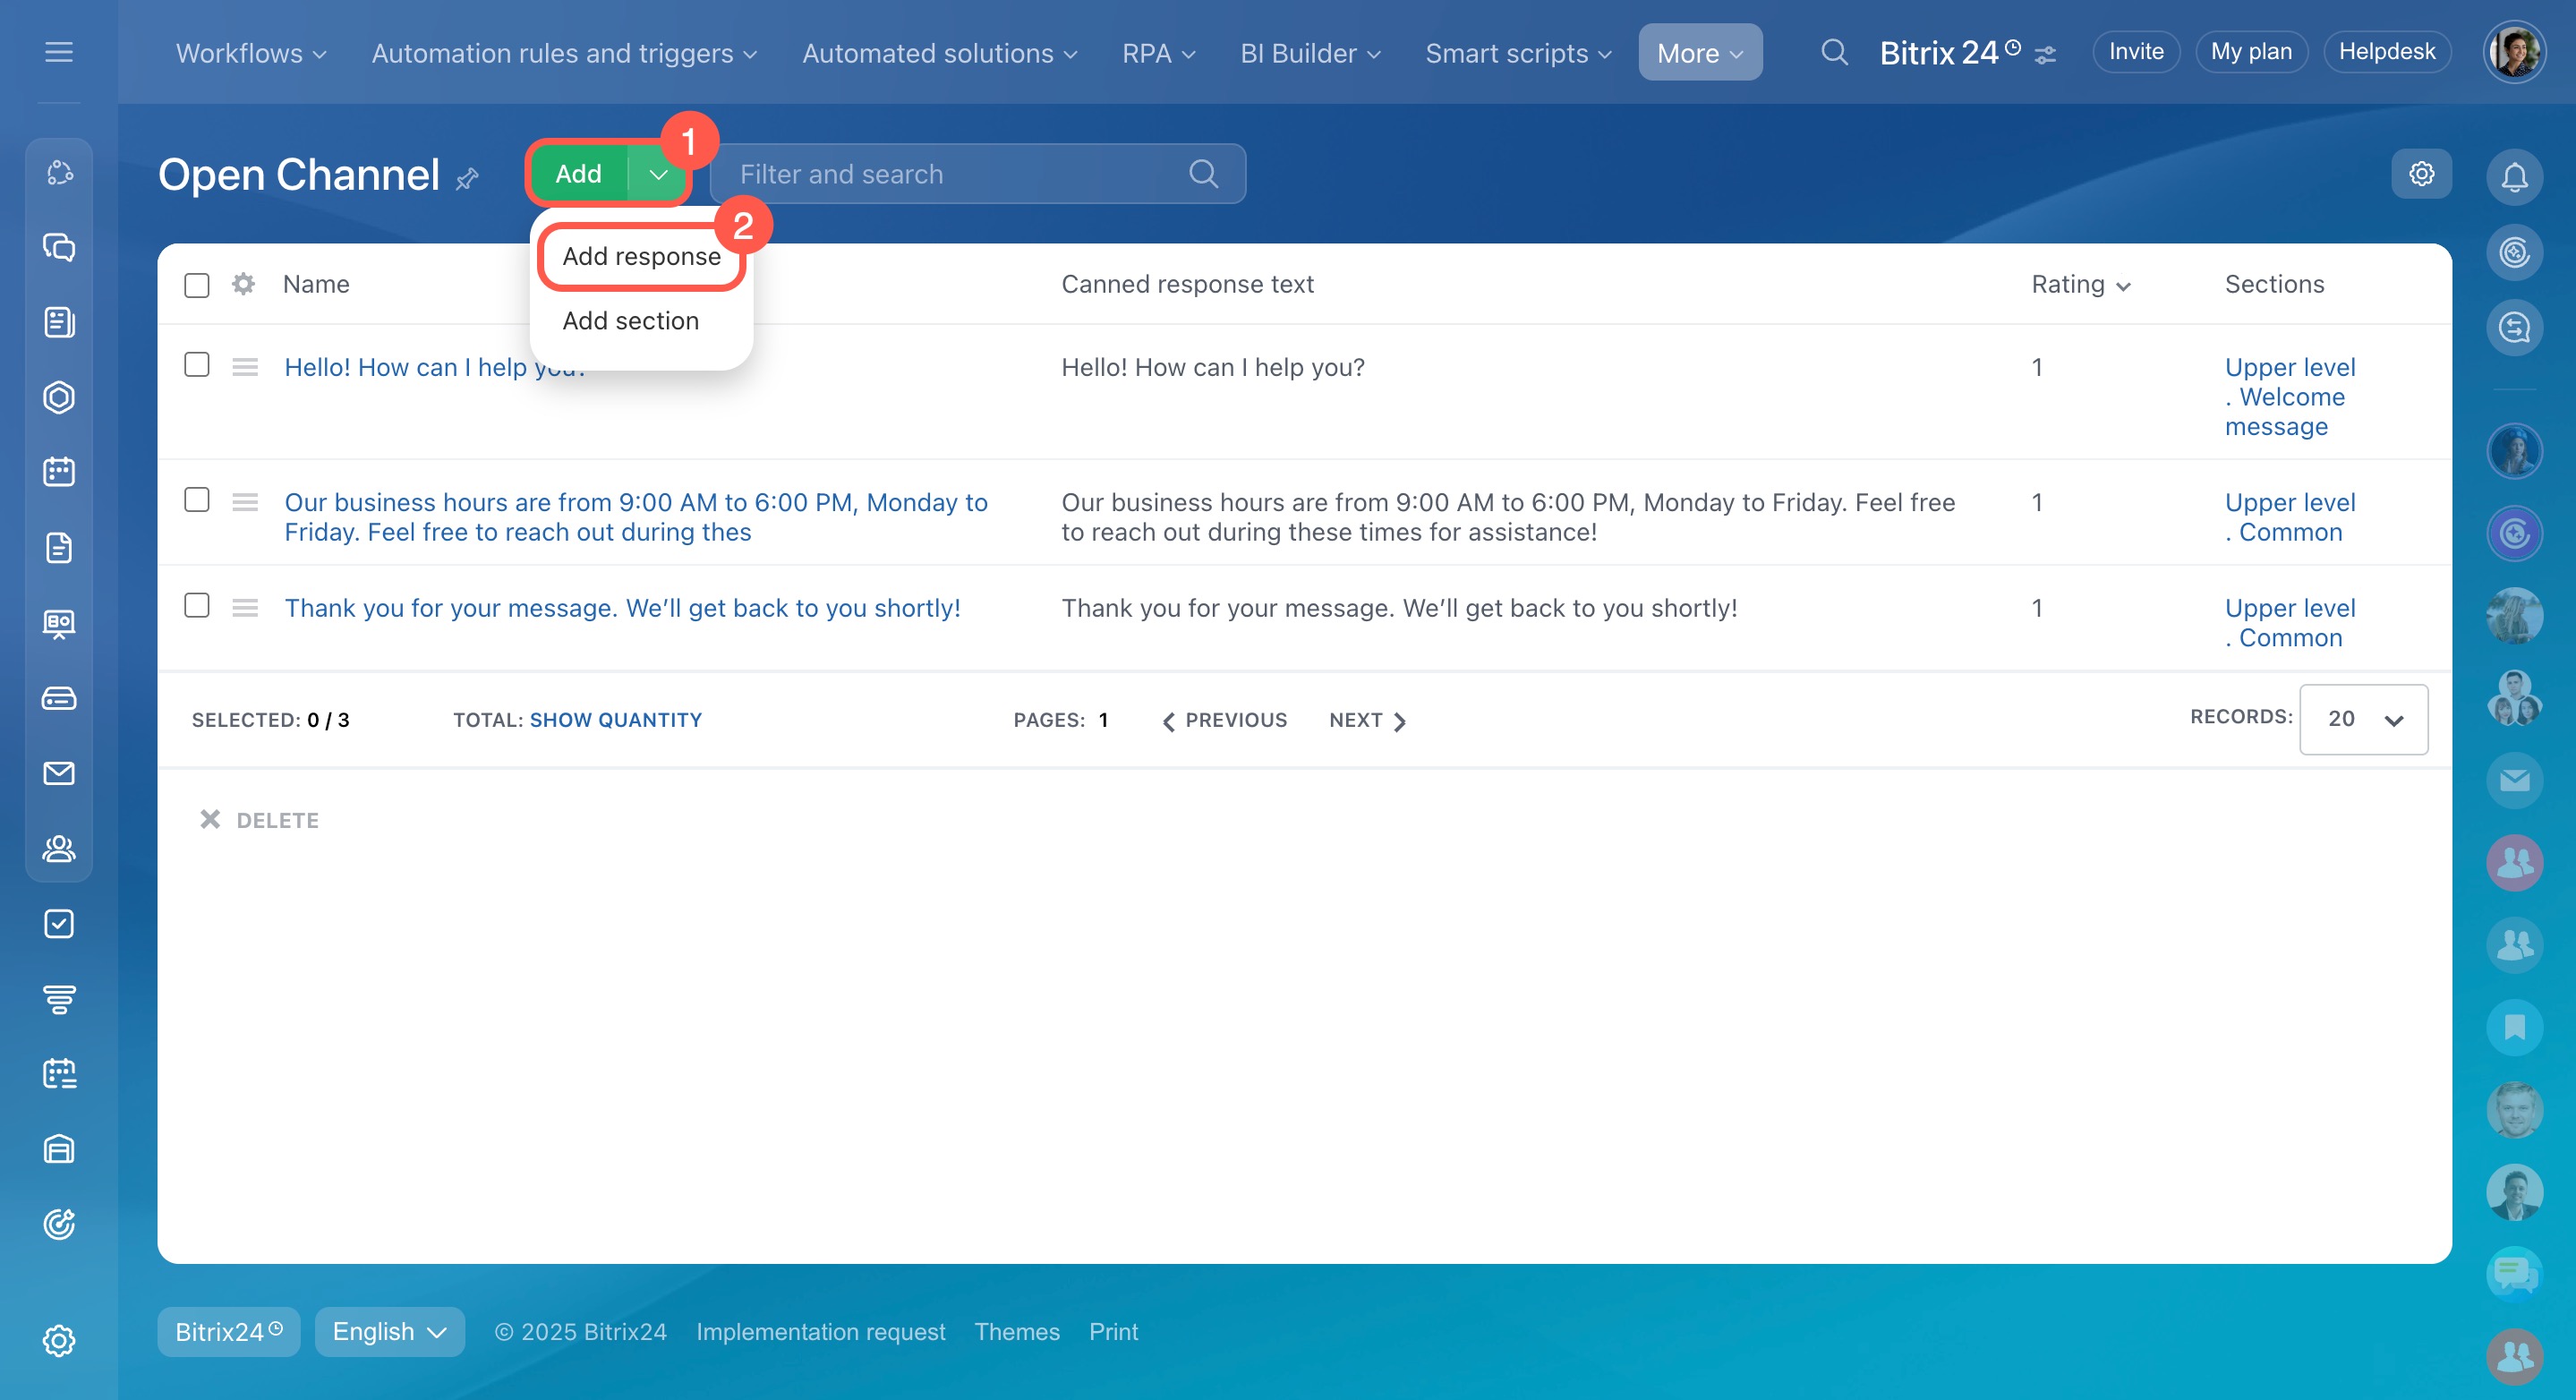
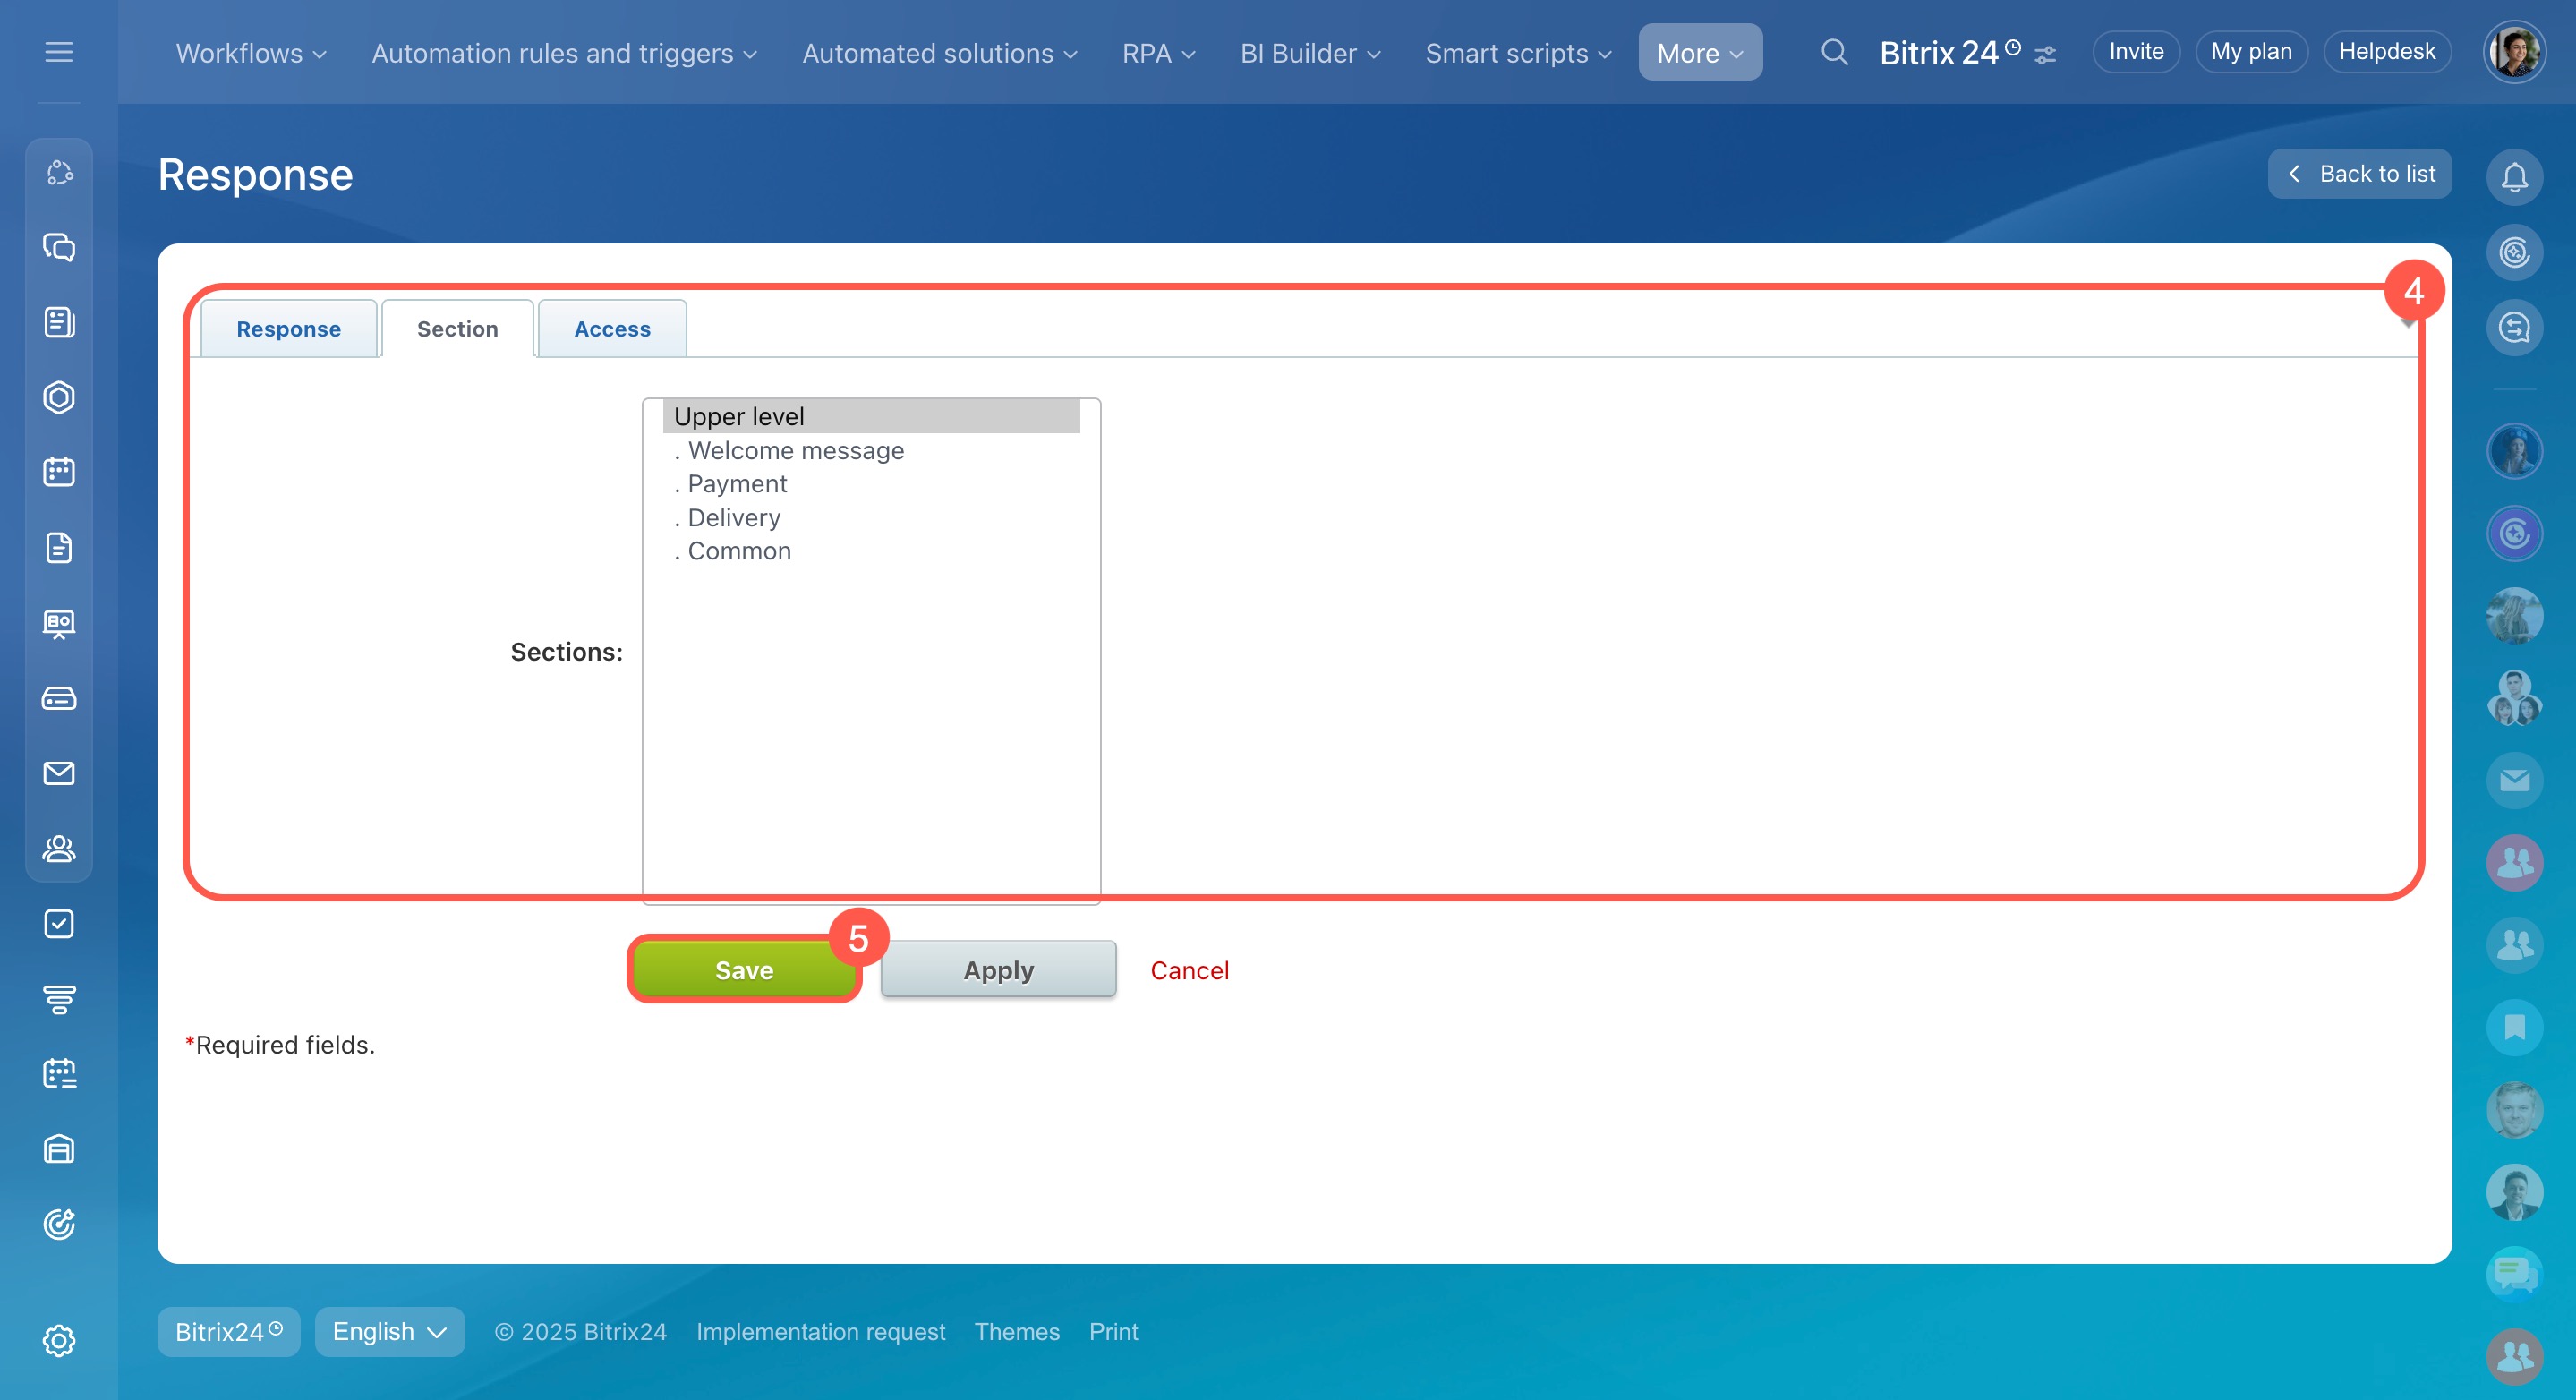
Open detailed settings. Use this option to create multiple responses at once, organize them into sections, and add ratings. It’s a great way to prepare a list of ready-to-use responses for your team.
- Click Add.
- Select Add response.
- In the Response tab, enter the name and message text. Assign a rating to prioritize it (higher numbers appear first in the list). This won’t affect the order in customer chats.
- In the Section tab, choose where to save your response.
- Click Save.
Use canned responses
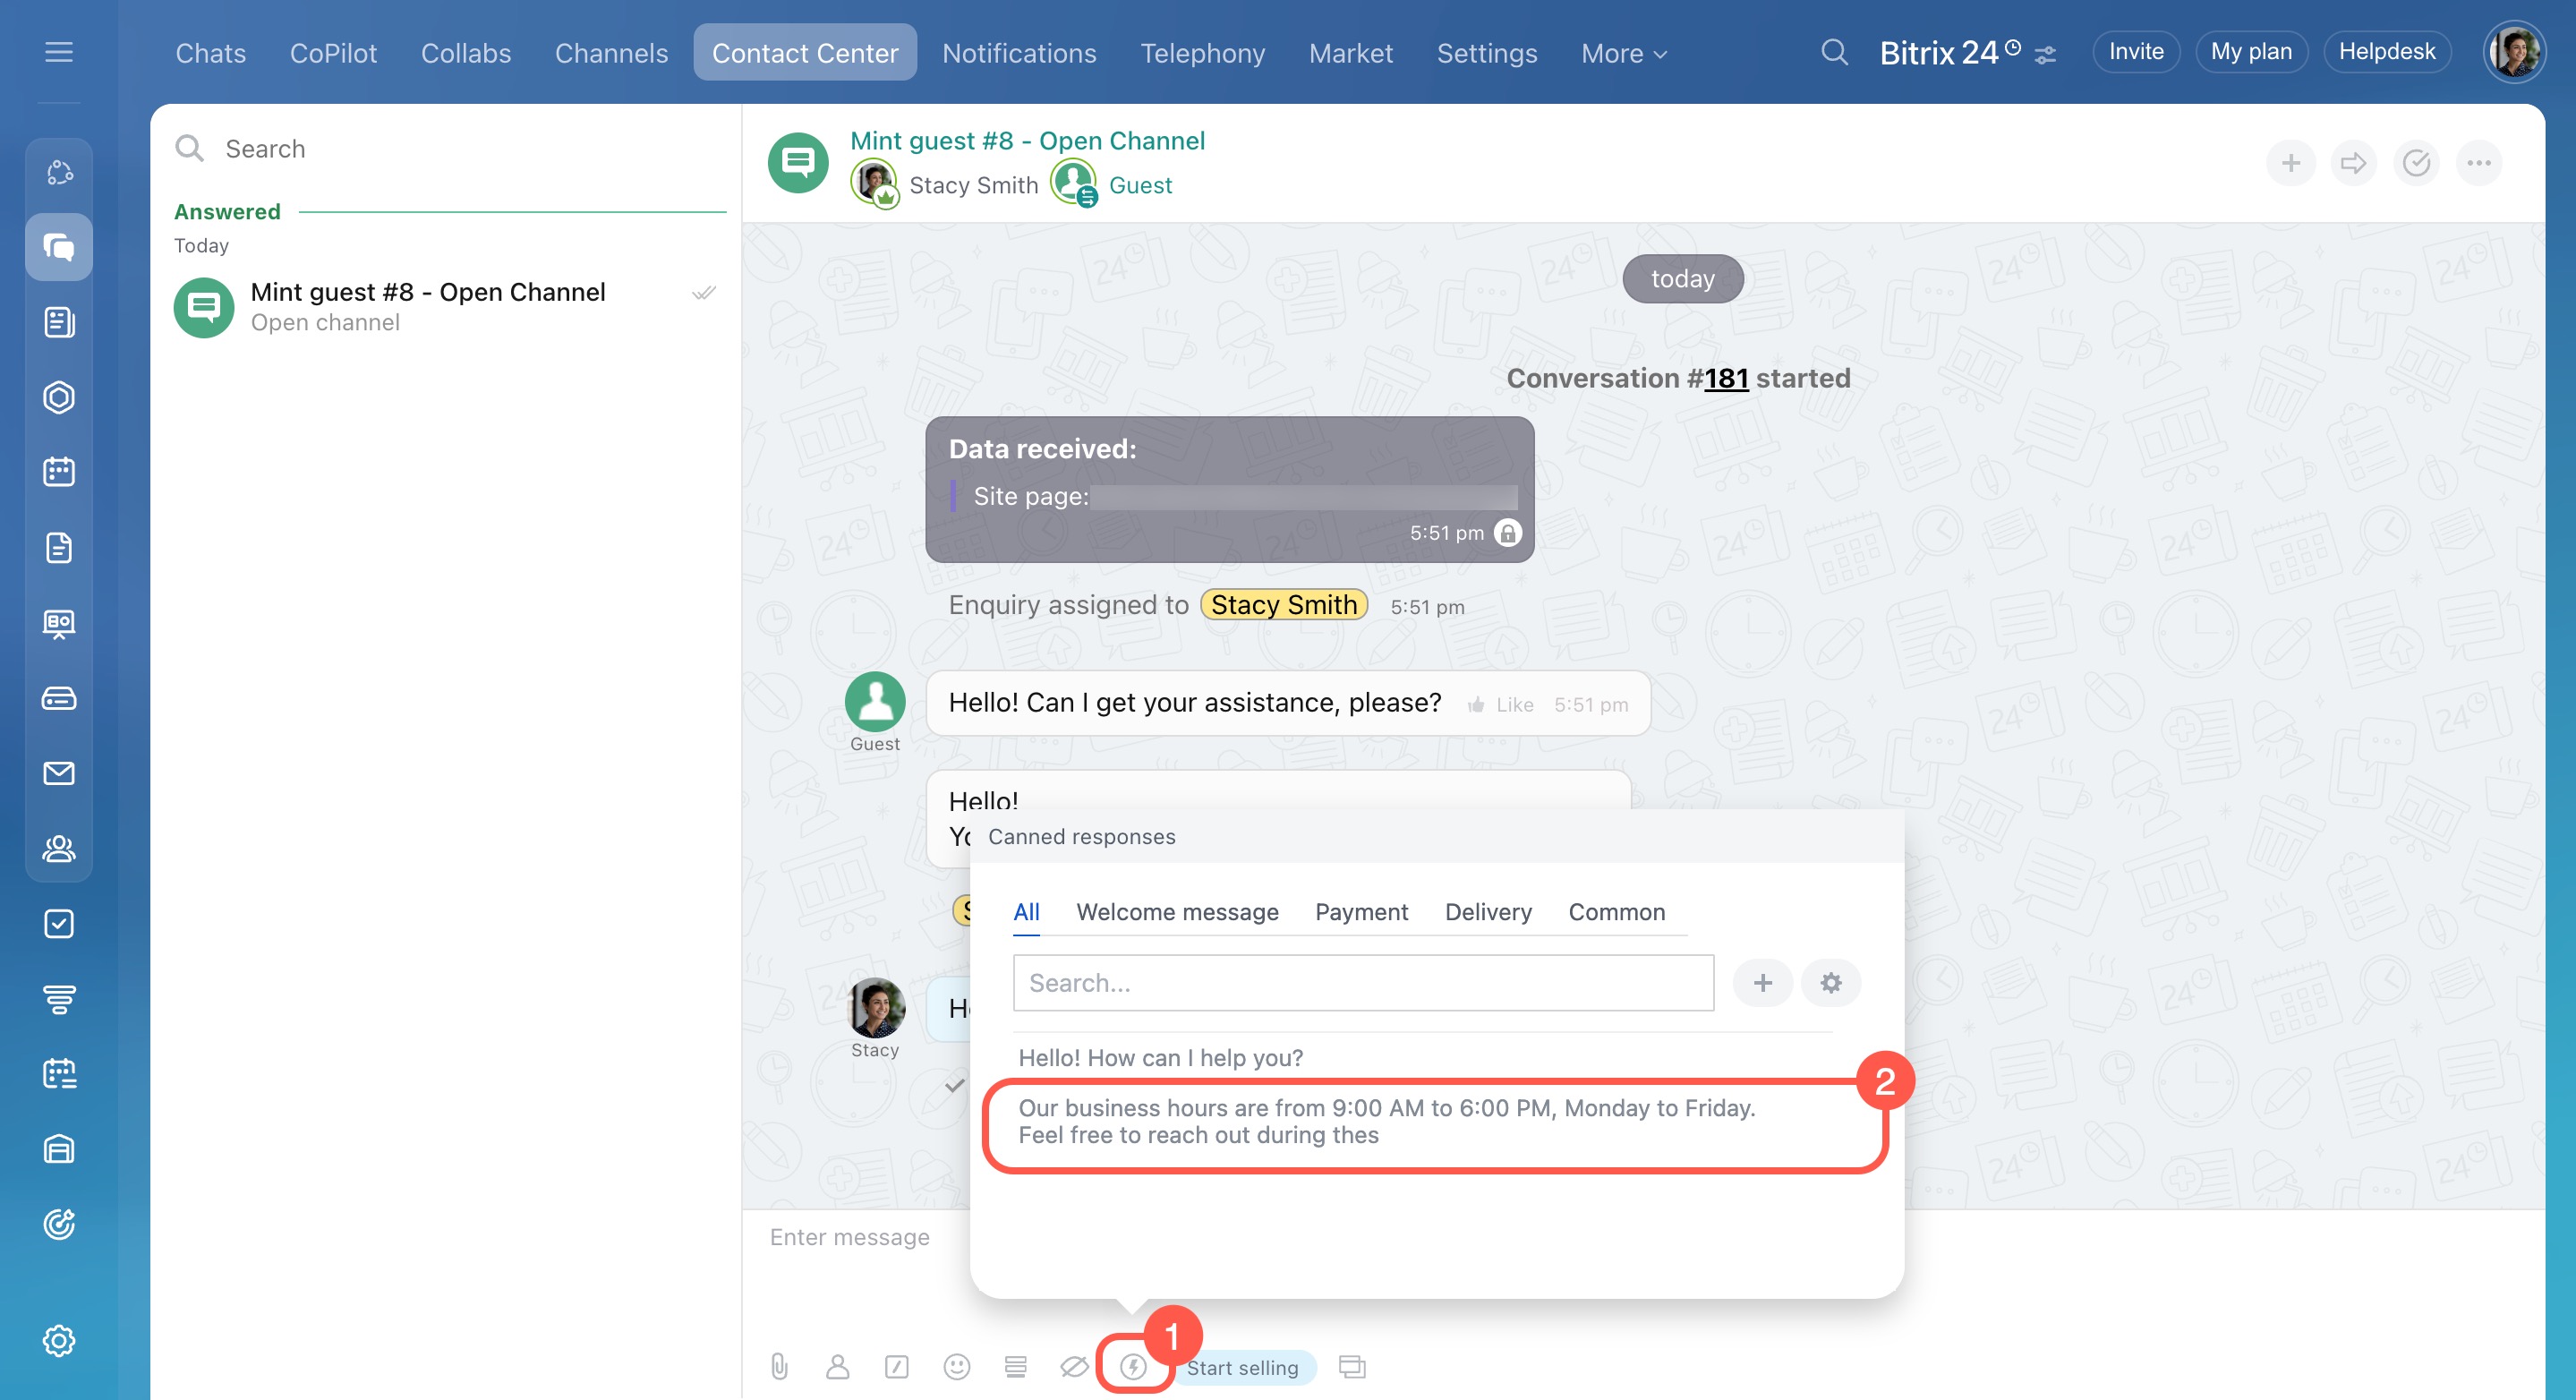
Once a canned response is saved, agents can easily use it during conversations.
- Click the icon.
- Choose a response by browsing, searching, or selecting a specific section.
- The message will appear in the text input field. You can edit it if needed.
- Send your response.
Manage the canned response list
When you create your first canned response, Bitrix24 automatically sets up a response list and links it to the current Open Channel. The list will be named after that channel.
Create and configure a list in Bitrix24
You can:
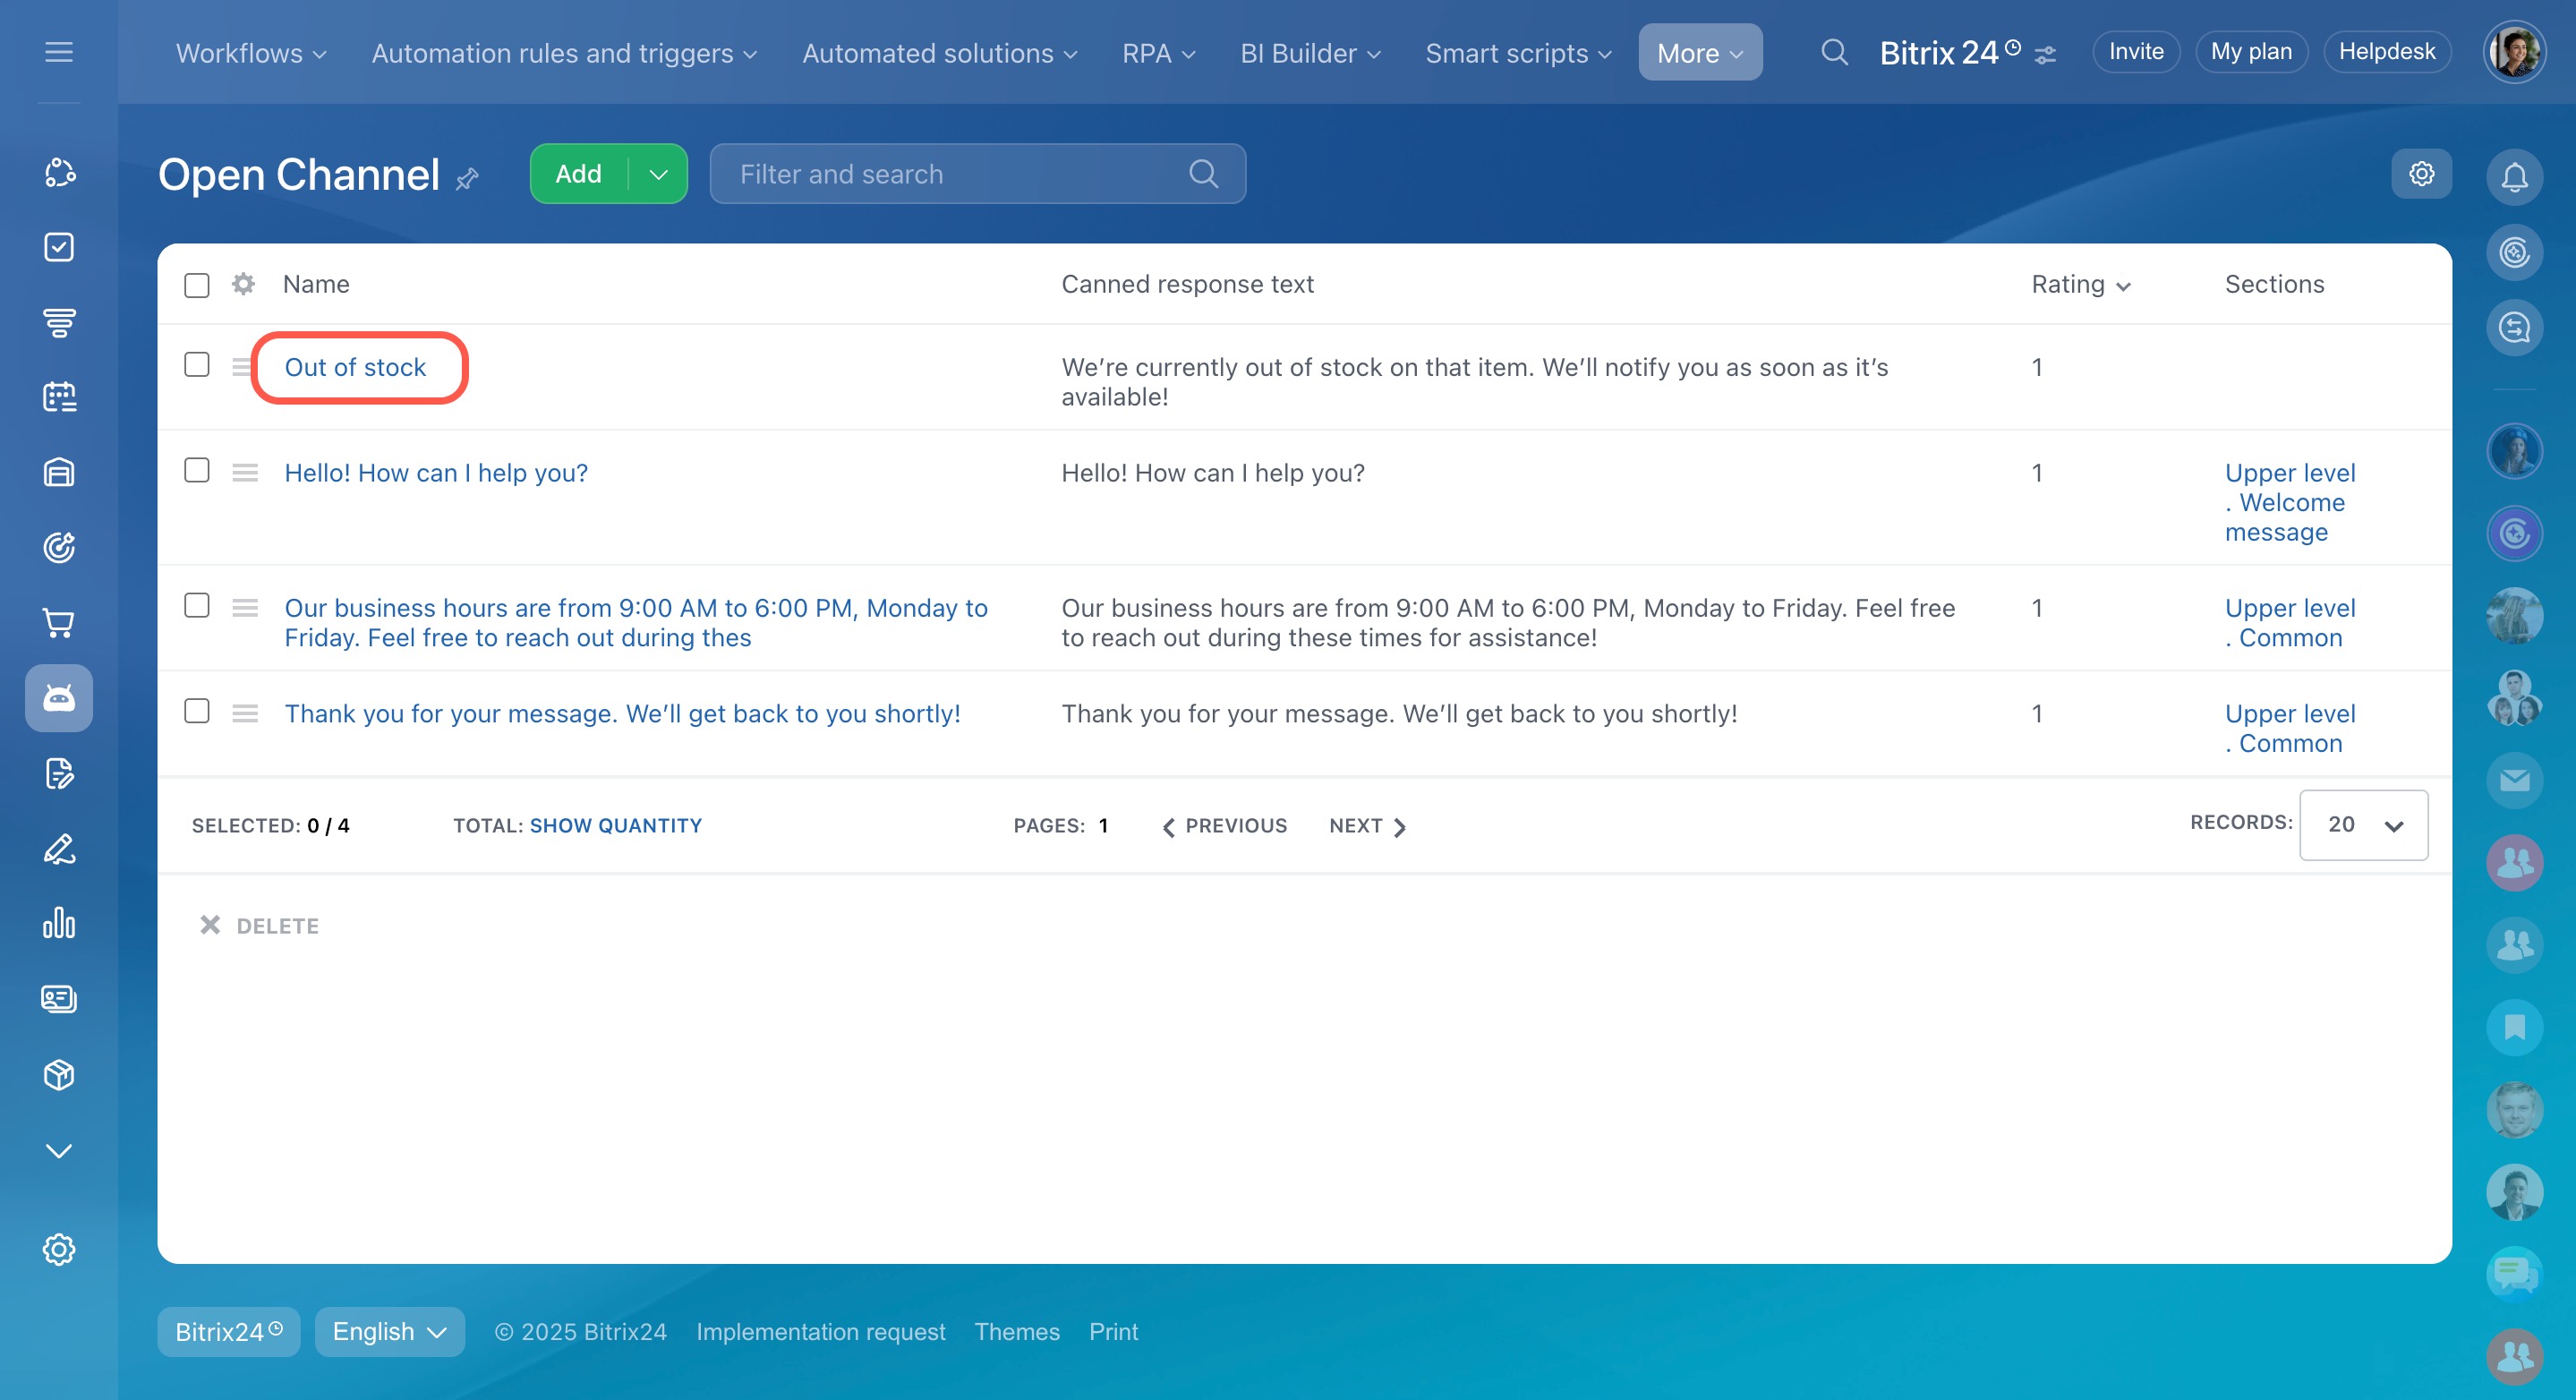
- Open a canned response list
- Edit responses and organize them into sections
- Link the list to one or more Open Channels
- Set access permissions to canned responses
- Delete the list if it’s no longer needed
Open a canned response list
You can access your list of canned responses to view, edit, or manage them. There are three ways to do this: through customer chats, Open Channel settings, or the Automation section.
From a customer chat. Any agent assigned to the Open Channel queue can access the response list this way:
- Click the icon.
- Go to Settings (⚙️).
- The canned response list will open.
From Open Channel settings. Only administrators or employees with permission to edit Open Channels can use this option:
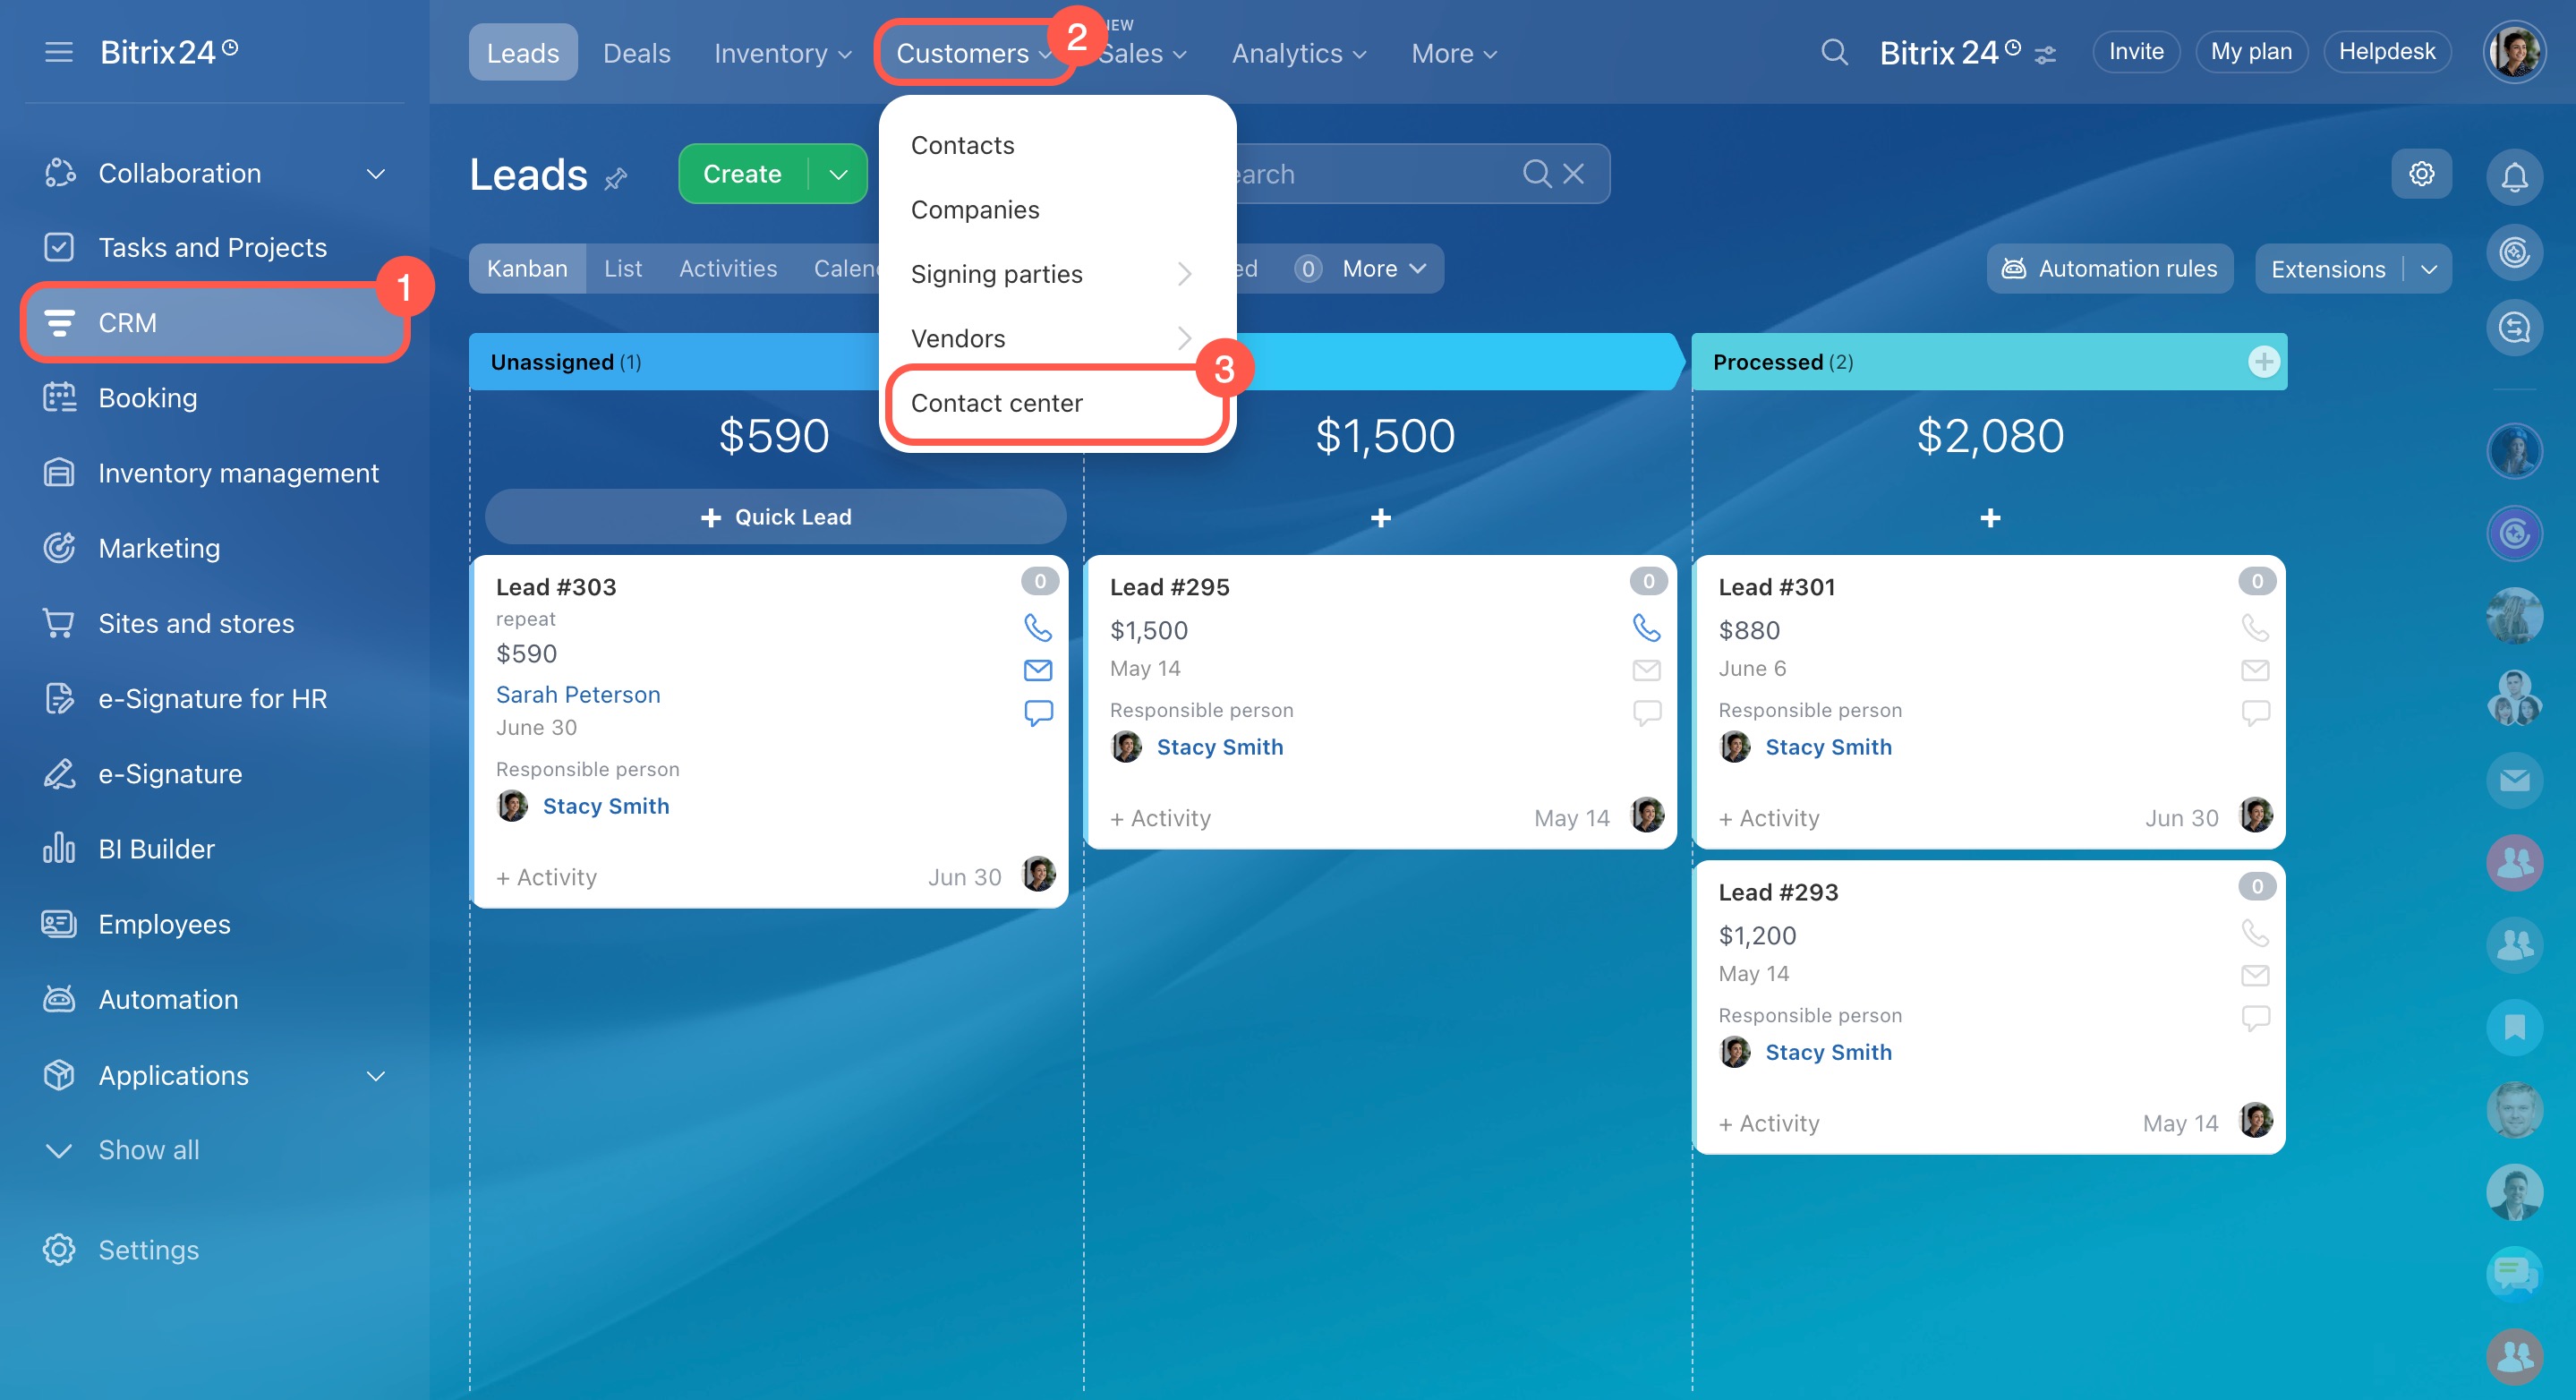
- Go to CRM.
- Expand the Customers tab.
- Select Contact center.
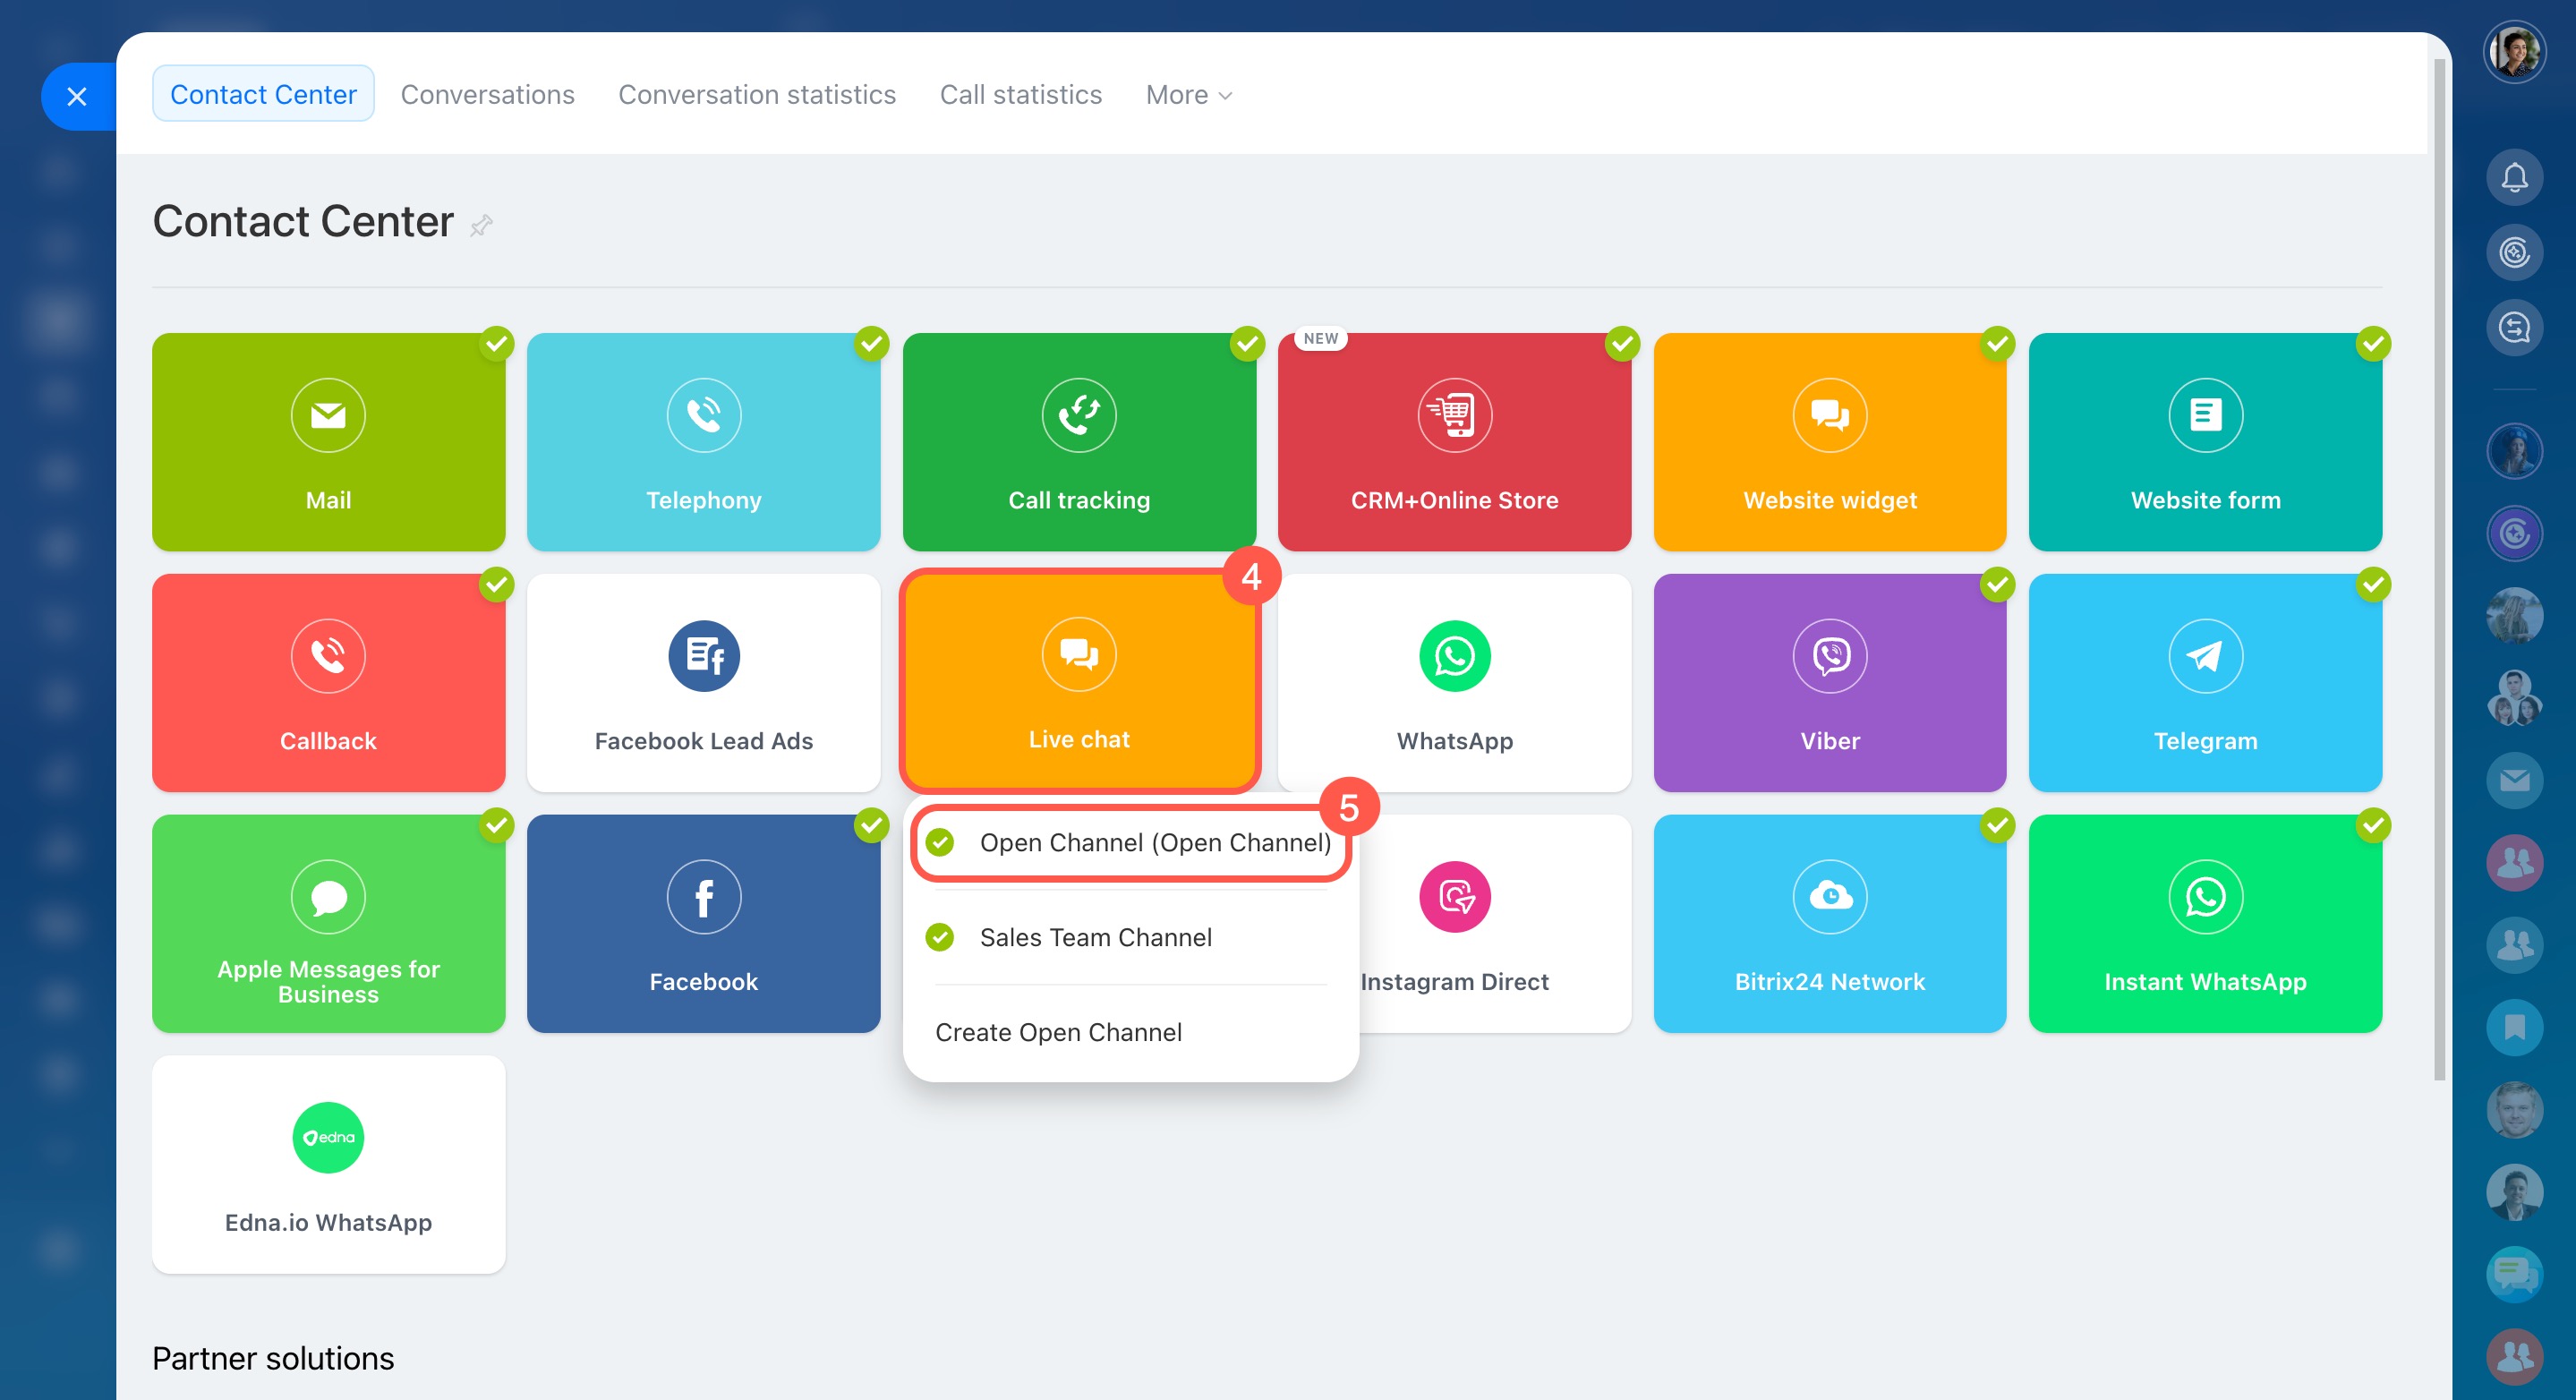
- Choose a channel, such as Live chat.
- Click the name of the Open Channel in the list.
- Under Open Channel and permissions, click Configure.
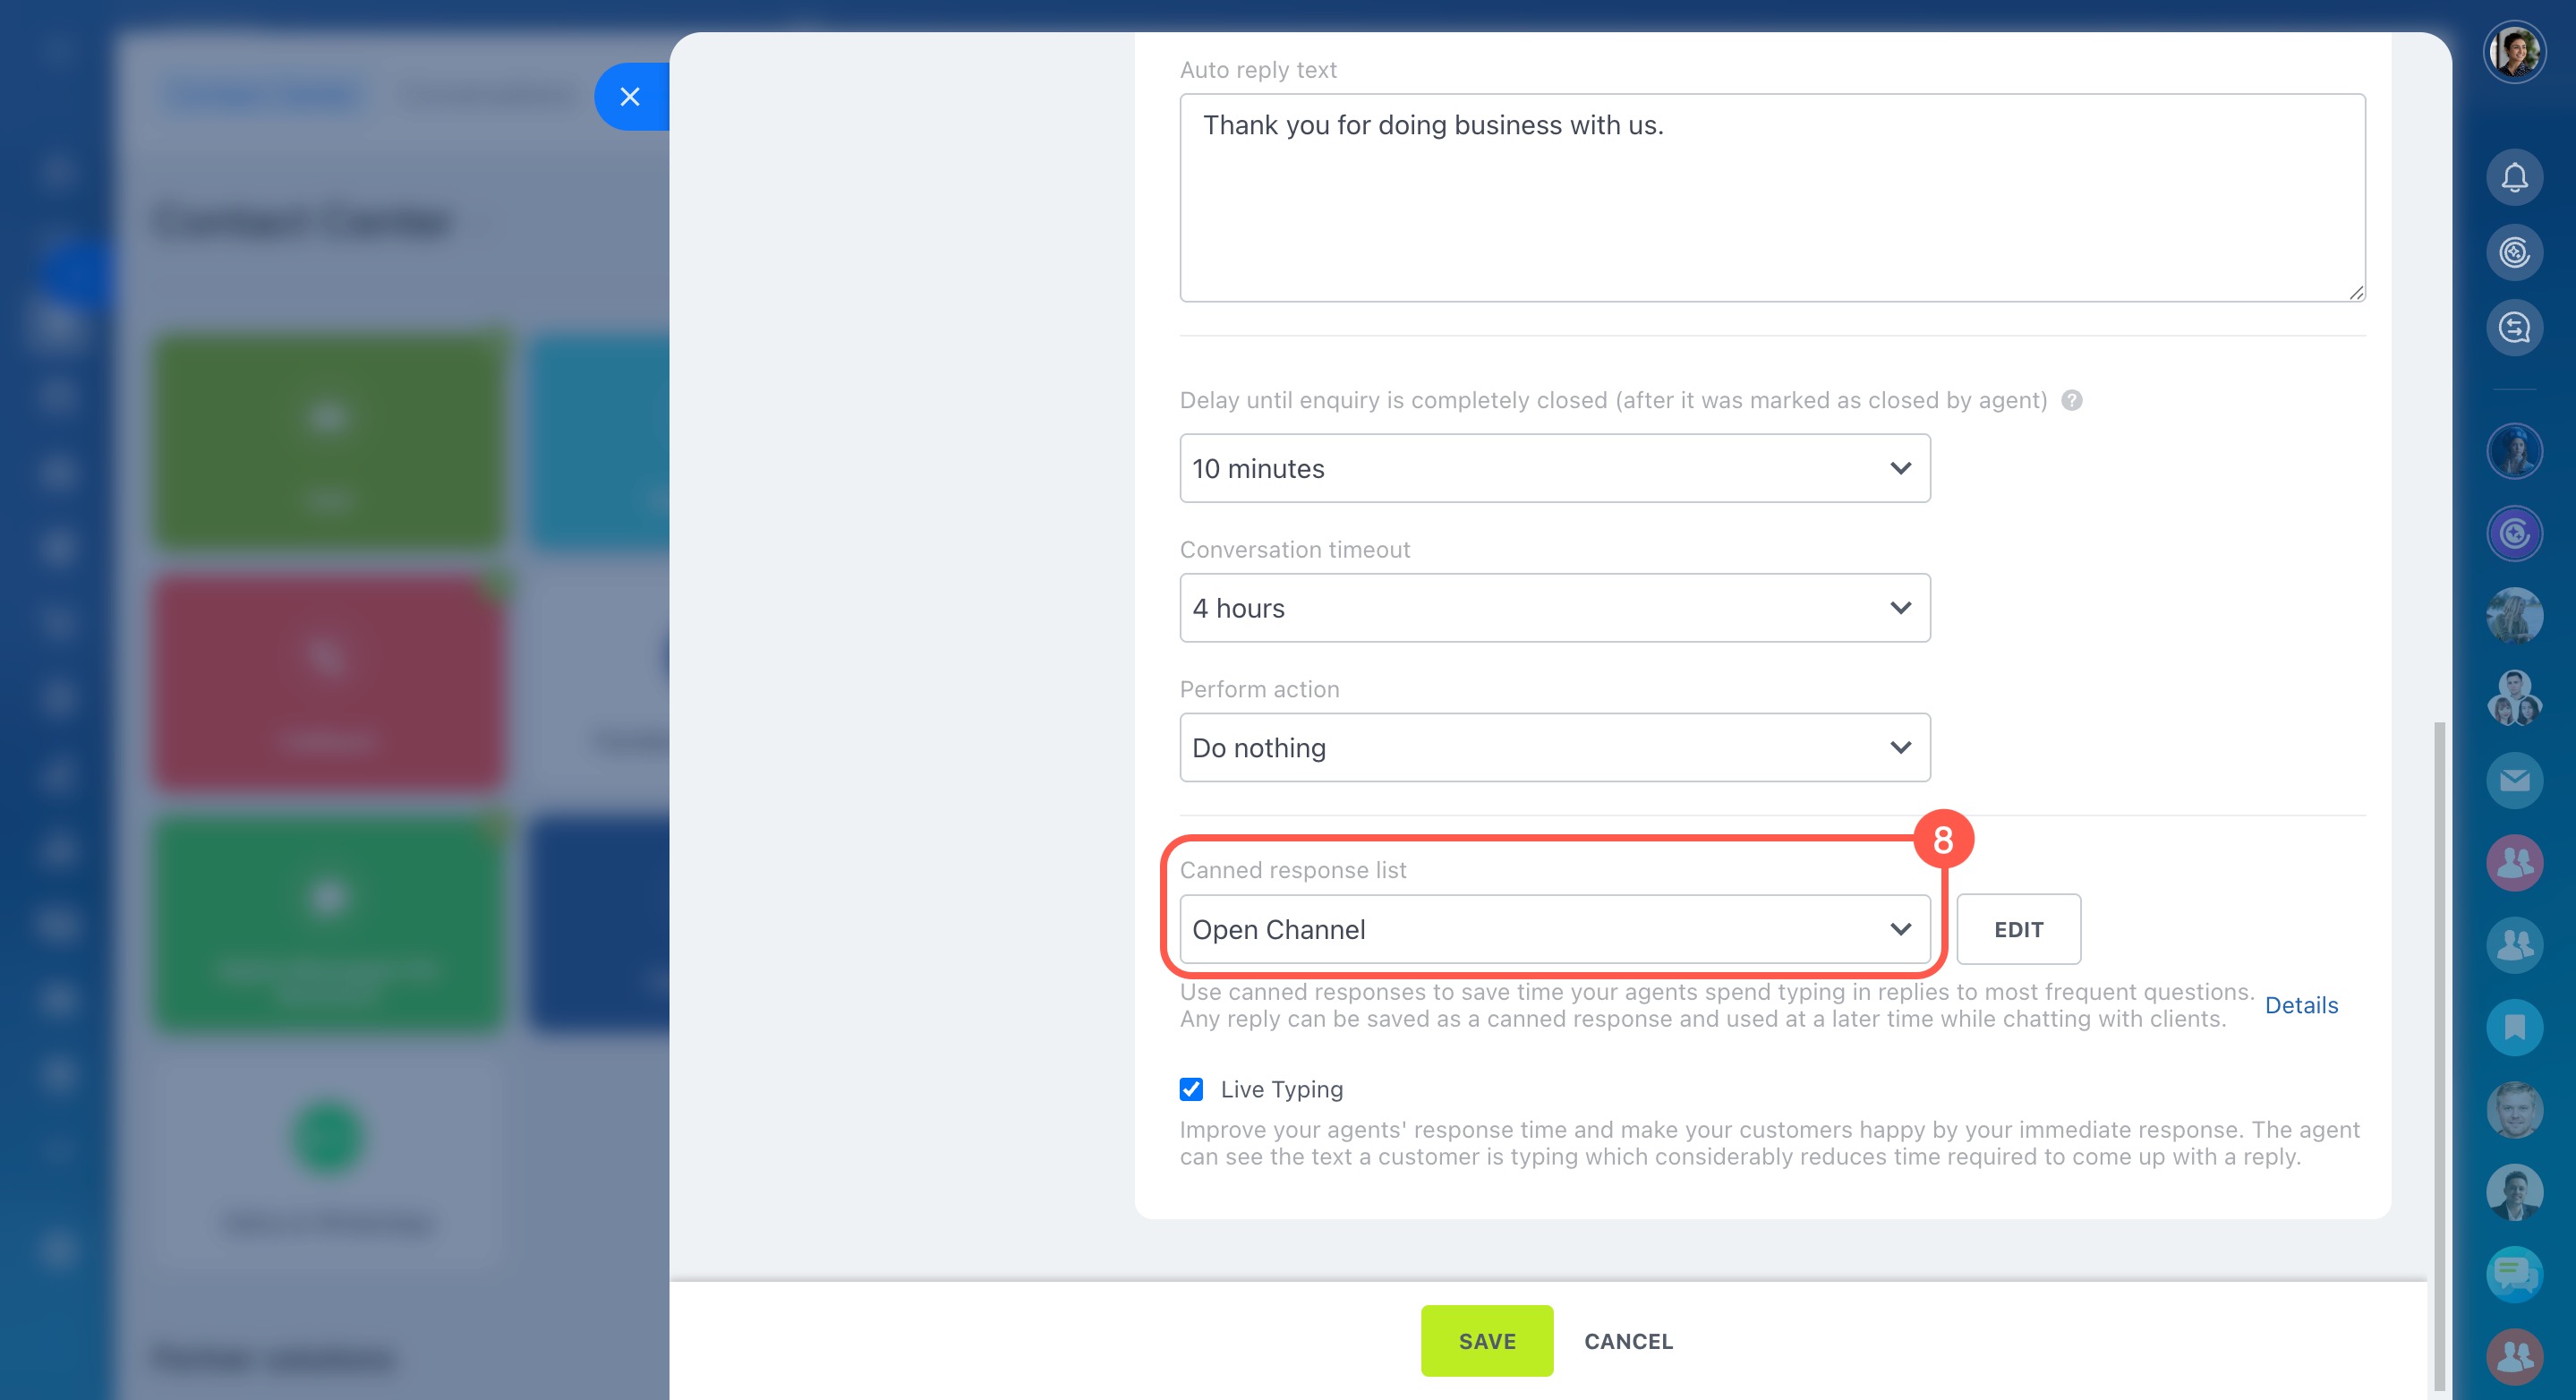
- Open the Auto Actions tab.
- Click Edit next to Canned response list.
- The list will open.
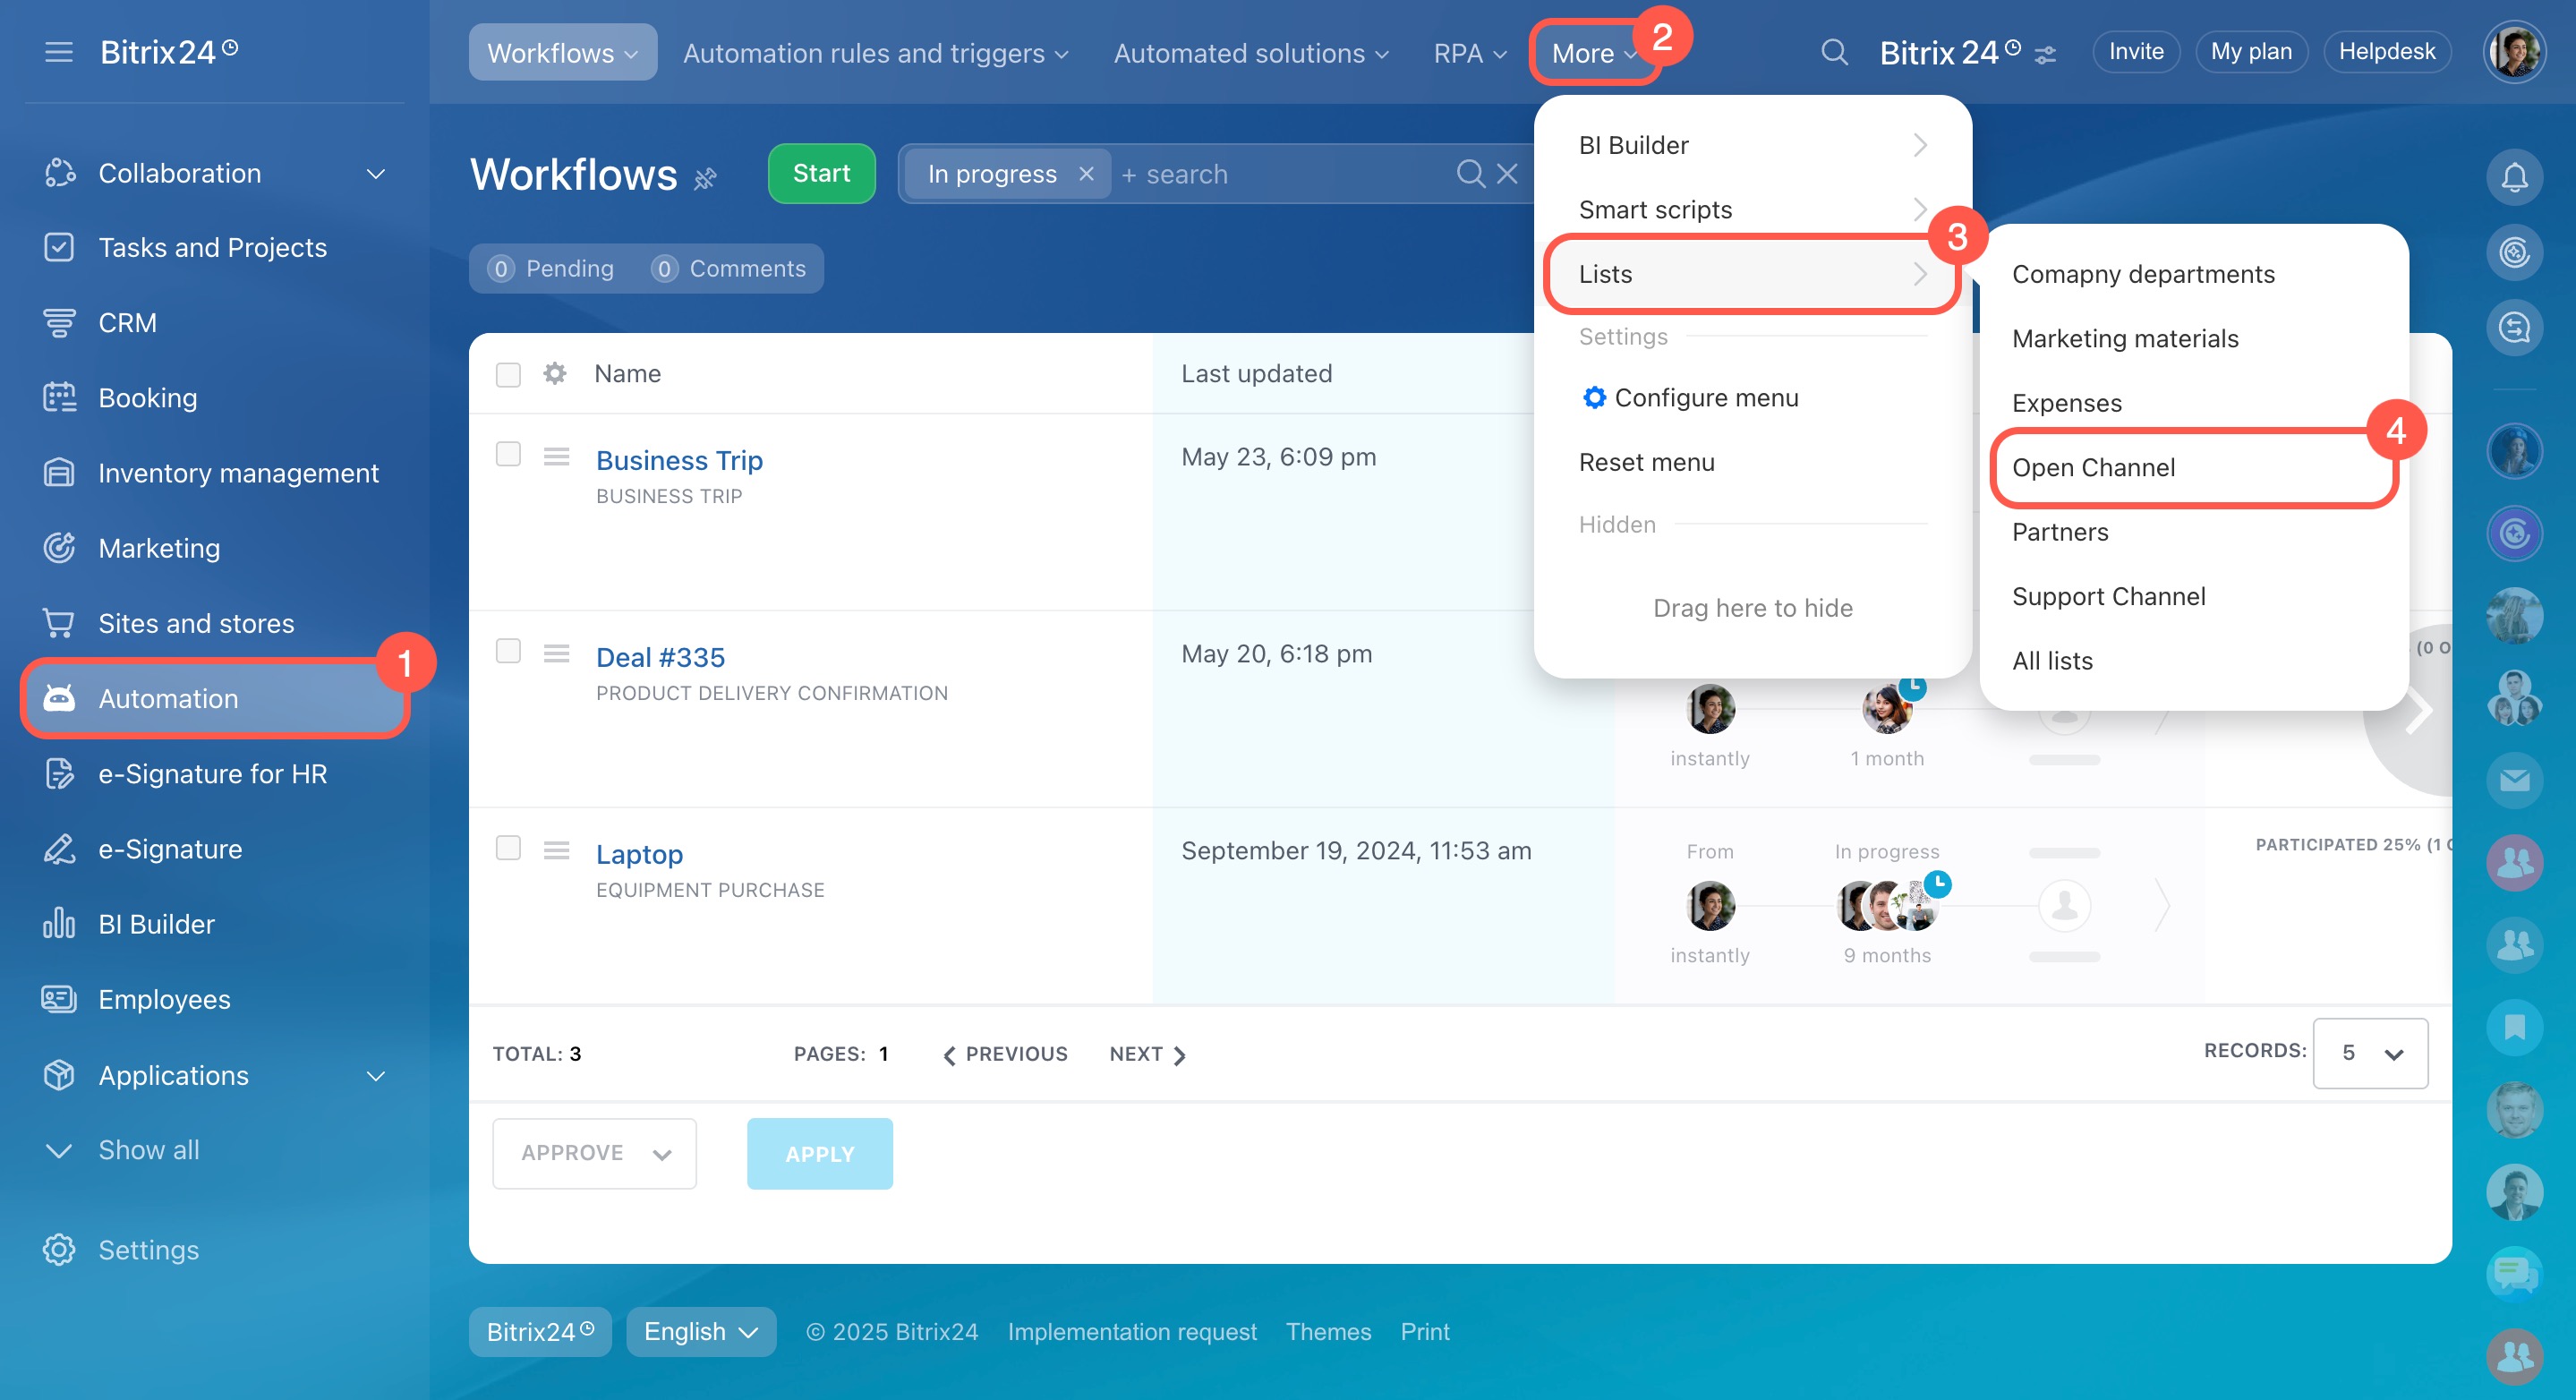
From the Automation section. Available to employees with access to Open Channels:
- Go to Automation.
- Click More.
- Select Lists.
- Choose the list you need.
- The canned response list will open.
Edit responses and organize them into sections
You can add, edit, and organize canned responses and sections in the list.
Add new responses. Agents assigned to the Open Channel queue can add new responses.
Create canned responses
Edit existing responses. Agents in the Open Channel queue can also edit existing responses.
- Click the response name in the list.
- In the edit window, update the name, message text, rating, or section.
- Save the changes.
Create and edit sections. Sections help organize responses so agents can find them faster. Administrators and employees with permission to edit the list can manage sections.
To create a new section:
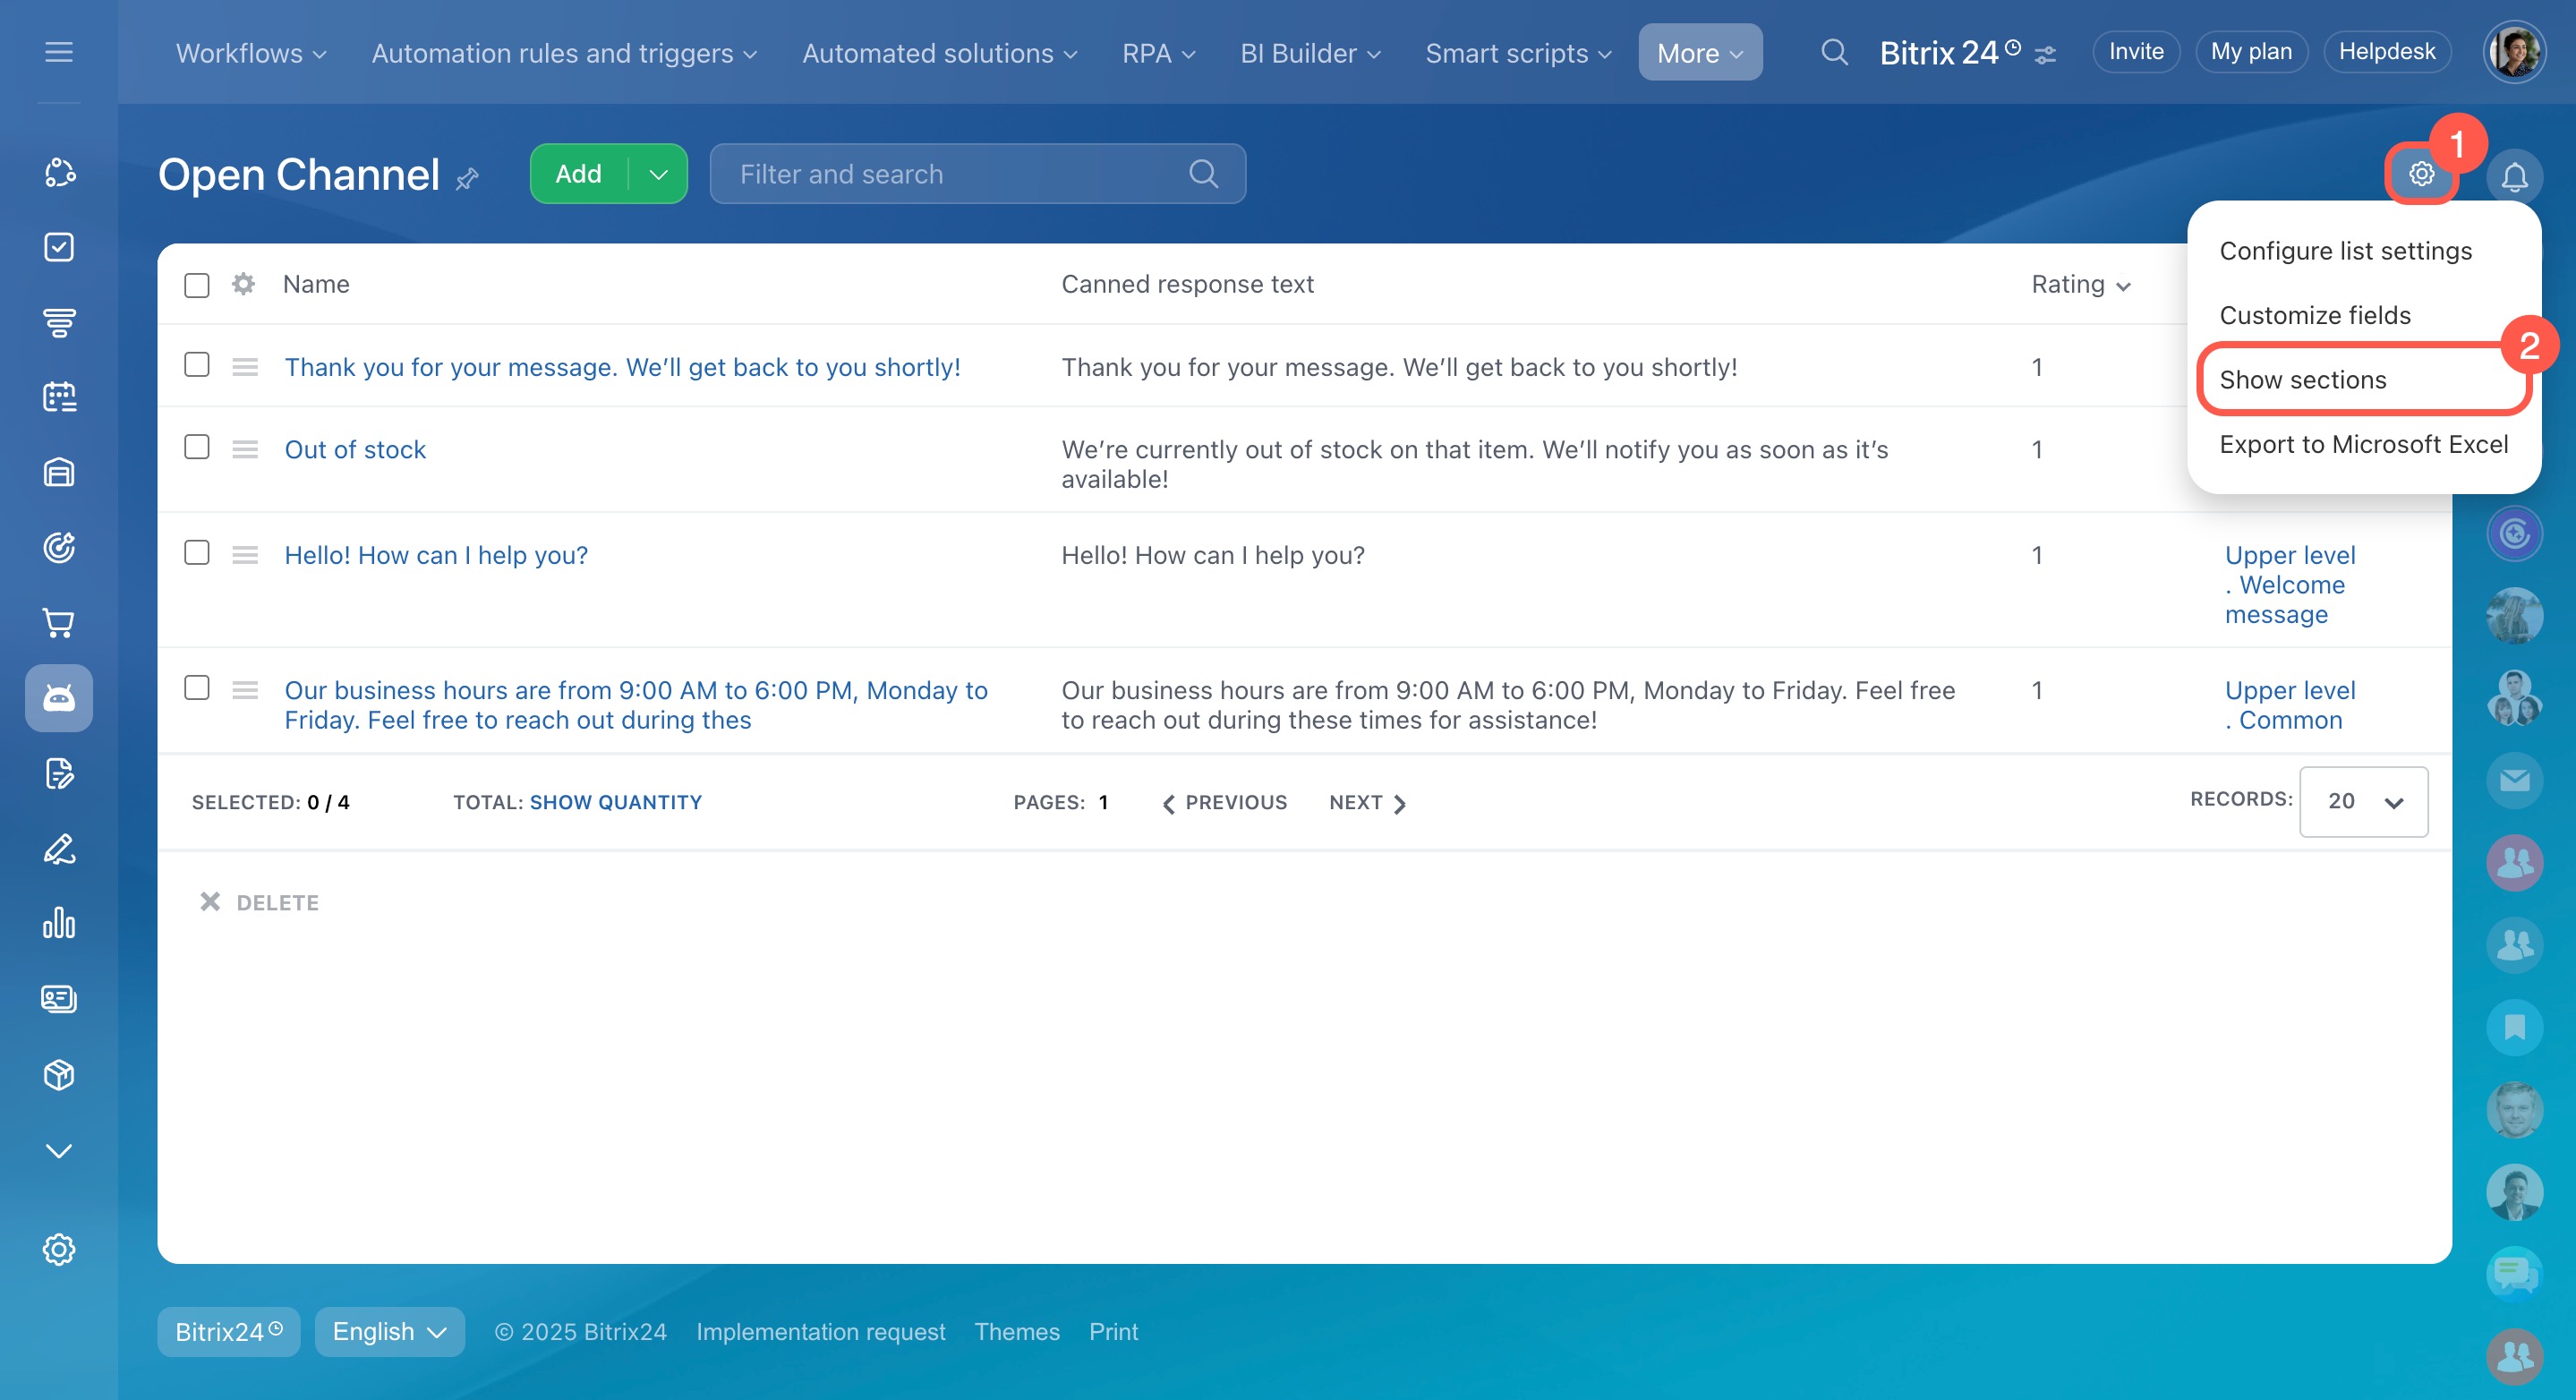
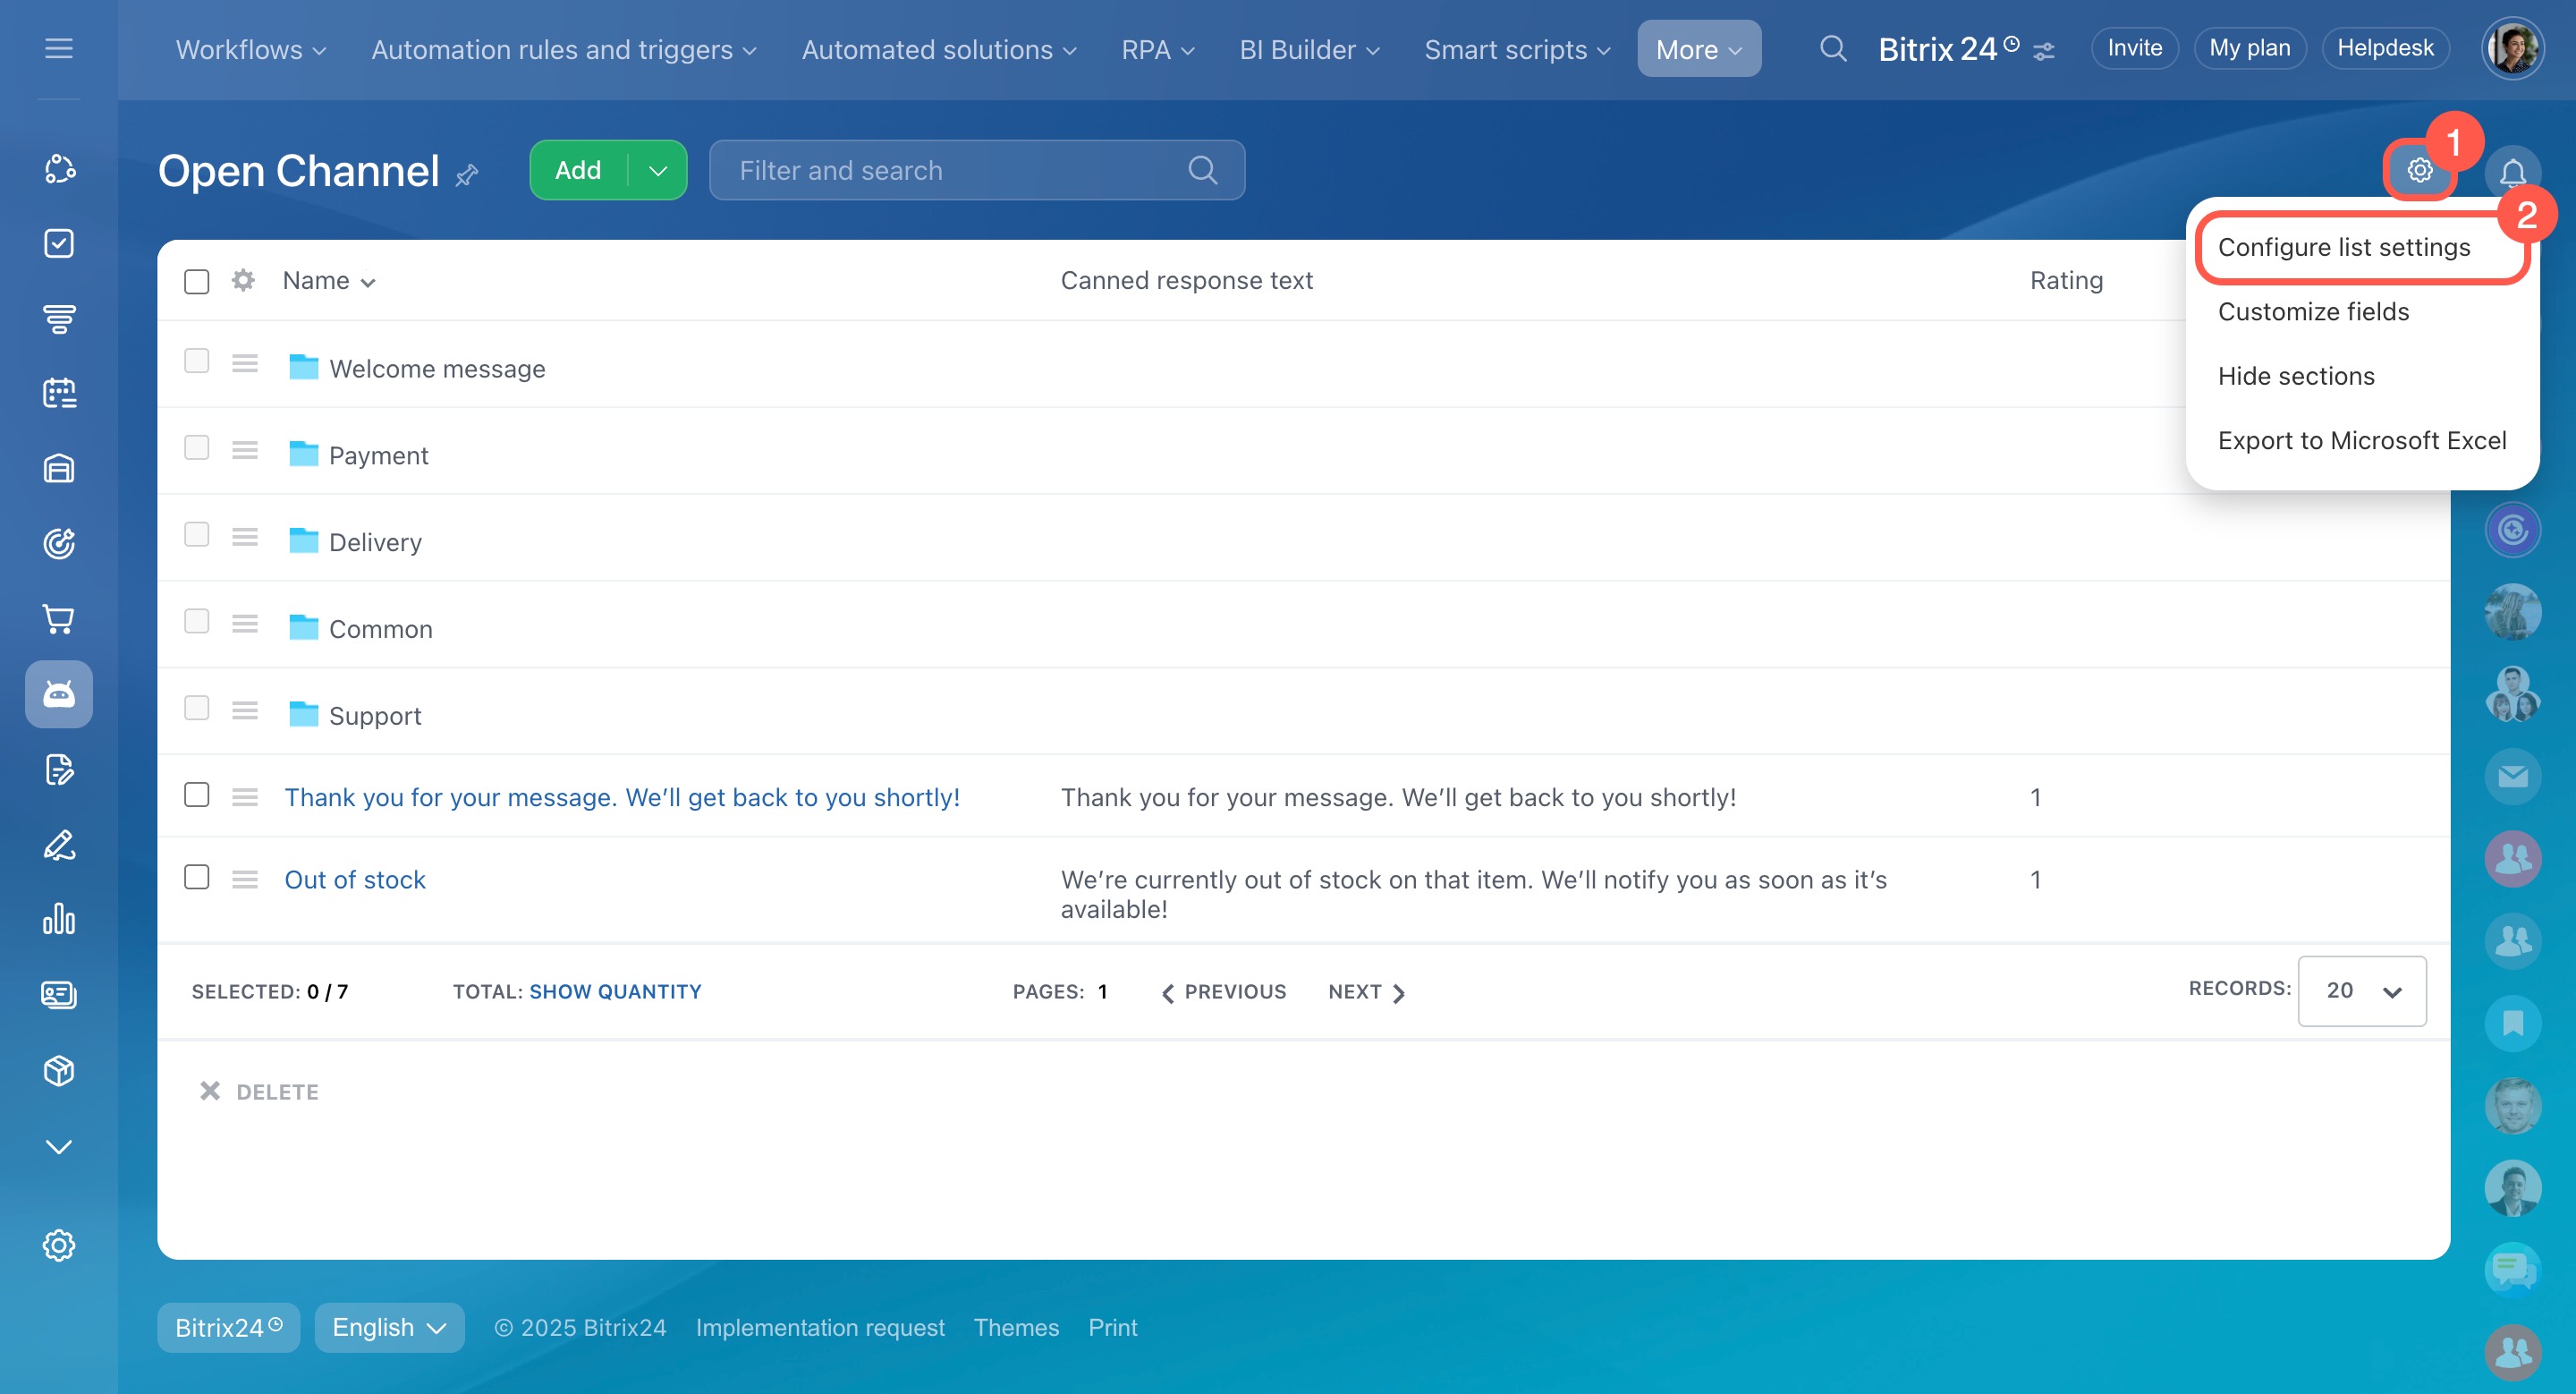
- Open the canned response list and click Settings (⚙️).
- Select Show sections.
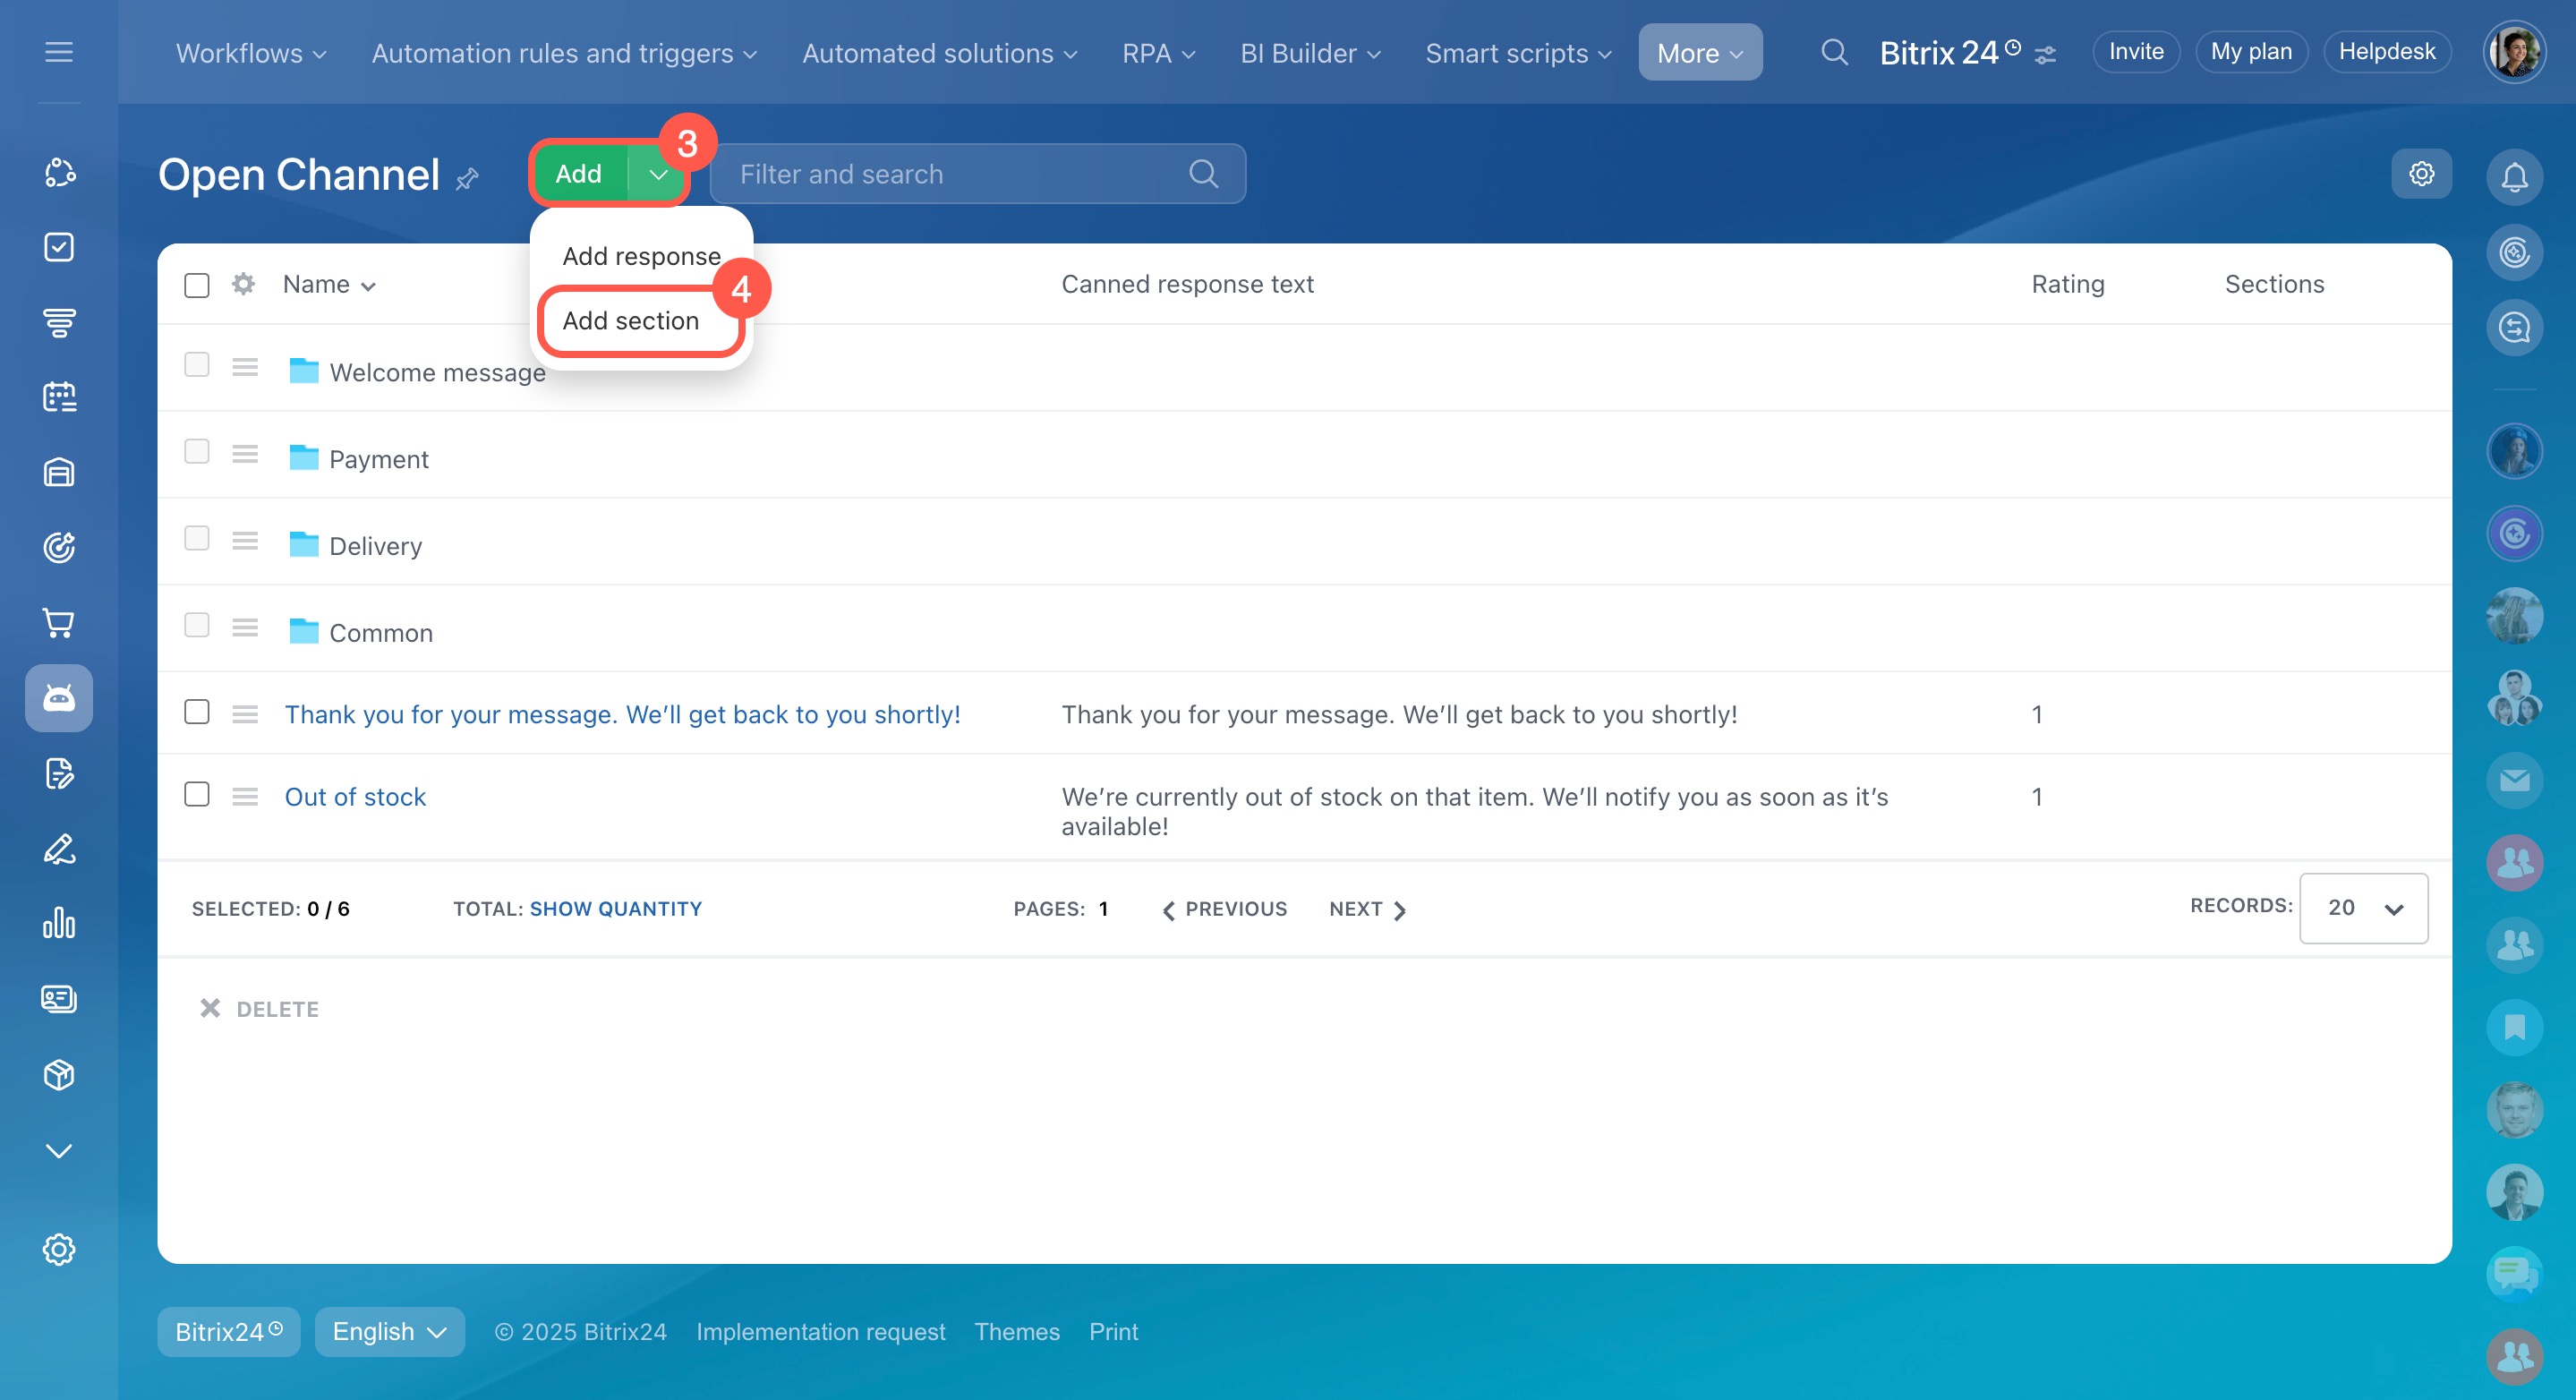
- Click Add.
- Select Add section.
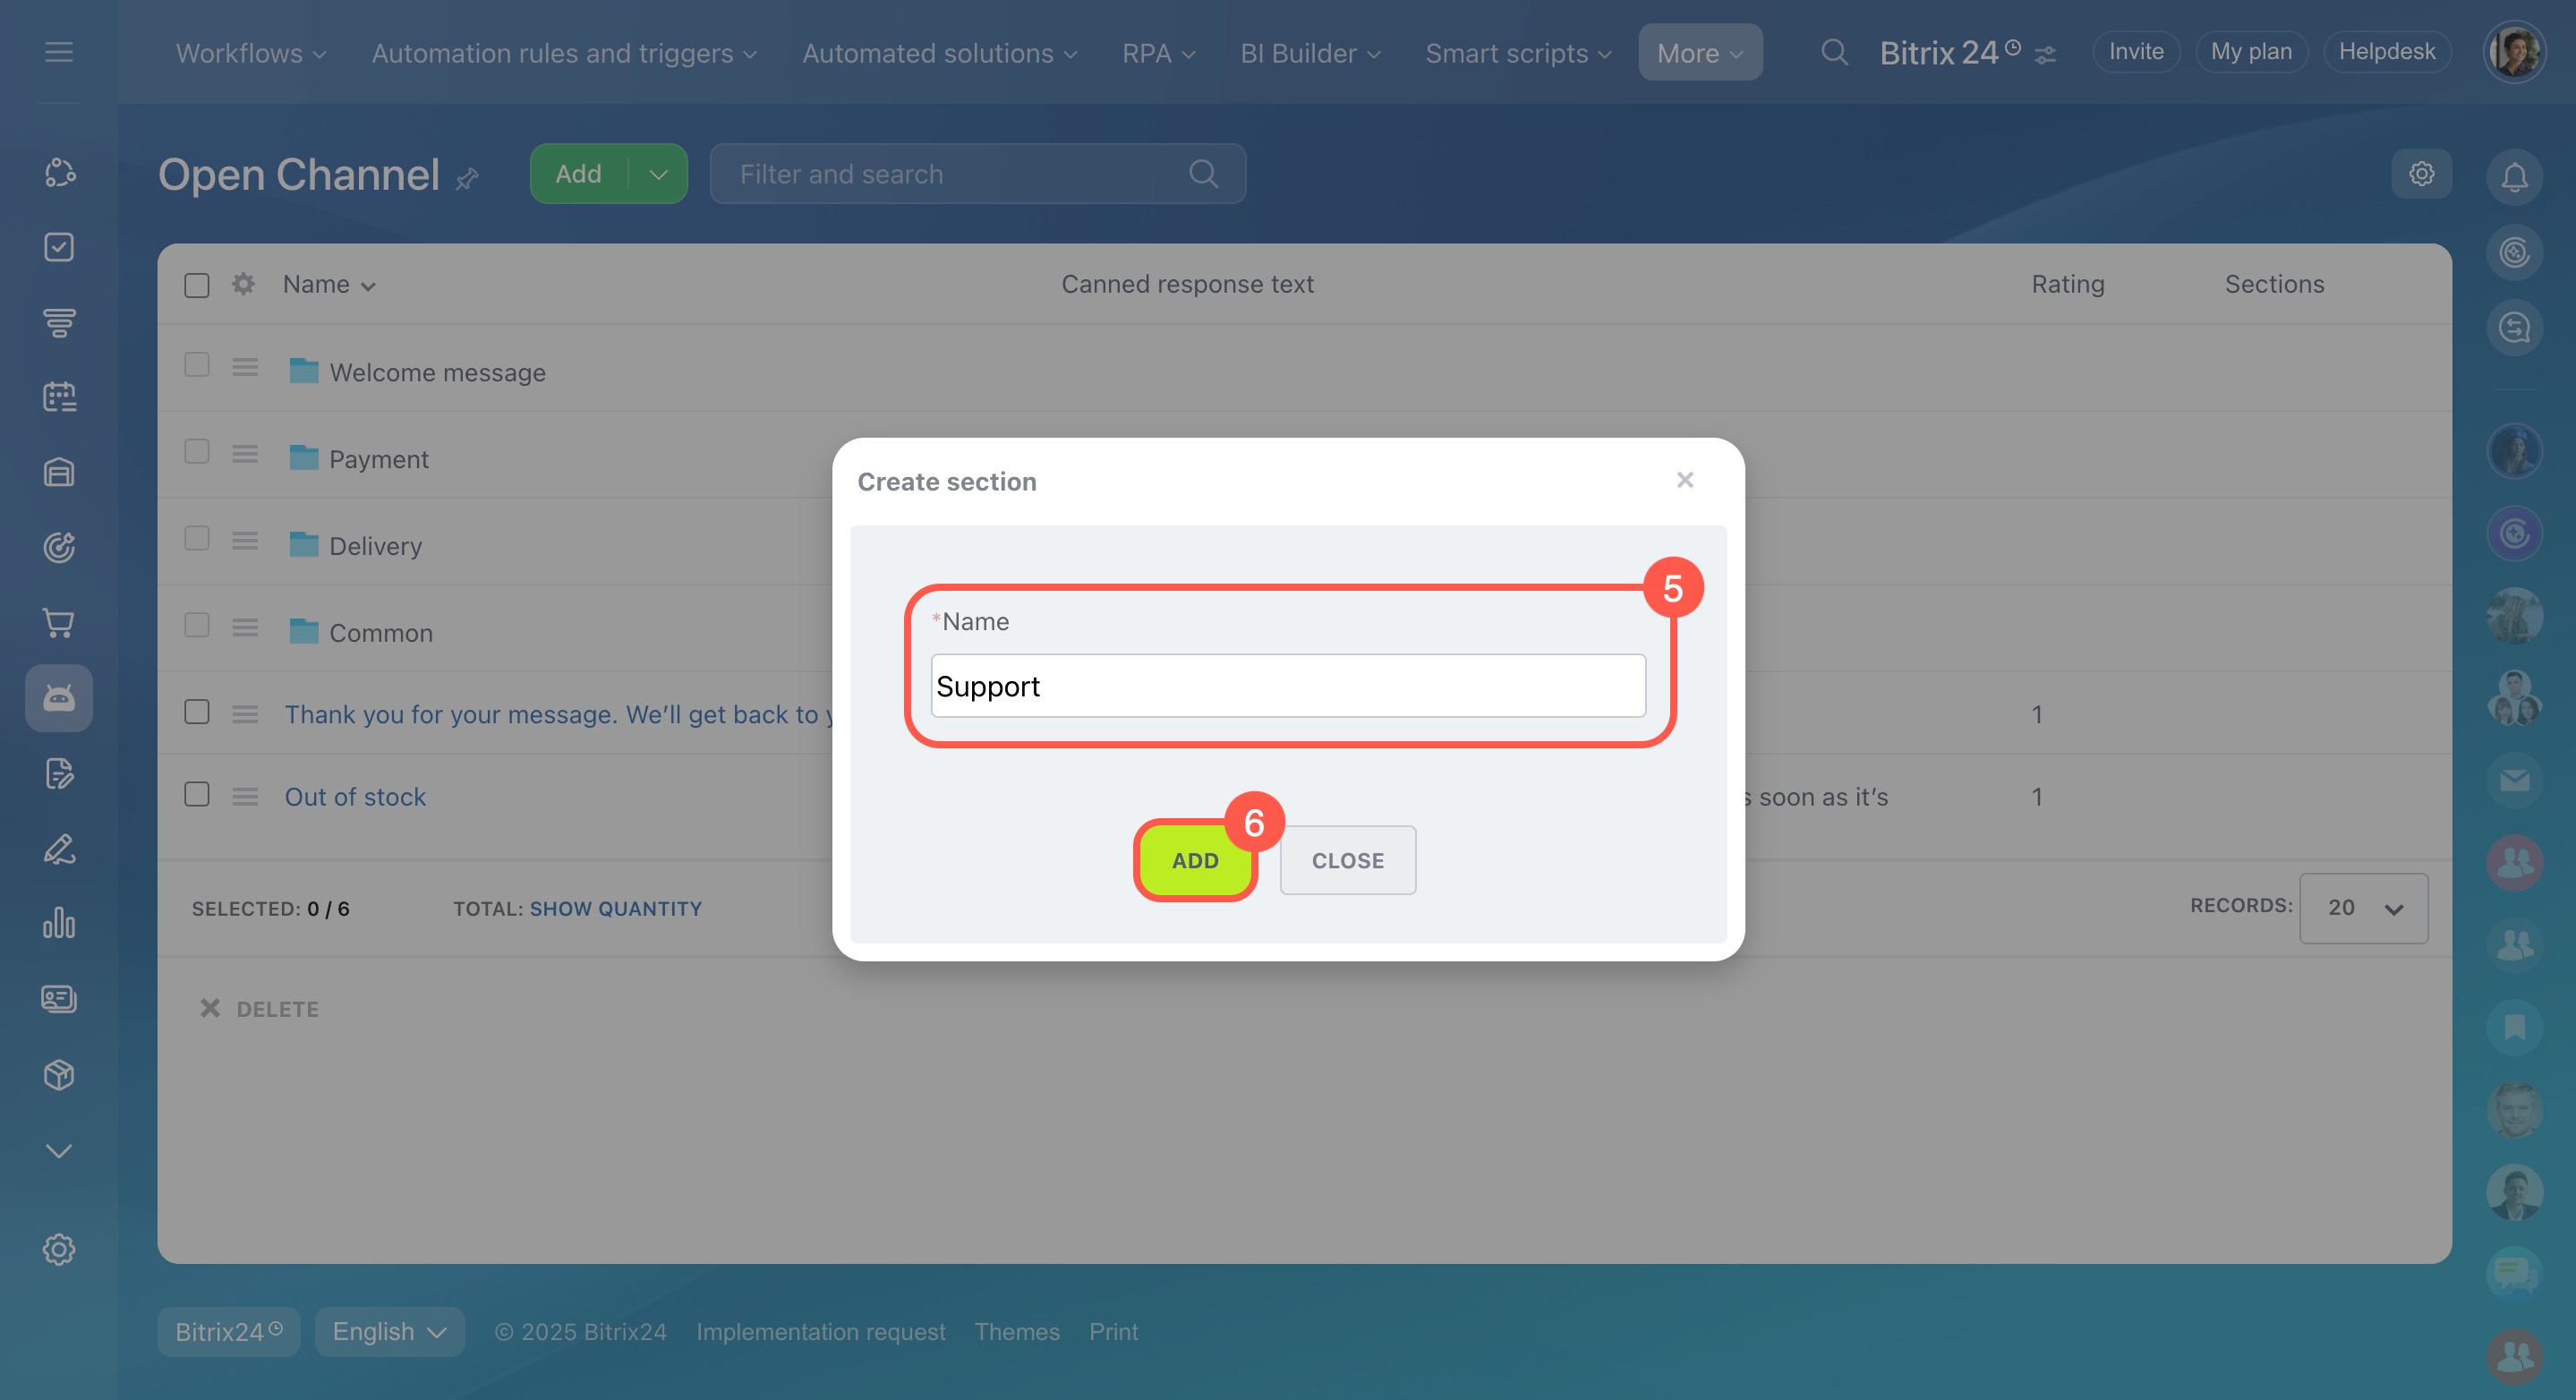
- Enter the section name.
- Click Add.
To rename or delete a section:
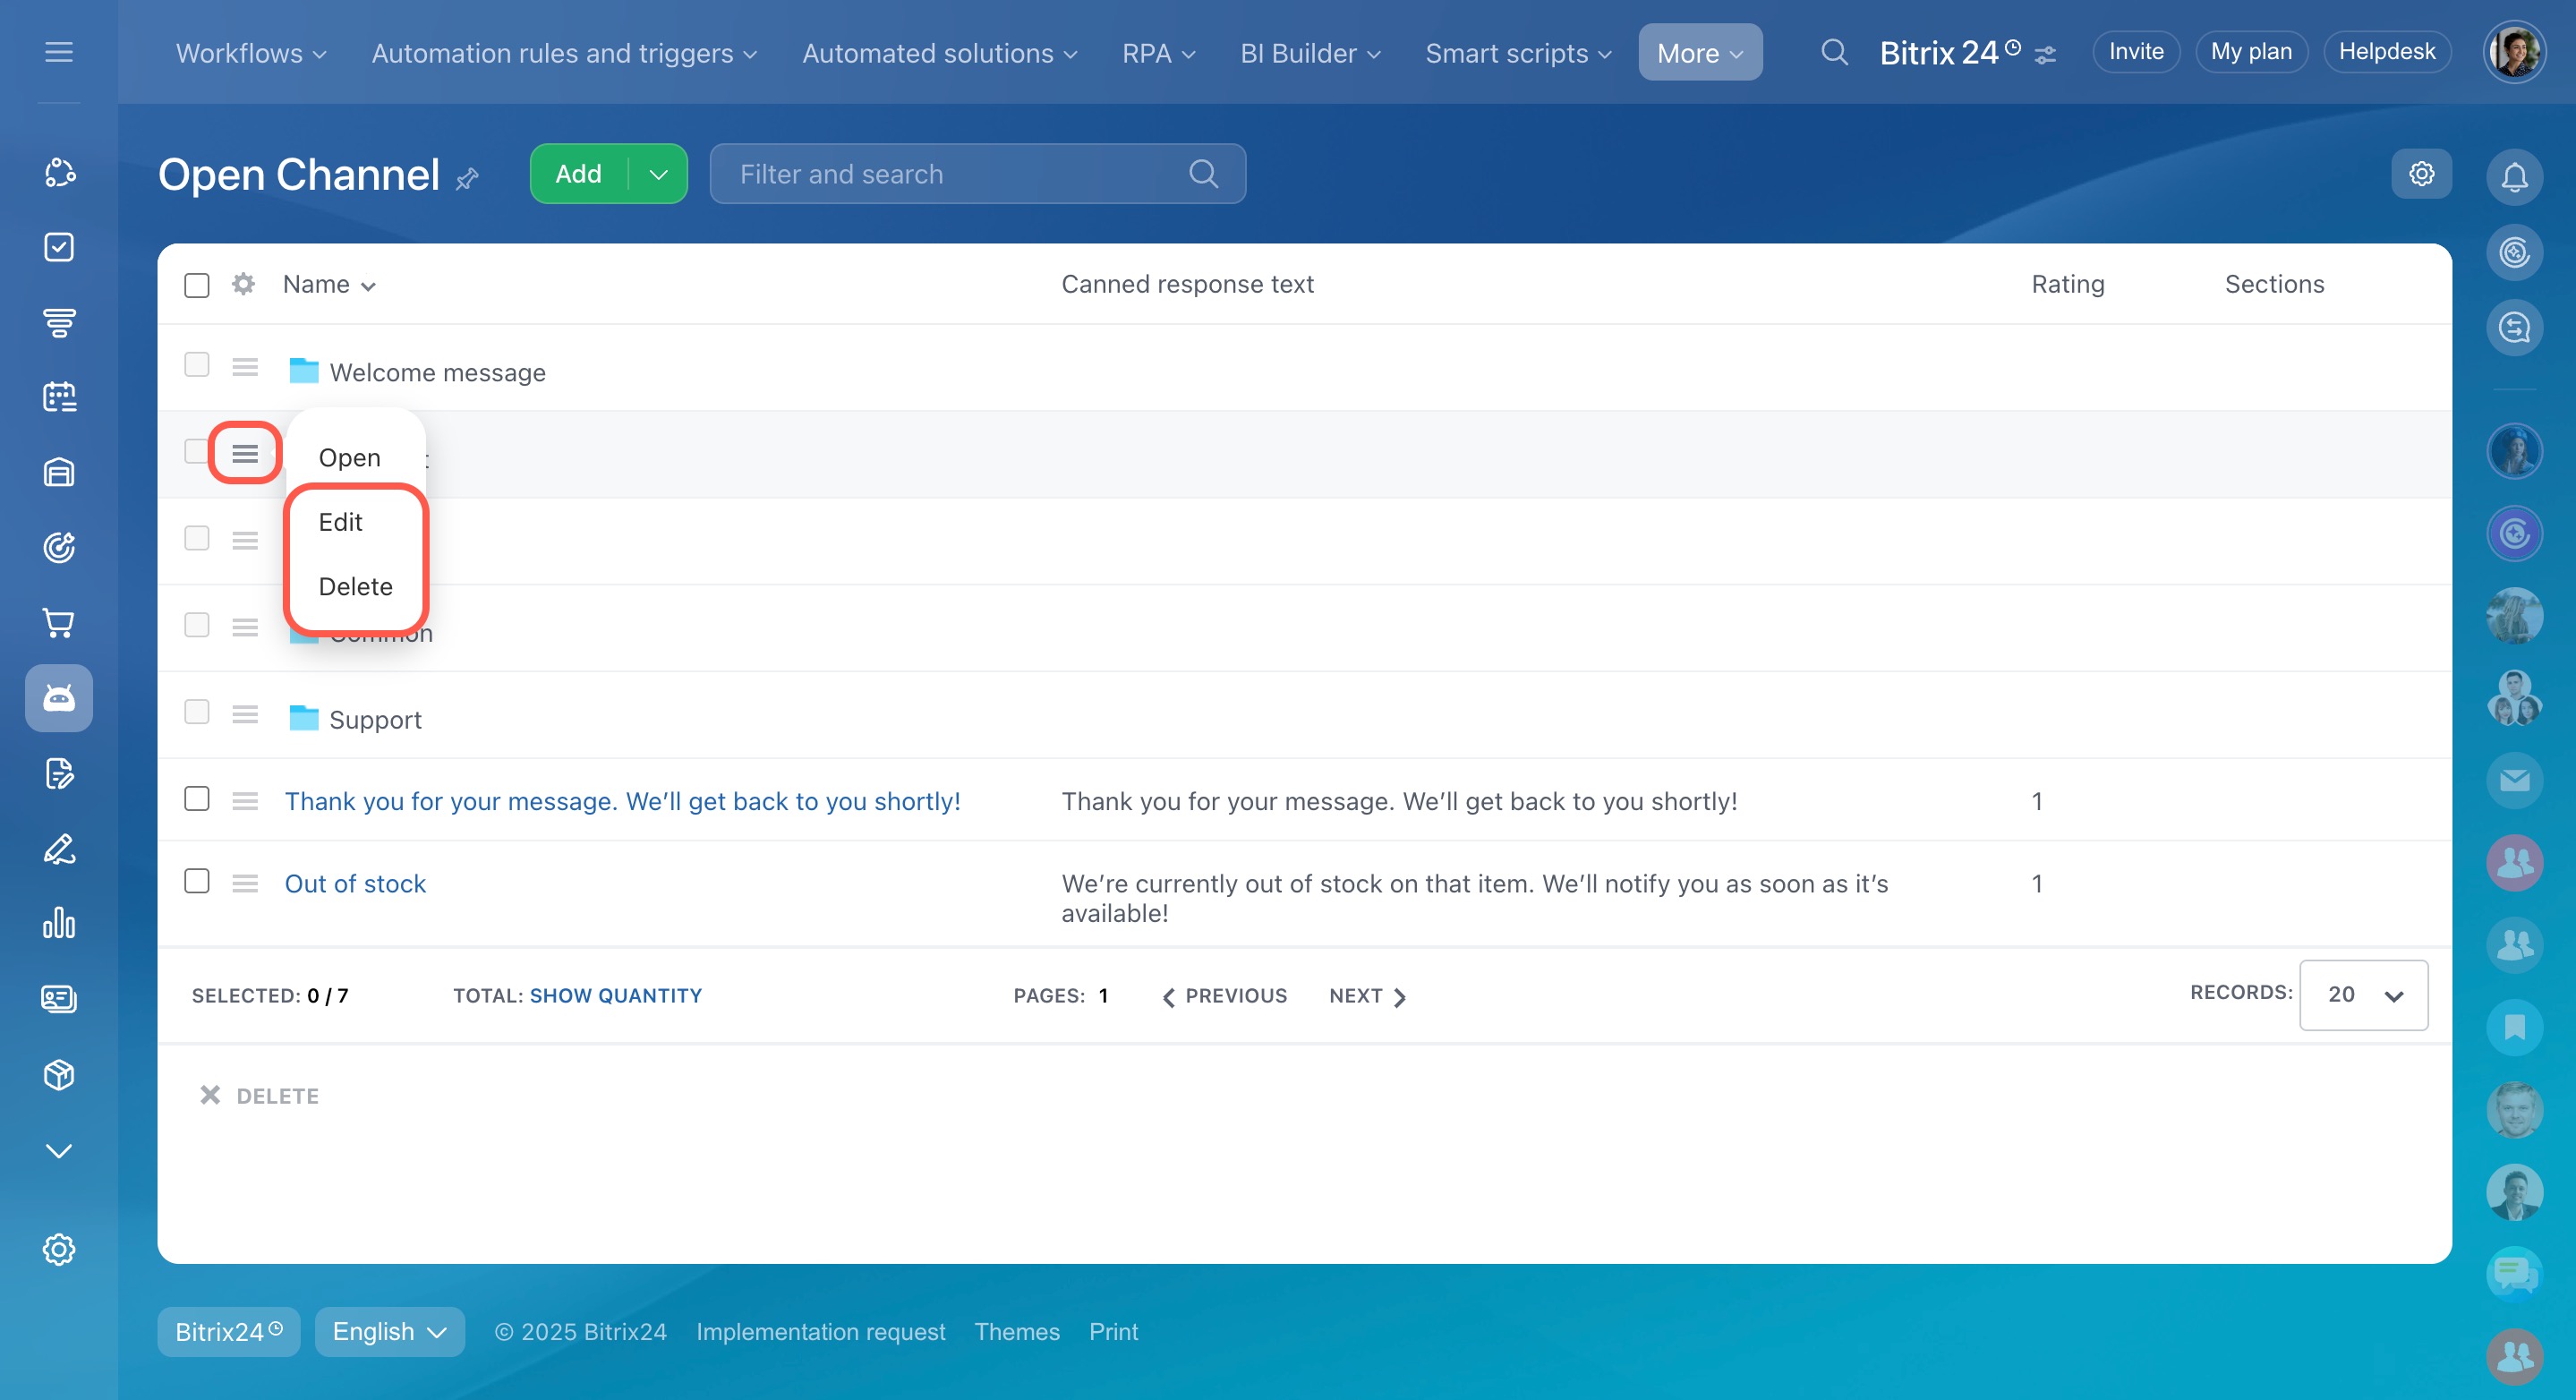
- Click the Menu (≡) icon next to the section name.
- Choose Edit to rename or Delete to remove the section.
Link the list to one or more Open Channels
You can link any canned response list to an Open Channel. This is helpful if you use the same replies across multiple channels—just connect one list to all of them.
- Go to CRM.
- Expand the Customers tab.
- Select Contact center.
- Choose a channel, such as Live chat.
- Click the name of the Open Channel in the list.
- In the Open Channel and permissions section, click Configure.
- Open the Auto Actions tab.
- Under Canned response list, select the list you want to link.
Set access permissions to canned responses
Administrators can control who can view and manage canned responses. Permissions can be set in the canned response list or Open Channel settings.
Assign admin permissions
Access permissions to Open Channels
From the canned response list.
- Click Settings (⚙️).
- Select Configure list settings.
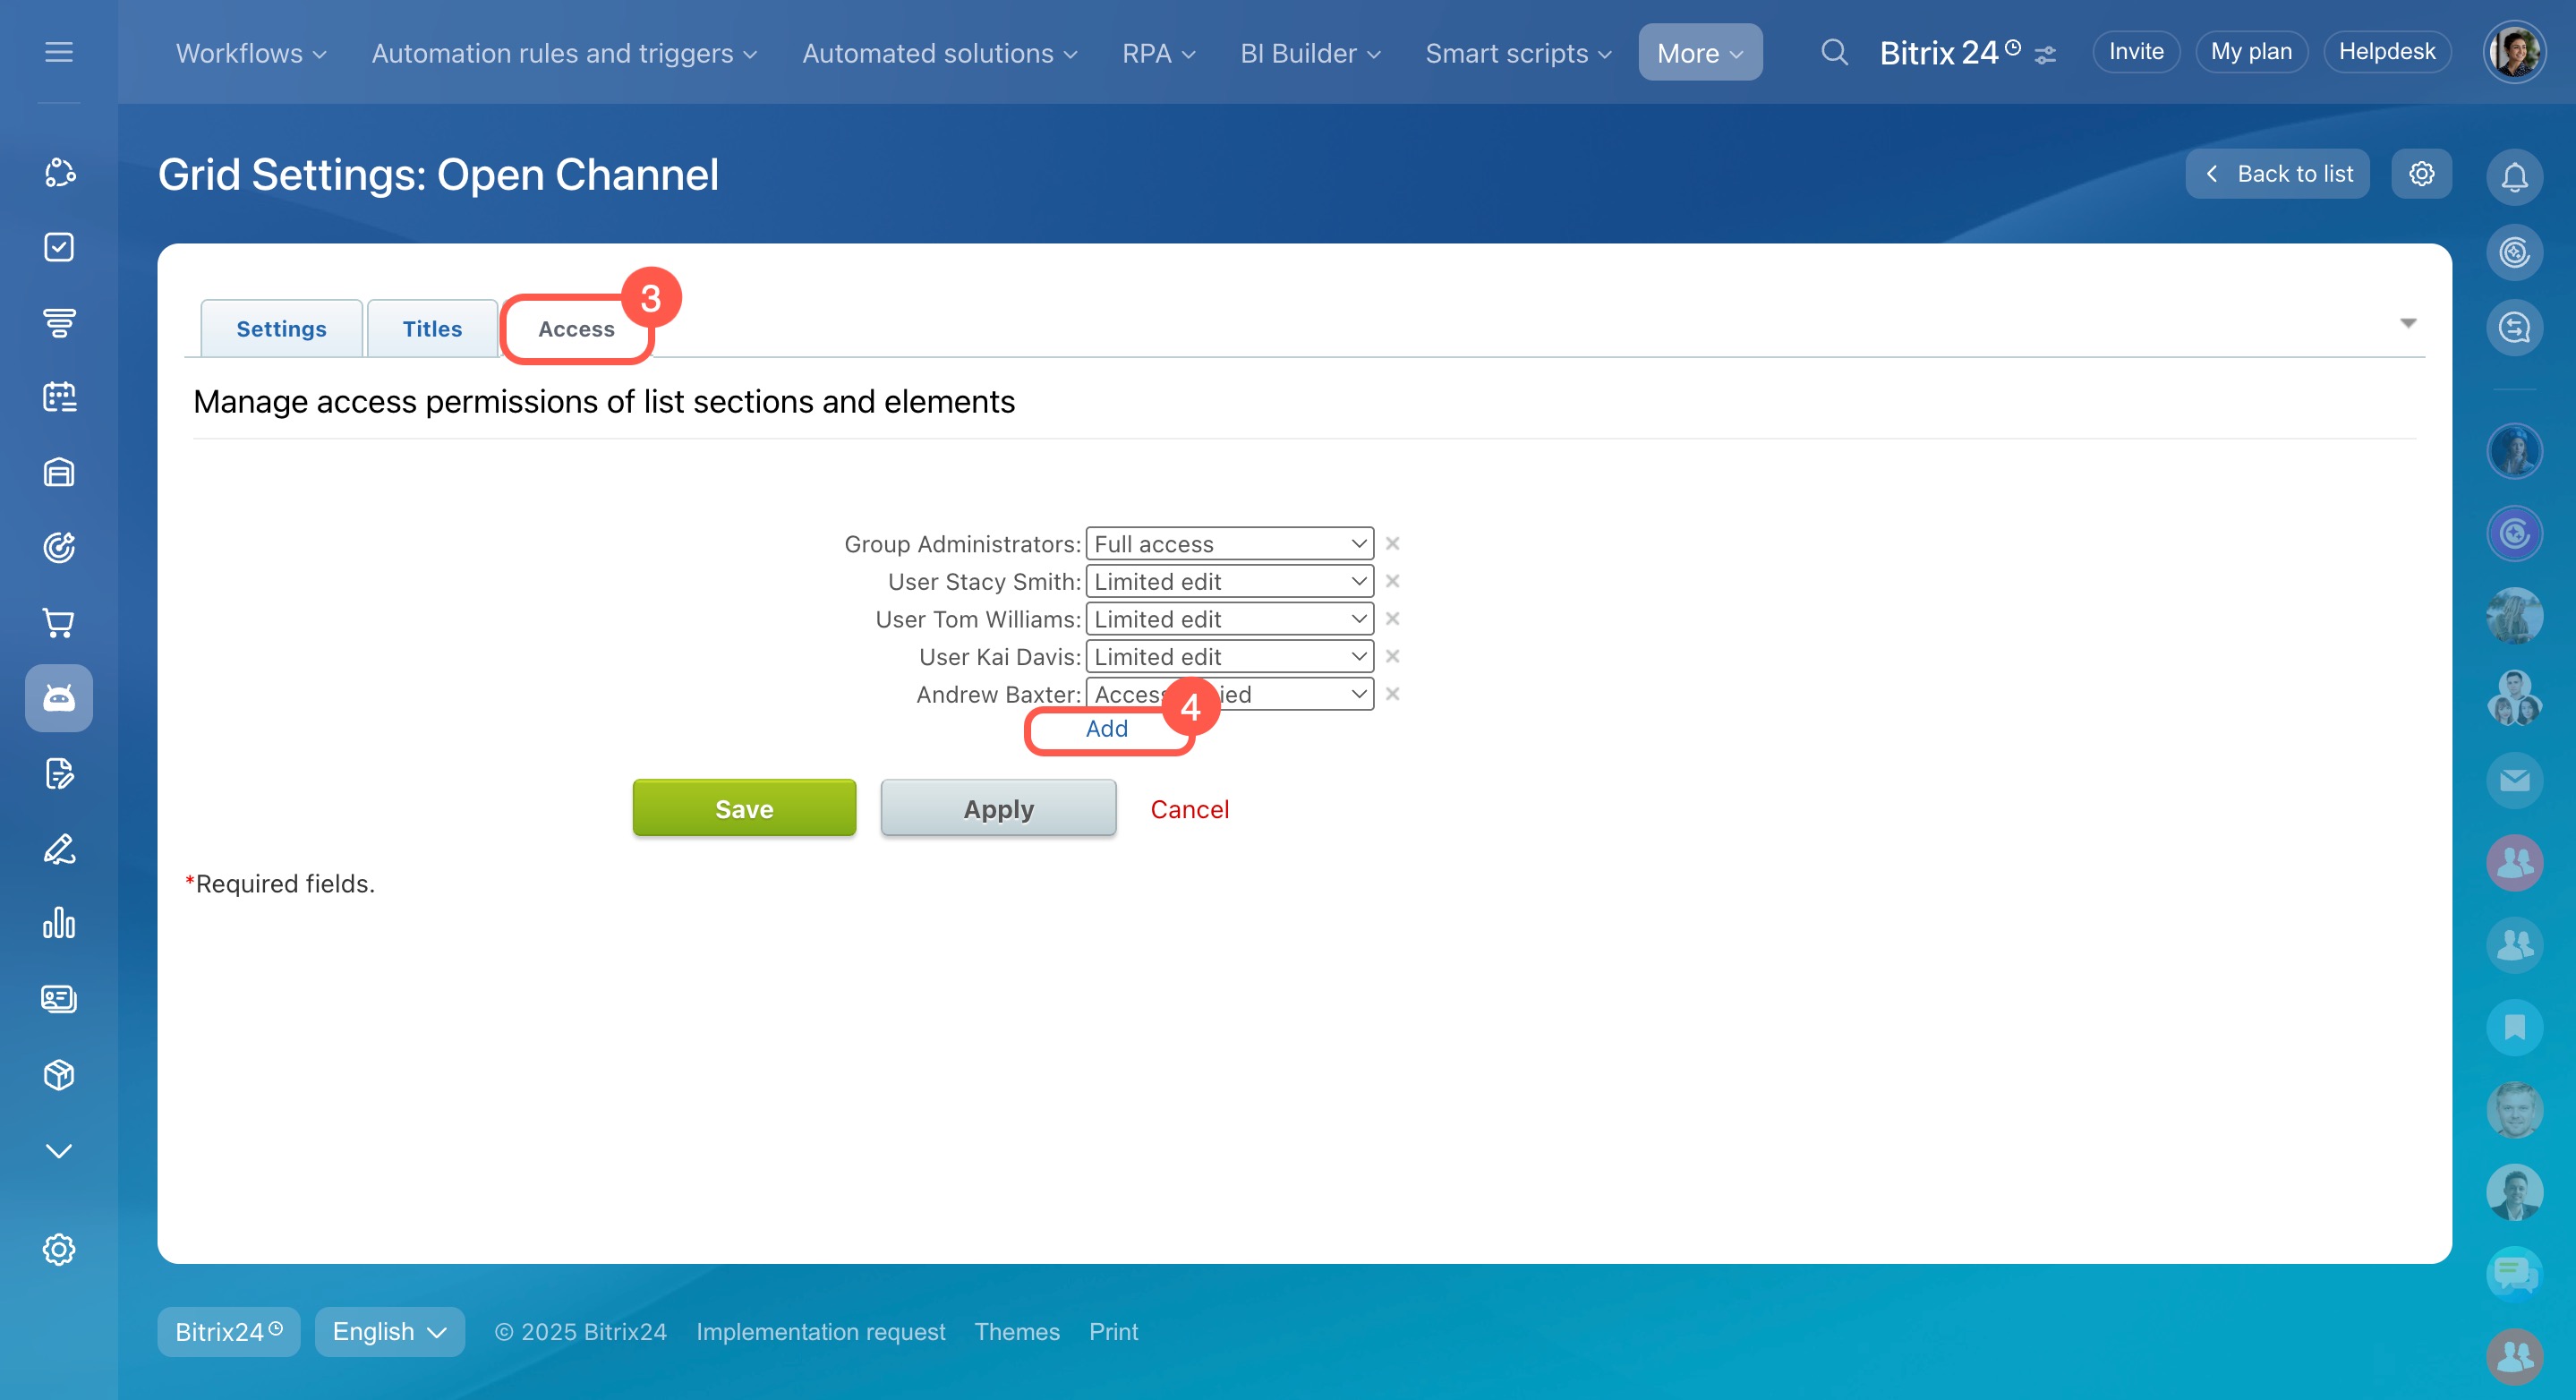
- Go to the Access tab.
- Click Add, choose a department or specific users, and set their access level.
From Open Channel settings.
- Go to CRM.
- Expand the Customers tab.
- Select Contact center.
- Choose a channel, such as Live chat.
- Click the name of the Open Channel in the list.
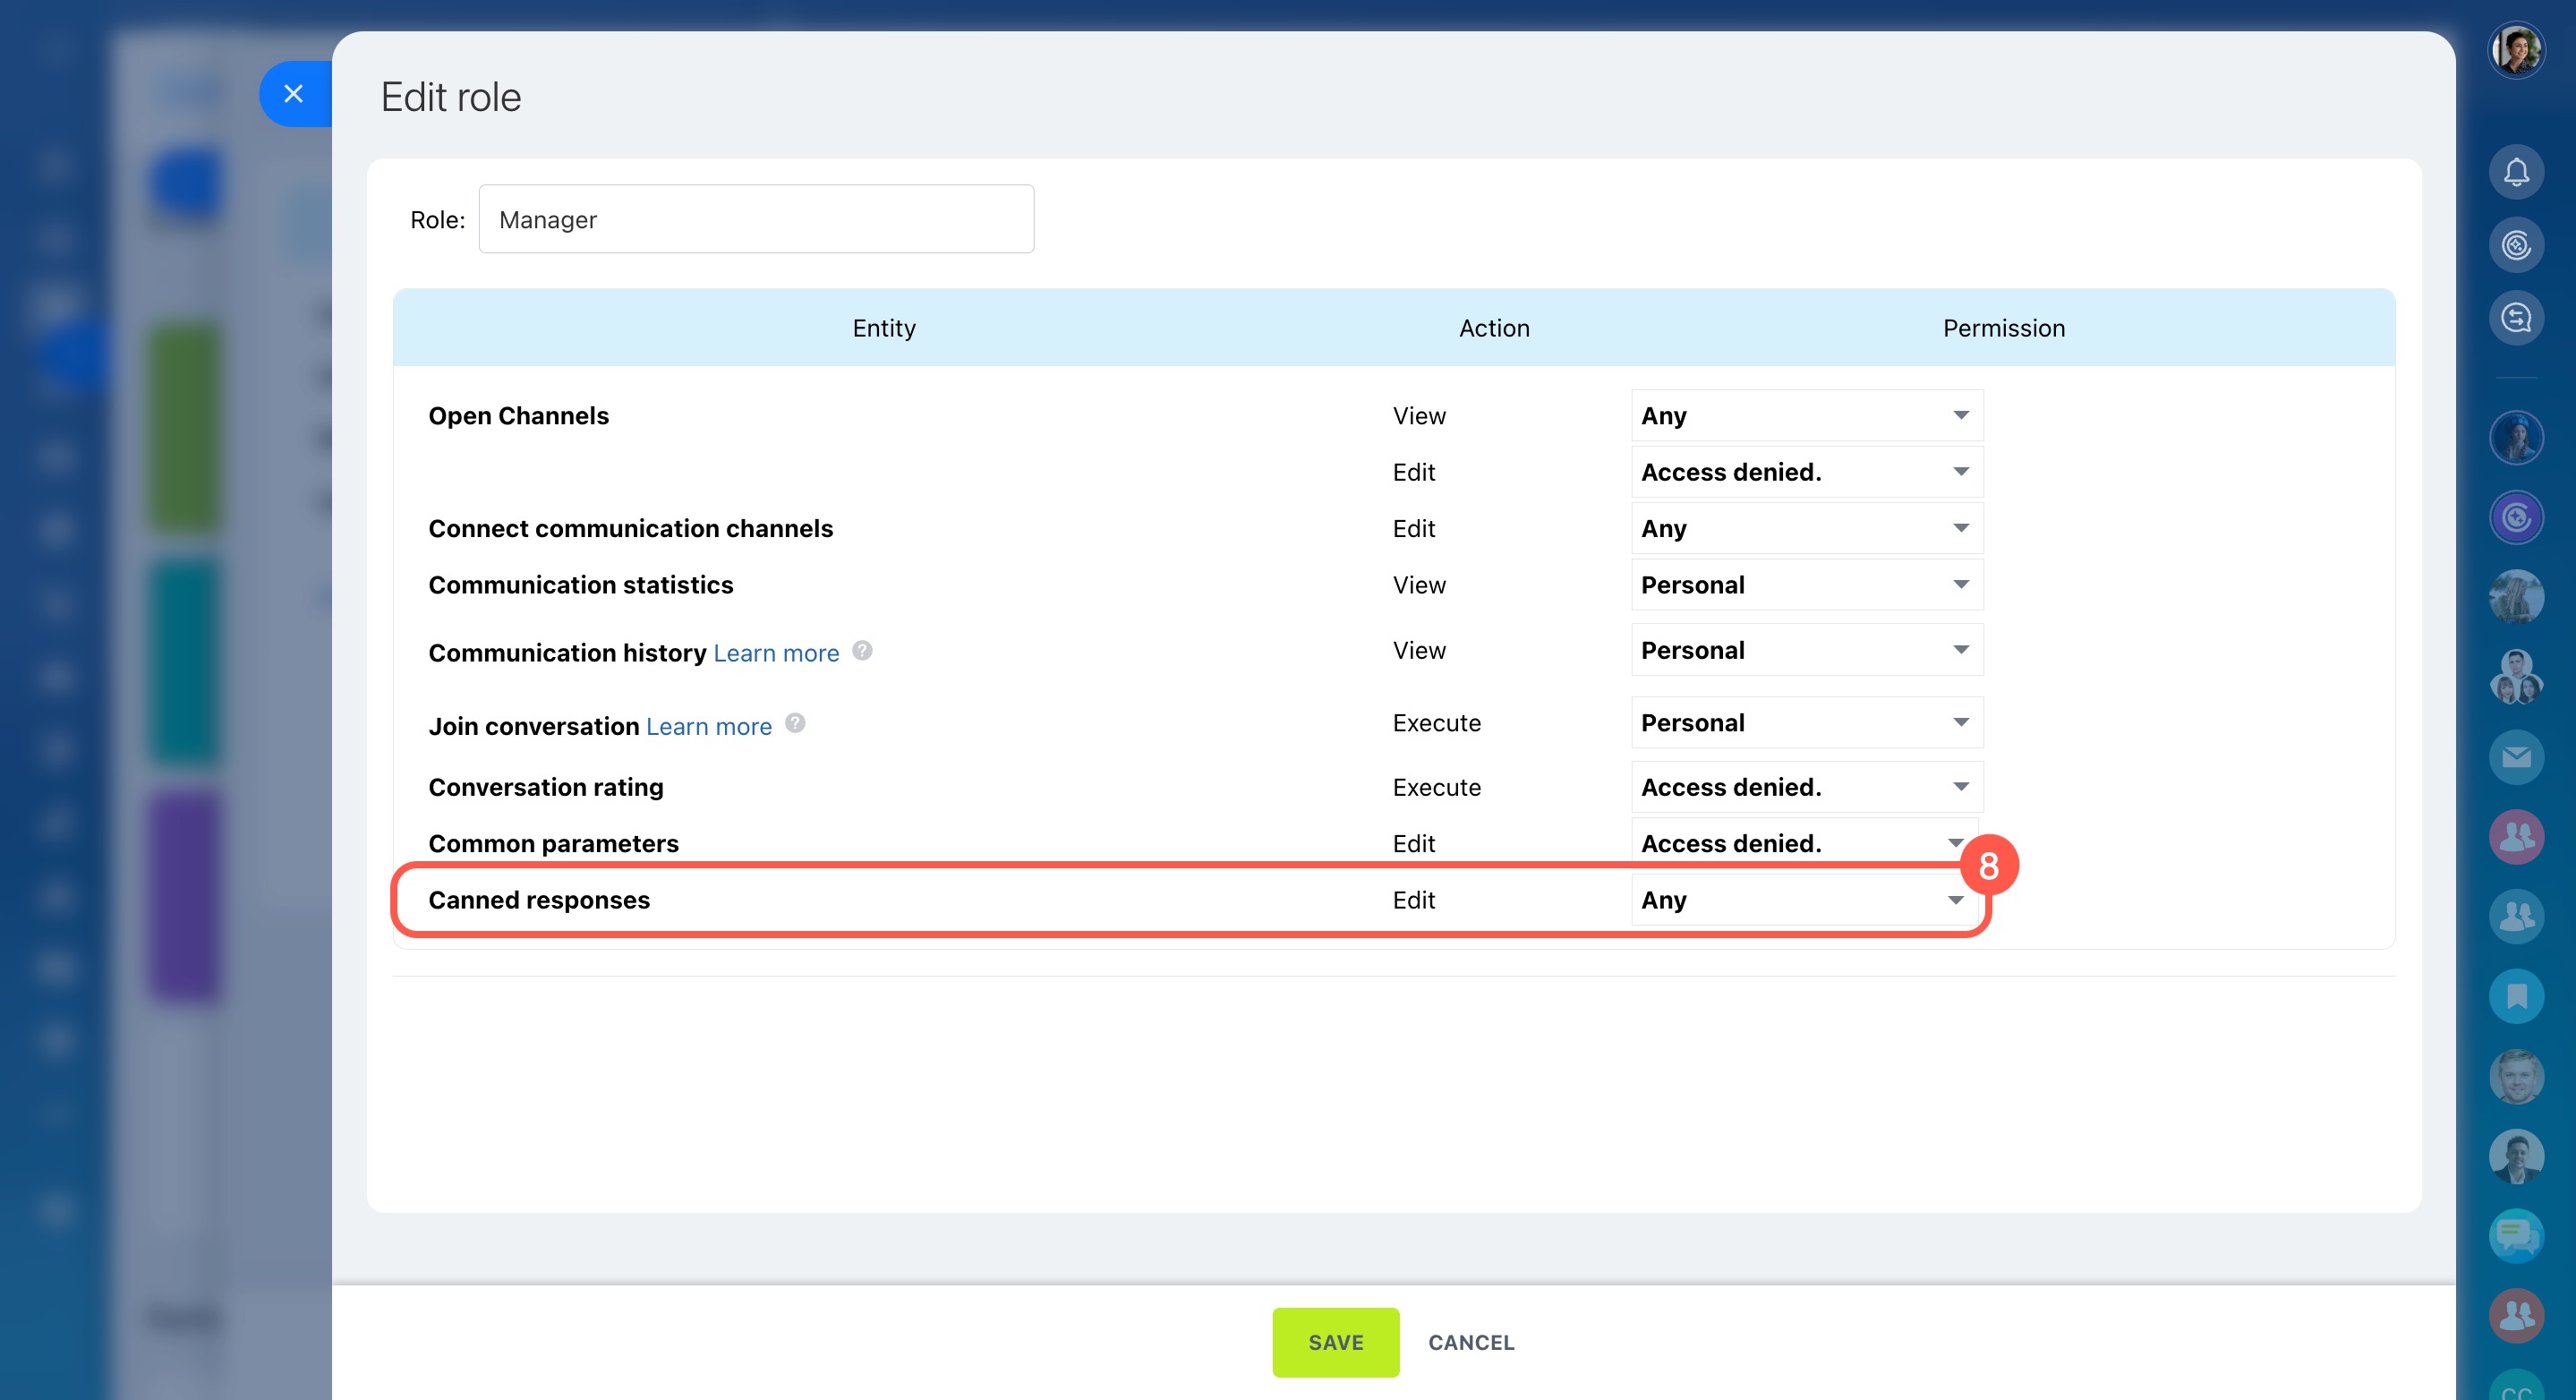
- Under Open Channel and permissions, click Access permissions > Configure.
- Click the pencil icon next to the role you want to edit.
- In the Canned responses row, set the access level.
Delete the list if it’s no longer needed
Only account administrators can delete a canned response list.
- Click Settings (⚙️).
- Select Configure list settings.
- In the window that opens, click Settings (⚙️) again, then select Delete list.
In brief
Canned responses are message templates that help agents quickly respond to common customer questions.
Create canned responses directly in customer chats and organize them into sections like Welcome messages, Payments, or Delivery.
If you haven't added any responses yet, Bitrix24 offers options to save a message as a canned response, create a new one, or access detailed settings.
Once a canned response is saved, agents can use it in conversations with just a few clicks.
When you create your first canned response, Bitrix24 automatically sets up a response list and links it to the current Open Channel. The list will be named after that channel.
You can customize the list by linking it to other Open Channels, editing responses and sections, and setting access permissions.
If you no longer need the list, you can delete it anytime.


