
BI analytics reports can use data on deal types. For example, to see which deals generate the most revenue.
Deal types
Bitrix24 has five standard deal types: Sales, Integrated sales, Merchandise sales, Services, and After sales service. These types appear with text names in reports (e.g., the sales deal type is called SALE). Custom deal types, however, will show up with an ID instead of a name.
To display custom deal type names in your reports, you need to find their IDs and rename them in Power BI or Google Looker Studio.
How to find the ID of a custom deal type
- Open a deal.
- Find the Deal type field.
- Inspect the web page code.
- Find the relevant line and copy the ID.


How to add custom deal types to Google Looker Studio reports
Go to CRM > Analytics > Real time analytics > BI analytics > Google Looker Studio. Install a template, for example, Universal data source for BI analytics, and connect to Google Looker Studio.
Connect Google Looker Studio

Open the report, add the Deal name column, and select the Deal type dimension.

The table will show deals with their types. Custom deal types will show IDs instead of names. To change this, click Add a field > Add calculated field.

Specify the field name, add the formula, and click Save.
Here's an example of a formula that replaces IDs with names:
CASE WHEN Deal type = "1" THEN "Equipment rental" WHEN Deal type = "2" THEN "Contract" ELSE Deal type END
-
CASE: Starts a conditional expression.
-
WHEN and THEN: Define conditions and their corresponding values. In this example, deal types 1 and 2 are renamed to Equipment rental and Contract.
-
ELSE: Specifies what to do with values that don't meet the conditions. Here, values not equal to 1 or 2 remain unchanged.
-
END: Ends the conditional expression.

Add this new field to dimensions, and the deal types will show names instead of IDs in the table.

How to add custom deal types to Power BI reports
Go to CRM > Analytics > BI analytics > Microsoft Power BI. Install and open a template, for example, Universal data source for BI analytics.
Connect Microsoft Power BI

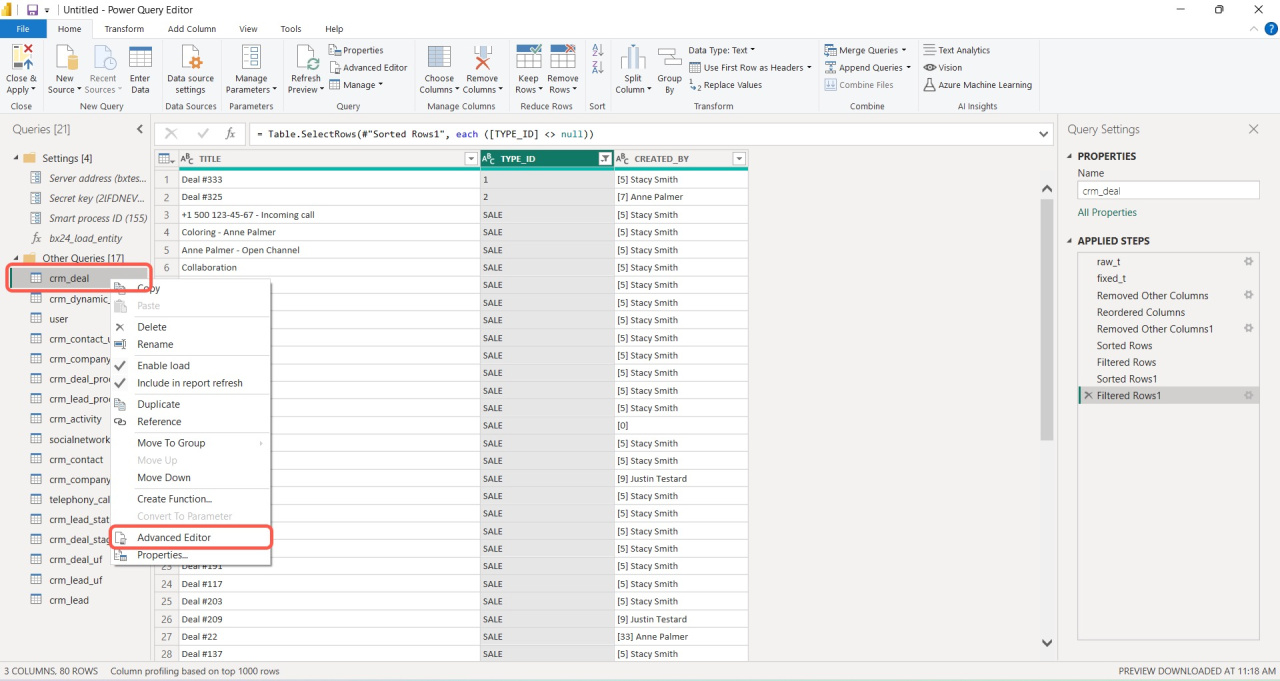
Click Transform data, select crm_deal, and find the TYPE_ID column in the table. Custom deal types will have IDs instead of names.

To change this, you need to edit the query. Right-click crm_deal and open Advanced Editor.
In the pop-up window, add the following formula to replace the IDs with your own deal type names:
replacedTypes = Table.TransformColumns( fixed_t, { {"TYPE_ID", each if _ = "1" then "Equipment rental" else if _ = "2" then "Contract" else _} } ) in replacedTypes

After adding the formula, the deal types will show names instead of IDs in the table.

In brief
-
BI analytics reports can use data on deal types.
-
To display custom deal type names in your reports, find their IDs and rename them in Power BI or Google Looker Studio.
-
Find the Deal type field in the deal form and inspect the web page code to view the field's value ID.
-
In Google Looker Studio, use a calculated field to change the names.
-
In Power BI, add a special formula to the query to rename the deal types.
