
Bitrix24 Booking helps businesses manage appointments and service requests. Clients can book appointments through website forms, while employees can add bookings manually in the CRM. Booking works for different types of service businesses. For example, a beauty salon can let clients book appointments with a specialist through its website, while an auto repair shop can schedule technicians and manage service requests in the CRM.
You can use Booking in two ways:
- Without the CRM. Use this option when booking is a standalone process. For example, a building supply store can schedule material deliveries without linking them to sales or CRM items. Logistics employees can manage requests and view the schedule directly in the Booking section.
- With the CRM. Use this option when booking is part of managing client relationships. For example, a window installation company can schedule technician visits, with each booking automatically saved in the corresponding deal.
In this article:
Booking scenarios
You can set up Booking for different types of businesses. Here are three common scenarios:
Simple services. Use this option when one specialist provides a service without additional equipment. Examples include a doctor's appointment or an online consultation with a lawyer. In Booking, create resources such as "Consultant" or "Lawyer." For each resource, set a work schedule, appointment duration, and automatic reminders. Employees can book clients manually, or you can add a booking form to your website. In both cases, the booking appears in the schedule, and the CRM tracks its status. The client receives an appointment reminder, and the employee receives a booking confirmation. This reduces administrative work and helps prevent no-shows.
Services requiring multiple resources. Some services require several resources at the same time, such as employees and equipment for on-site cleaning. For these services, use a resource bundle. In Booking, select a primary resource and add any additional resources. For example, a cleaning crew can be the primary resource, while equipment is an additional resource. Bitrix24 automatically checks resource availability and shows only time slots when all required resources are available. For an air conditioner installation, you can book a technician and a lift truck for the same time slot.
Booking: resource bundles
High-volume services. Use this option for businesses with a steady flow of clients, such as auto repair shops, dental clinics, and beauty salons. The goal is to make the most of available resources and handle incoming requests. In Booking, set up resources, such as five mechanics, and appointment durations of 15 to 30 minutes. If all time slots are booked, employees can add clients to the waiting list. When someone cancels an appointment, employees can offer the available time slot to a client on the list. This helps fill canceled appointments and reduce downtime. Bitrix24 sends reminders and tracks booking statuses so employees can follow up with clients when needed.
Booking: how to add a client to the waiting list
Set up booking
Add the resources clients can book, such as employees, equipment, or rooms. Then set up their schedules and automatic reminders. Clients receive reminders before their appointments. Employees can also add bookings manually after speaking with a client by phone, in a chat, or in person. Booking details are saved in the deal timeline and displayed in the Booking section.
Setting up Booking involves three steps:
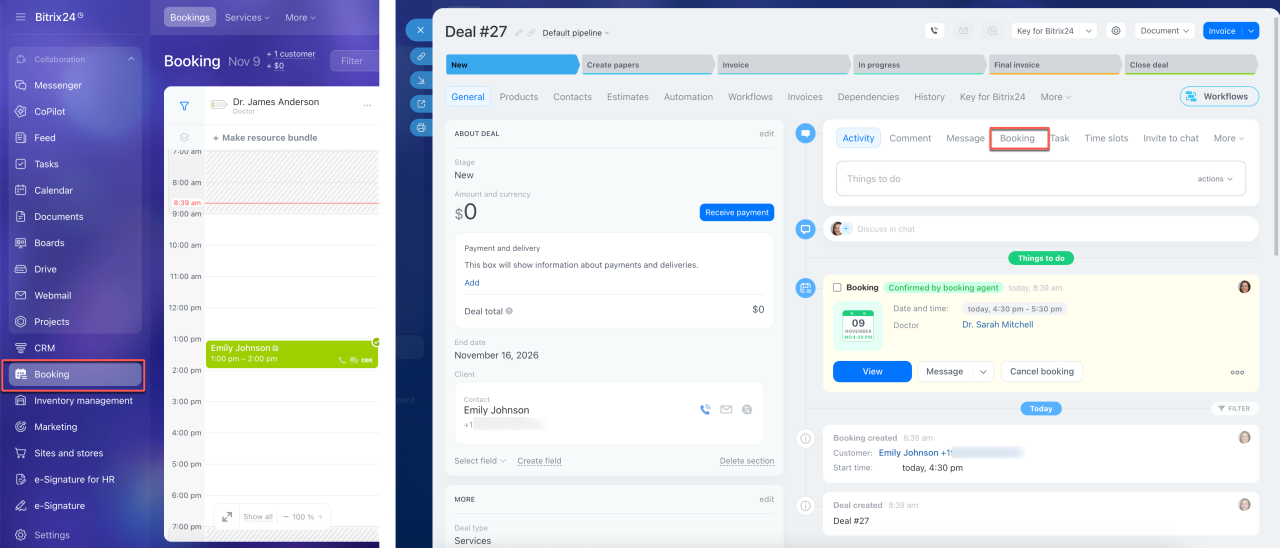
1. Add booking resources. Start by adding resources, such as employees, rooms, or equipment that clients can book. For example, a clinic might add doctors and exam rooms, while a training center might add instructors. Open the Booking section from the deal form or the side menu, click Add a resource, and select an industry.
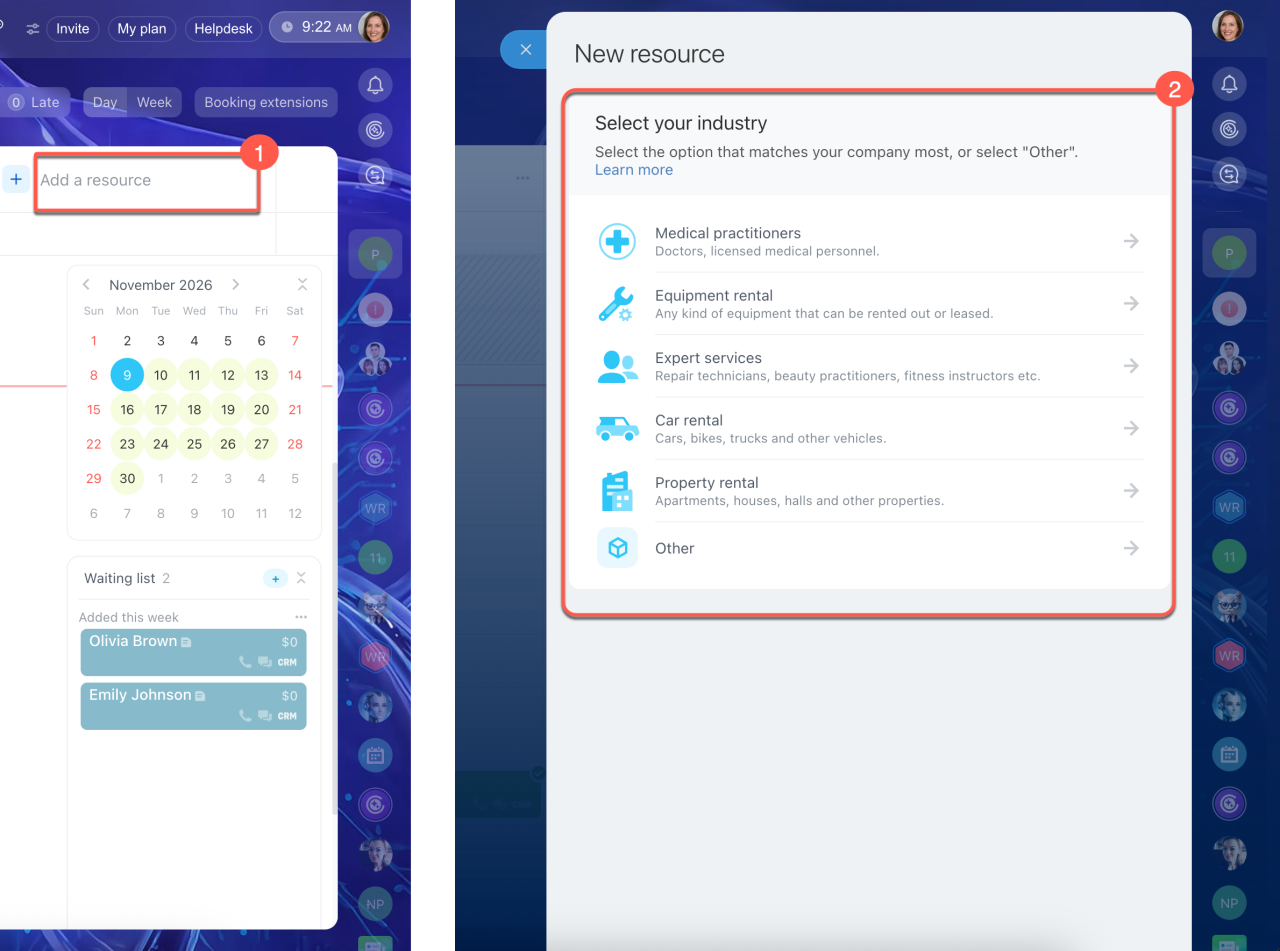
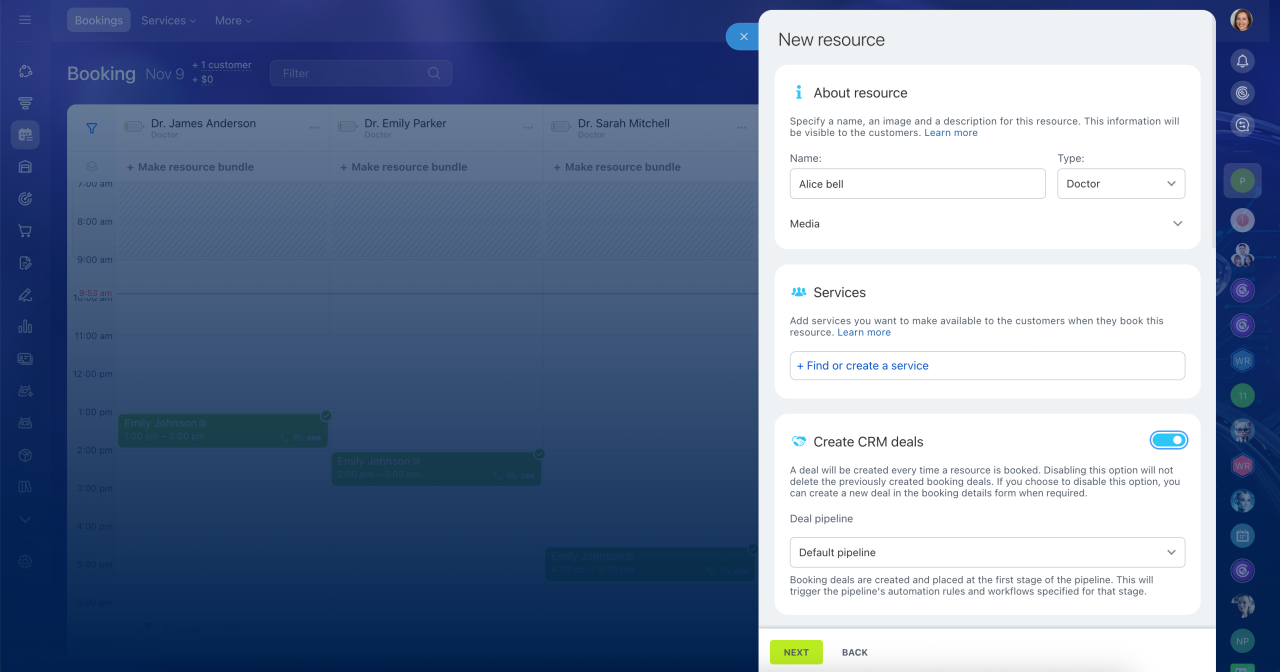
2. Set up the schedule and booking duration. Enter a resource name that both employees and clients can see. If all resources follow the same schedule, set shared working hours. Otherwise, set a separate schedule for each employee or resource. For example, a specialist may work only on weekends, while a hall may be available for rent only on weekdays. Set the booking duration based on the service: a consultation may take an hour, an appointment 30 minutes, and a hall rental two hours. You can adjust the booking duration manually in the deal when needed.
Choose how resources appear in the schedule:
- In columns — for primary resources required for bookings, such as specialists, rooms, or halls. These resources are always visible as separate columns in the schedule. Use this option when a booking can't take place without the resource.
- In a list — for additional resources that are needed only for certain bookings, such as equipment or machinery. These resources aren't always visible in the schedule. Employees can select them from the list when needed. This option works well for resource bundles. For example, if a service requires both a specialist and equipment, the specialist appears in the schedule, while employees can add the equipment from the list.
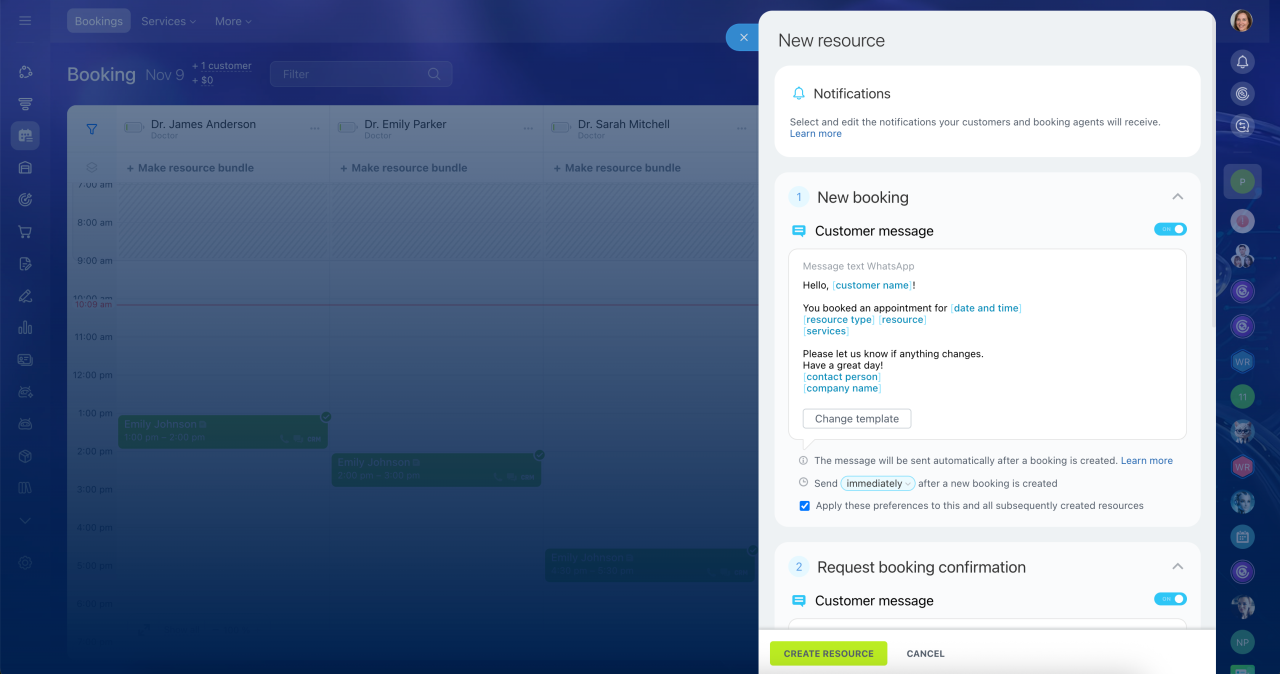
3. Set up notifications and reminders. Bitrix24 helps automate client communication and employee notifications. Four notification types are available. For each type, you can enable notifications, choose when to send them, and select a recipient.
- New booking. The CRM sends the client a message with the appointment date, time, service name, and resource. By default, the message is sent immediately after the booking is created, but you can change the timing, for example, to 10 minutes or one hour later. It lets clients know their booking was successful.
- Request booking confirmation. The client receives a message with a link to confirm the appointment. By default, the message is sent one day before the appointment, but you can choose a different time. If the client doesn't confirm, a red counter appears in the schedule. The CRM can also notify the employee by creating an activity in the CRM item form. The employee can then contact the client to check whether they plan to attend. This is especially useful for services that require an on-site visit or advance preparation.
- Reminder. The CRM automatically reminds clients about upcoming appointments. You can choose when to send the reminder, such as the morning of the appointment. This is useful for appointments booked well in advance.
- Customer is late. If a client doesn't arrive on time, you can set up notifications for both the client and the employee.
Choose who receives notifications:
- The client. A message is sent, for example, 10 minutes after the scheduled appointment time. It asks the client to confirm whether they still plan to arrive.
- The employee. If the appointment hasn't been confirmed, the CRM creates an activity so the employee can contact the client or free up the time slot.
This is useful for businesses with tightly scheduled appointments.
After setup, the resource appears in the schedule. You can add bookings to a resource manually or connect a CRM form so clients can book independently.
Booking: Getting started
Add a resource to the Booking section
Add a customer booking
Booking in CRM
Use CRM forms for client booking
In Bitrix24, you can create a CRM form that lets clients book appointments through your website or social media. Clients choose a service, specialist, and convenient time, and the booking details are automatically saved in the CRM.
Three form types are available. Choose the one that best fits your needs:
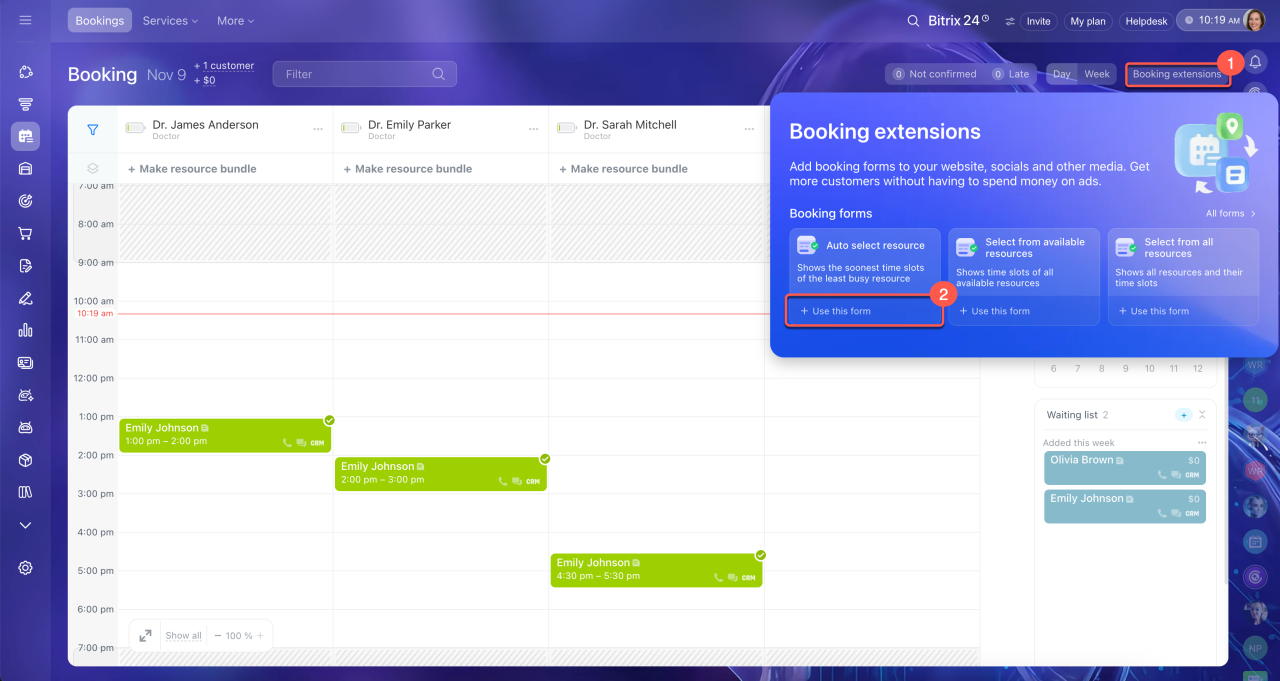
- Auto select resource — Bitrix24 suggests the earliest available time slot and an available specialist. Use this option when clients want to book quickly and don't have a preference for a specific specialist.
- Select from available resources — clients see available time slots for specialists on the selected date and choose a time. Use this option when clients care about the date and time but don't need a specific specialist.
- Select from all resources — clients choose a specialist, date, and time. Use this option when clients want to book a specific specialist, such as their doctor or stylist.
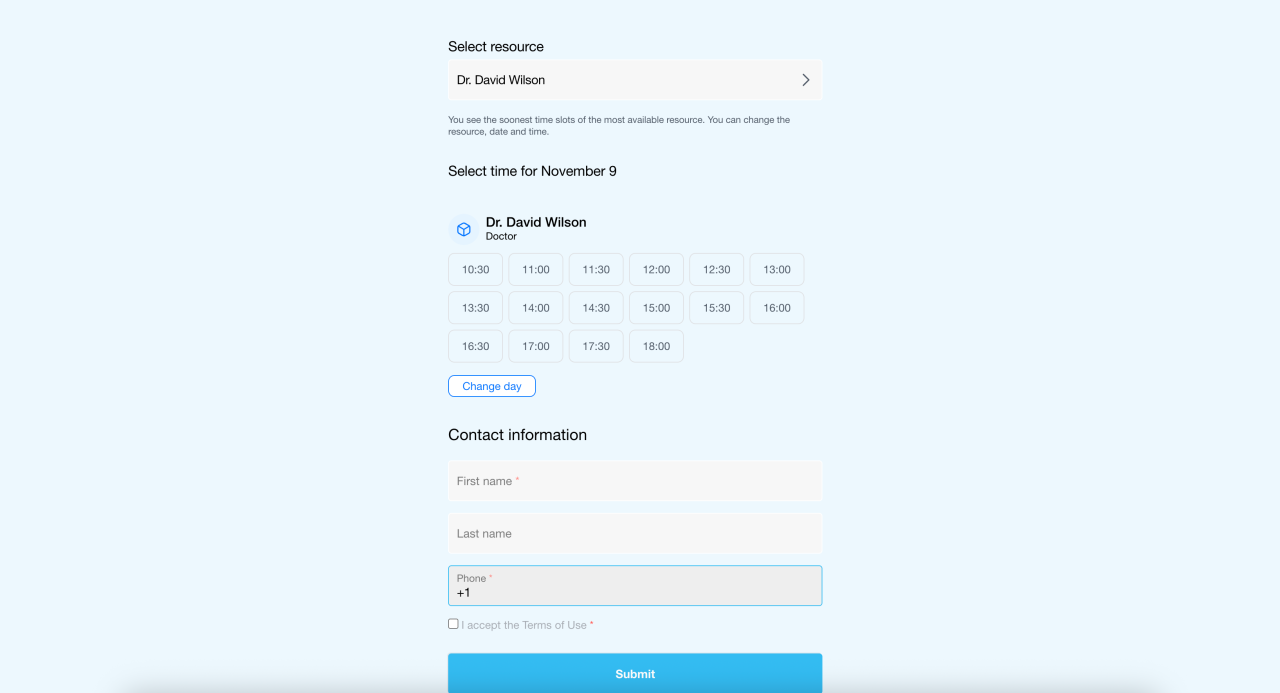
To create a booking form, follow four steps.
1–2. Open the Booking extensions section, choose a form type and click Use this form.
3. Set up the fields: specify services and resources.
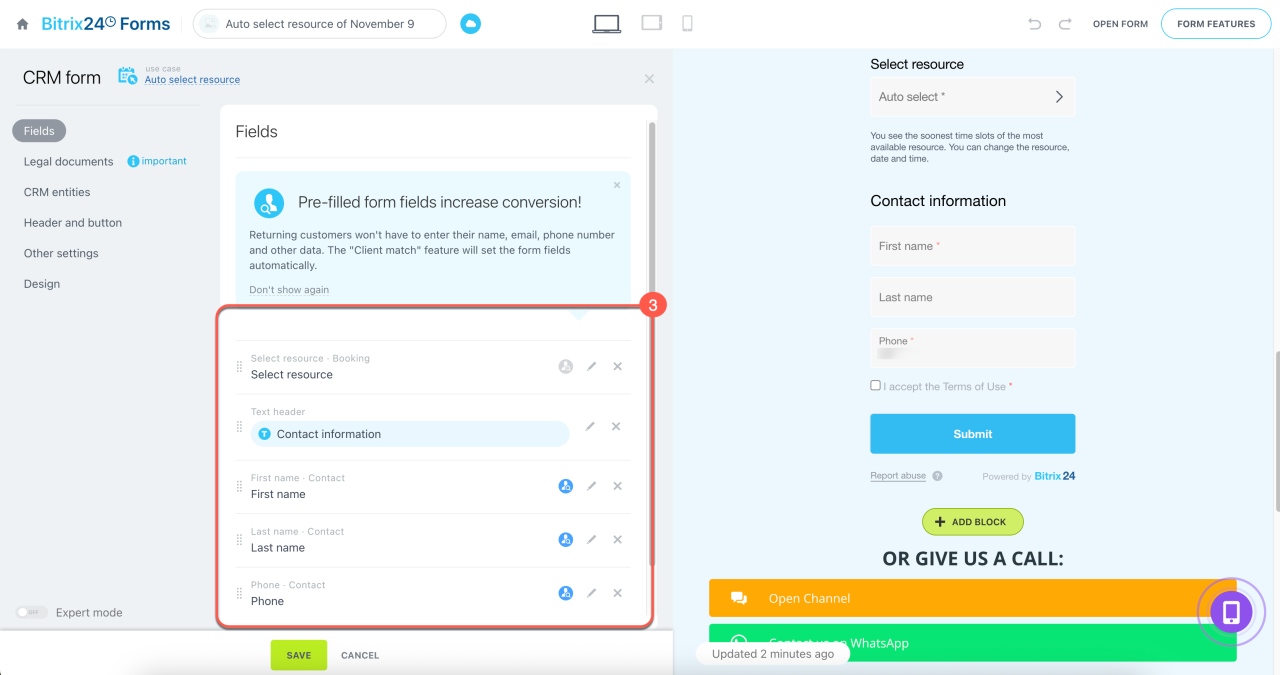
4. Save and publish the form. It's ready to use on your website, social media, or messengers.
Create a resource booking form
In brief
- Bitrix24 Booking helps you manage appointments and service requests through the CRM or website forms.
- Booking supports simple services, services requiring multiple resources, and high-volume services. Employees can create bookings manually, or clients can book online.
- To get started, add resources such as employees, rooms, or equipment. Then set their work schedules and booking durations.
- Set up notifications and reminders to keep clients informed about their appointments and alert employees when a booking hasn't been confirmed.
- To let clients book online, connect a CRM form. Clients can choose a service and time slot, and their booking details are automatically saved in the CRM.