A modifier is a special code that changes the field format. It is placed inside a symbolic code after the tilde symbol (~). For example, in {DocumentCreateTime~F j, Y, g:i a}, DocumentCreateTime is the field code, and F j, Y, g:i a is the modifier.
To understand how to use modifiers, start by reading the article about symbolic codes, as modifiers won't function without them.
Symbolic codes: what they are used for
You can only use modifiers on fields with a defined data type.
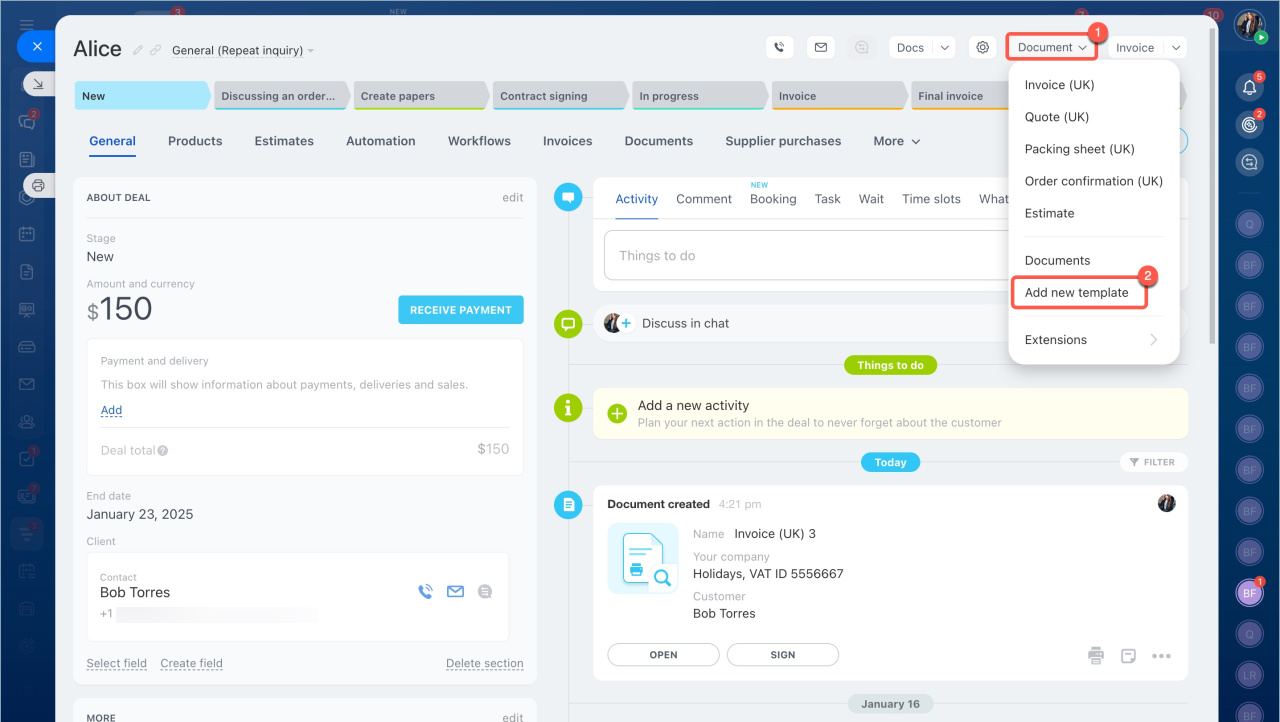
- Go to the CRM section and open a deal form.
- Click Document and select Add new template.
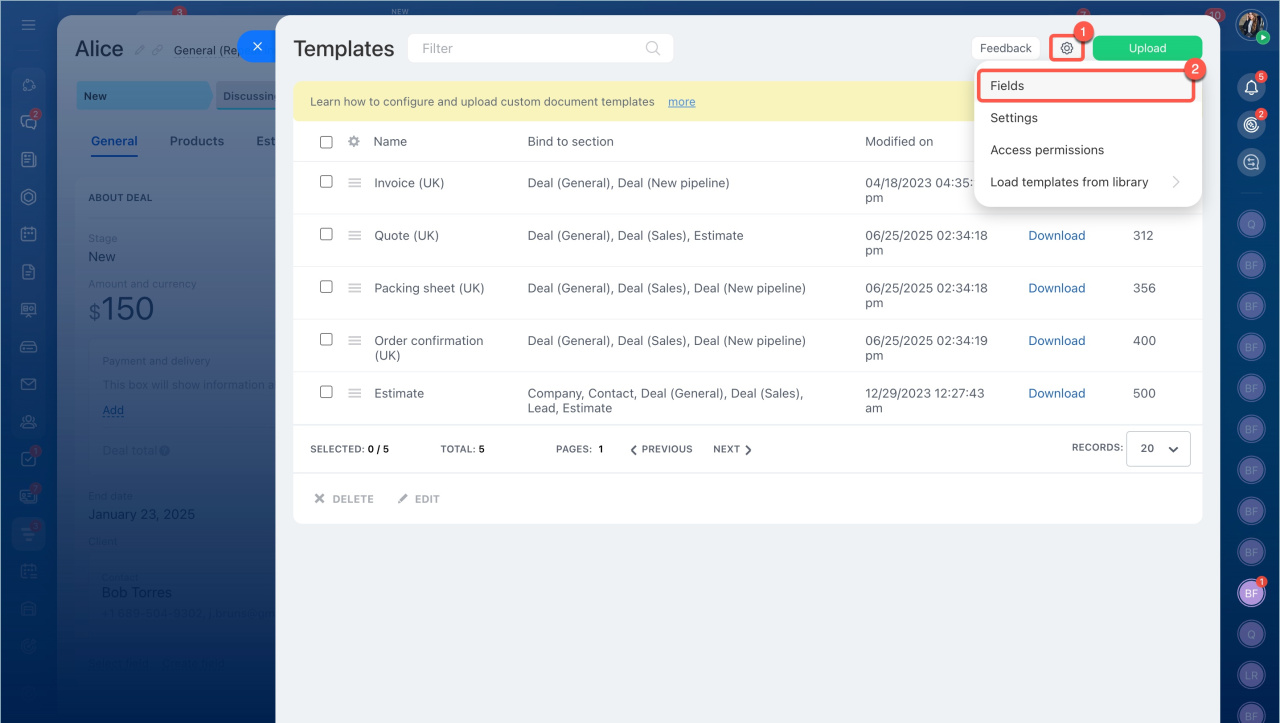
- Click the settings icon and select Fields.
If there is no Type column, click on the settings icon and add it manually.
Types of modifiers
Modifiers can be used for dates, names, addresses, money amounts, and text case. Here are the modifiers for each type.
Date and time. By default, the date format in a document template matches the country specified in the template settings. Make sure to check which country is set.
Template settings
Date modifiers:
- d.m.y — 28.08.25
- d.m.Y — 28.08.2025
- j, n, Y — 28, 08, 2025
- j F, Y — August 28, 2025
Time modifiers:
- H:i:s — 10:24:18
- g:i a — 10:24 am
Combining date and time modifiers:
- Y-m-d H:i:s — 2023-08-28 10:24:18
- F j, Y, g:i a — August 28, 2025, 10:24 am
For a complete list of date and time modifiers, refer to the documentation for developers.
Additional date and time parameters
To format the Created on field, add the ~F j, Y, g:i a modifier to the {DocumentCreateTime} code. This results in the {DocumentCreateTime~F j, Y, g:i a} code.
Name. You can use modifiers to set the order of the last name, first name, second name, and salutation. To change the order, use the ~Format= parameter. Name modifiers only work with standard fields.
Standard fields in CRM
Name format parameters:
- #TITLE# — salutation
- #NAME# — first name
- #LAST_NAME# — last name
- #SECOND_NAME# — second name
- #NAME_SHORT# — the first letter of the first name with a dot
- #LAST_NAME_SHORT# — the first letter of the last name with a dot
- #SECOND_NAME_SHORT# — the first letter of the second name with a dot
For example, to format the contact's full name to show the salutation, first name, the first letter of the second name and last name in the print form, use the code: {ContactFormattedName~Format=#TITLE# #NAME# #SECOND_NAME_SHORT# #LAST_NAME#}.
Address. By default, Bitrix24 uses the country address format of the current template.
Template settings
You can change the address format and add a line break if needed. Use the ~Format= parameter to change the format and ~Separator= to separate lines.
Format and separator modifiers:
For the Format parameter:
- 1 — Europe
- 2 — United Kingdom
- 3 — North America
- 4 — Russia (street > country)
- 5 — Russia (country > street)
For the Separator parameter:
- 1 — comma
- 2 — no separator
- 3 — line break
For example, to use the US address format even if the document template is set to the UK, and to add a line break between address parts, use: {Address~Format=3,Separator=3}.
Money amounts. For money amounts, you can modify symbolic codes to display or hide zeros after the decimal point and the currency symbol in the print form.
Available parameters:
-
WZ (With zeros). By default, Bitrix24 shows insignificant zeros for money amounts. With WZ=N, the amount will be shown without zeros at the end. For example, 120.00 will turn into 120. By default, zeros are shown in fields like
{TotalRaw}(total original price),{TaxesTaxRate}(tax rate), and{TotalSum}(total amount). In tabular fields like{ProductsProductPriceRawNetto}(full price without tax) and{ProductsProductPriceRawSum}(total full price without tax), zeros are only displayed when you use the WZ=Y modifier. -
NS (No sign). If the value is NS=Y, the currency sign is not shown, and if the value is NS=N, the currency sign is included.
-
SN (Show No VAT). If the value is SN=Y, the tax rate is shown without the percent sign—just the number. For example,
{TaxesTaxRate~SN=Y}will display 20 instead of 20%. -
WP (With Percent). If the value is WP=Y, a percent sign is added to the tax rate. For example,
{TaxesTaxRate~WP=Y}will display 20%.
If WP is set to N, the percent sign won't be shown.
To display the deal amount with the currency sign and zeros at the end, use the code: {TotalSum~WZ=Y,NS=N}. For the tax rate with the percent sign, use the code: {TaxesTaxRate~WP=Y, SN=Y}.
Phone number. You can change the phone number format using the ~format= modifier.
Available formats include:
- E.164 — +1212xxxxxxx
- International — +1 212 xxx-xx-xx
- National — 1 (212) xxx-xx-xx
To display a contact's phone number in the familiar format without spaces, use the code {ContactPhone~format=E.164}, where {ContactPhone} is the symbolic code for the Phone field in the contact form.
Text case. Use the ~letterCase= modifier to change the text case.
The modifier can take the following values:
- upper — UPPER CASE
- lower — lower case
- title — Title Case (first letter of each word capitalized)
For example, to format a comment from the deal form into a title, use the code: {Comments~letterCase=title}.
Using modifiers to display multiple field values
CRM fields marked as multiple can have several values at once, like the standard Phone, Email, and Messenger fields.
Use the ~mfirst= parameter to control how these multiple fields are displayed:
- mfirst=y — shows only the first value
- mfirst=n — shows all values
For example, if you have the Phone field with multiple values and want to display all of them, use the code {ContactPhone~mfirst=n}. By default, a comma separates the values. The ~mseparator= modifier allows you to choose a separator: comma (1) or line break (2) — {ContactPhone~mseparator=2}. To display all phone numbers separated by line breaks, use the code {ContactPhone~mfirst=n,mseparator=2}.
To display list items in a document, use the ~index= parameter. The list starts numbering at zero, so a product with index 1 is actually the second list item. For example, the code {ProductsProductName~index=2} will show the third product in the list.
To display all values of the Bind to CRM items multiple field, use the ~all=y modifier.
In brief
-
A modifier is a special code that changes the field format. It is placed inside a symbolic code after the tilde symbol (~). For example, in
{DocumentCreateTime~F j, Y, g:i a}, DocumentCreateTime is the field code, and F j, Y, g:i a is the modifier. -
There are different types of modifiers for date and time, address, name, money amounts, phone number, and text case.
-
Using modifiers, you can display all the values from a multiple field or a specific one from the list.


