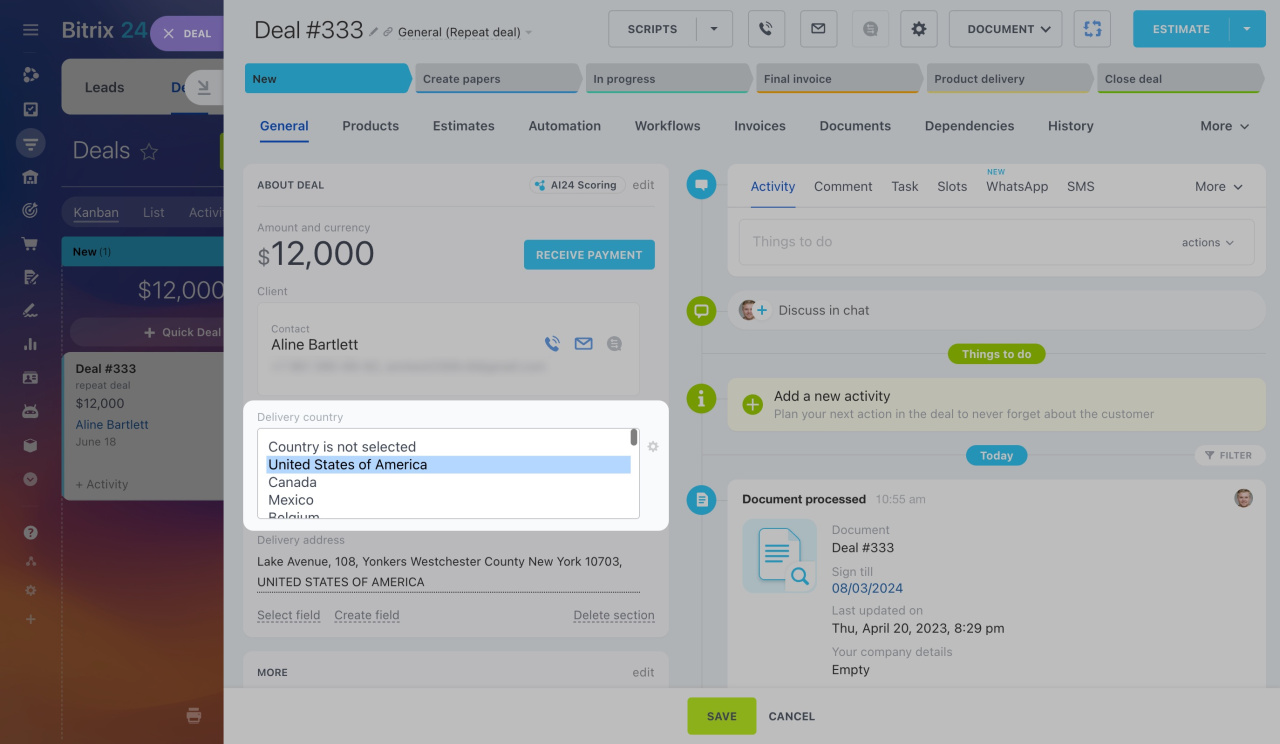
Use custom fields to store additional customer information when standard fields are not enough. Create and customize fields to meet your business needs. For example, if your company delivers items, create fields for the delivery address, time, and order number.
This article covers custom fields in leads, deals, contacts, companies, and estimates.
For custom fields in invoices and Smart Process Automation, refer to this article: Custom fields in invoices and Smart Process Automation
For custom fields in the warehouse form, see this article: Custom fields in warehouses
Only Bitrix24 administrators and employees with permission to edit CRM settings can create custom fields.
Access Permissions in CRM
Types of custom fields
There are several types of custom fields in CRM. They are used for storing different types of data. You can choose the type when creating a field.
-
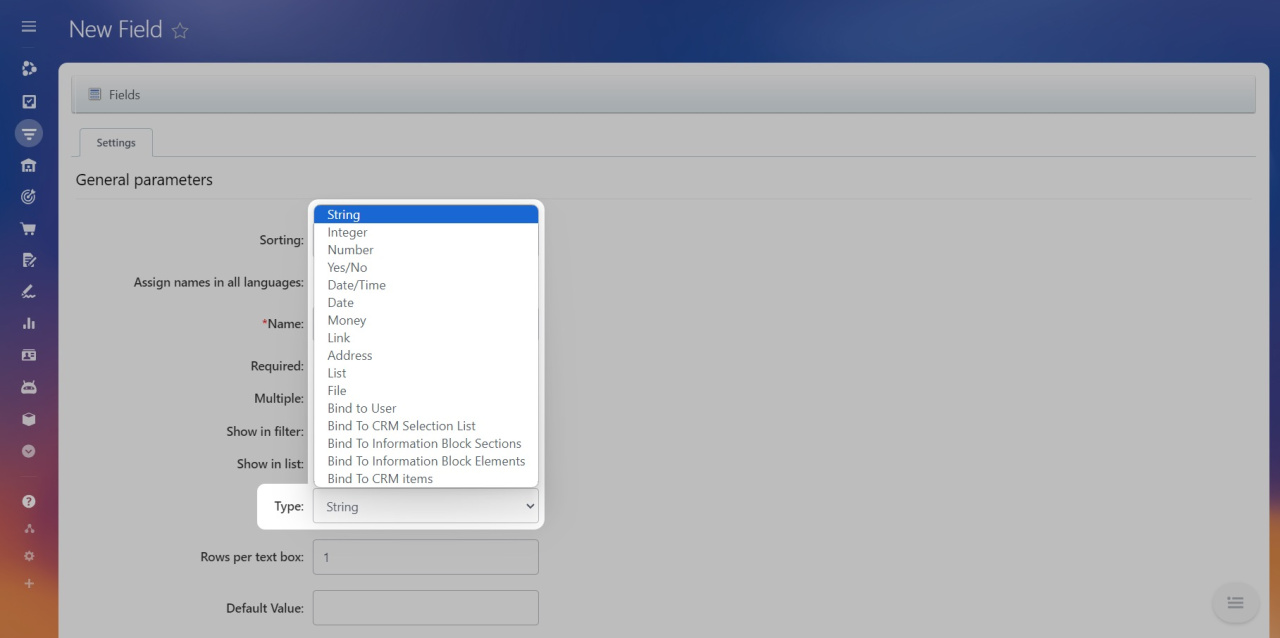
String: Enter any information (text, numbers, or dates).
-
Integer: Enter whole numbers (e.g., customer age, discount percentage).
-
Number: Enter any number (e.g., product weight, average check).
-
Yes/No: Select Yes or No (e.g., whether the product needs delivery).
-
Date/Time: Specify date and time (e.g., meeting date and time).
-
Date: Specify date without time (e.g., contract end date).
-
Money: Specify amount and currency (e.g., delivery cost, project budget).
-
Link: Enter URLs (e.g., client's website, social network profile, document or image link).
-
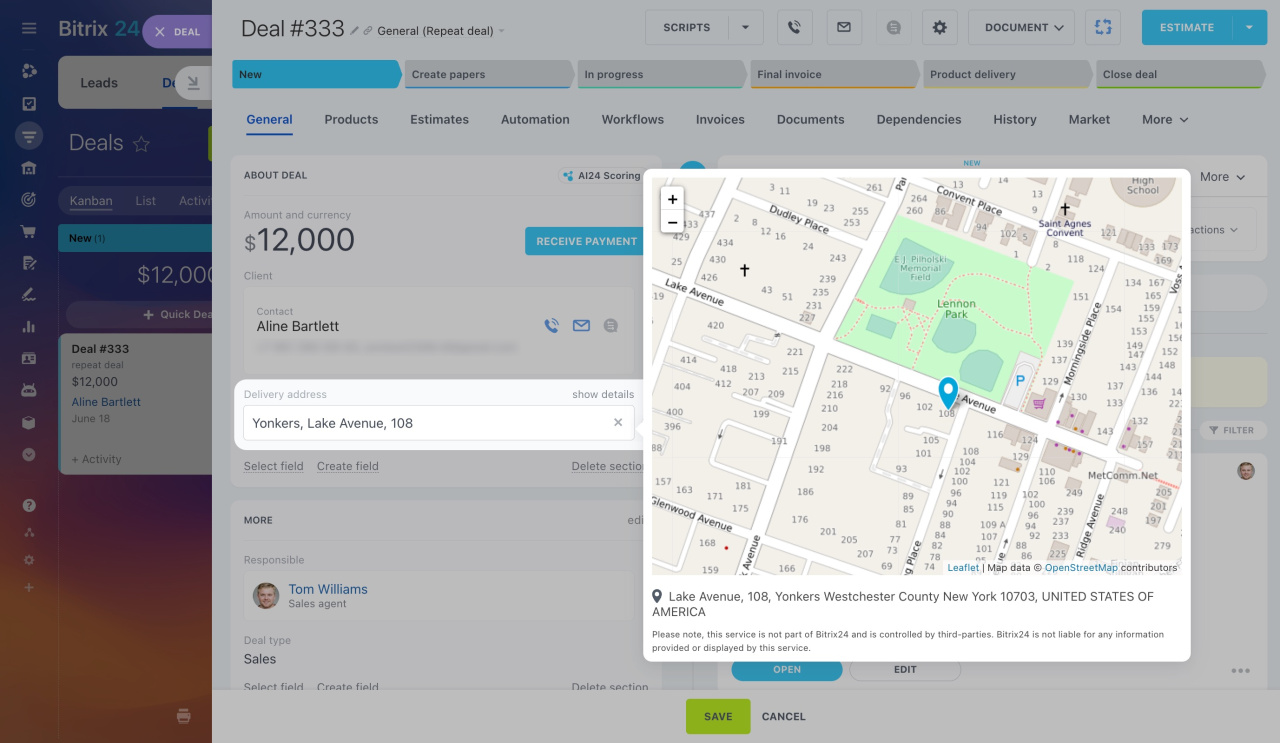
Address: Select an address on the map (e.g., delivery address).
-
Book a Resource: Schedule services (e.g., service type, provider, date, time).
How to manage bookings in CRM -
List: Select one or more values from a pre-installed set (e.g., event type: webinar, conference, training).
-
File: Upload files (e.g., contracts, technical documentation, call recordings).
-
Bind to User: Select a company employee (e.g., service provider).
-
Bind to CRM Selection List: Select a value from the statuses and dropdowns in CRM (e.g., deal stage, contact type, company industry).
Statuses and dropdowns in CRM -
Bind to Informational Block Sections: Select a section from the information block (e.g., company department, product catalog section).
-
Bind to Informational Block Elements: Select a specific element from the information block (e.g., product item, workflow element).
-
Bind to CRM items: Select a specific CRM entity (e.g., contact, company, invoice, estimate).
How to create a custom field
You can create a field in the entity form or CRM settings.
Create a field in the CRM entity form. This method is ideal for quickly creating and filling in a field.
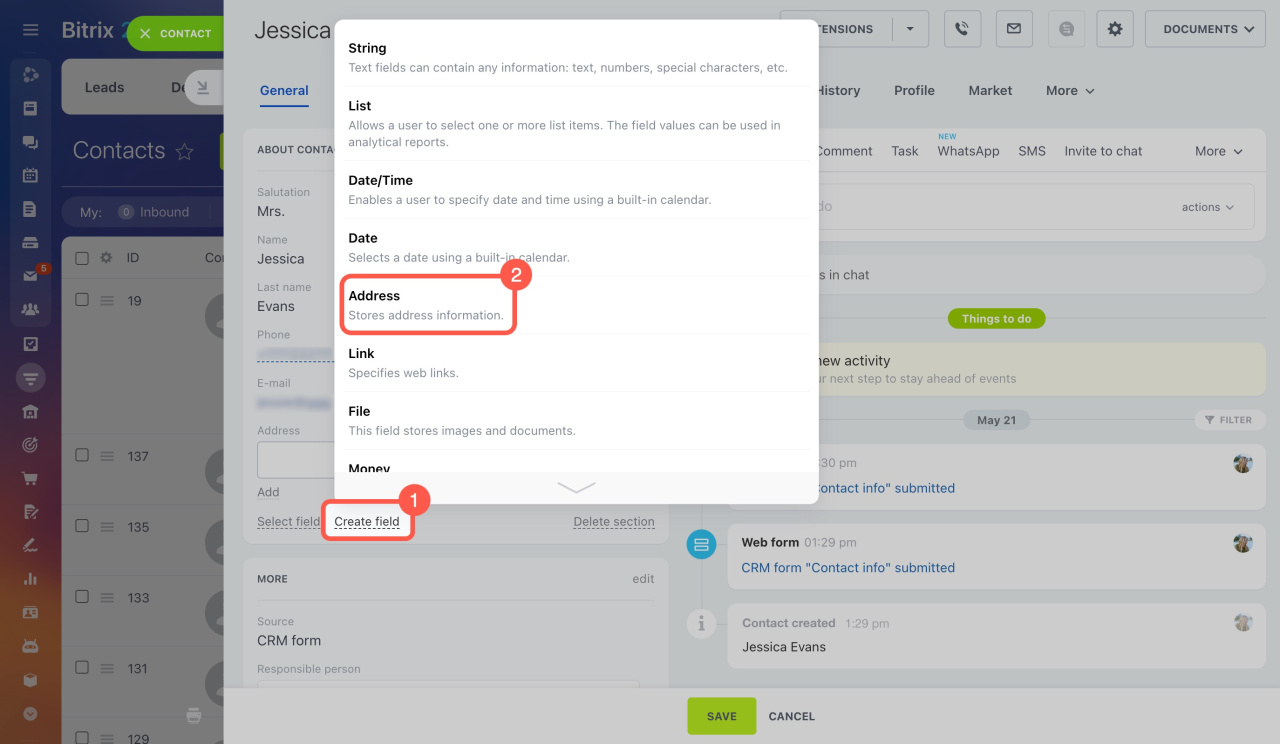
- Open a CRM entity form and click Create field.
- Select the field type from the drop-down list.
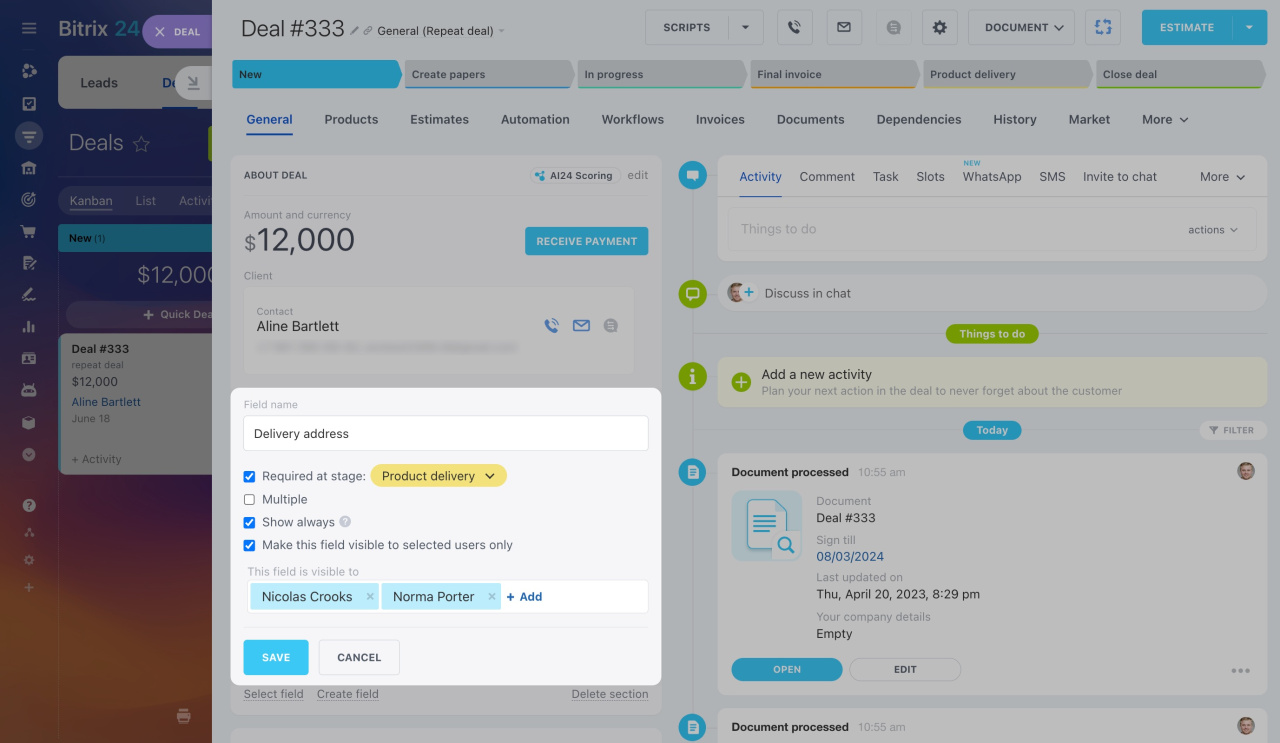
Specify the field name and enable the necessary parameters. The parameters may vary depending on the field type.
: Make the field mandatory at all stages or only at specific ones. Users cannot save the form until they fill in this field.
Required fields in CRM
: Allow users to enter multiple values in the field.
: Display the field in the form even if it is not filled in.
: Select which employees can see the information in this field. It will be hidden from others.
Make a custom field visible to selected users only
After configuring the settings, click Save. The field will appear in the CRM entity form, ready for immediate use.
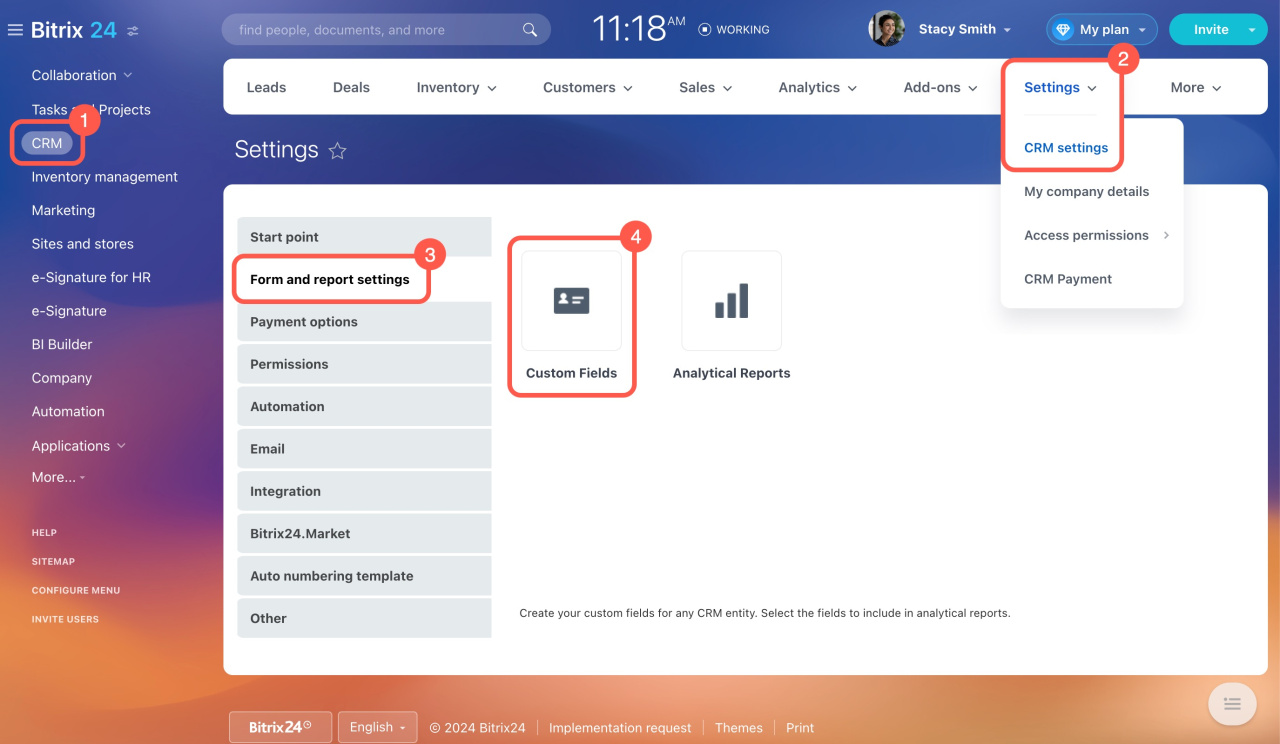
Create a field in CRM settings. This method is suitable for fields requiring additional settings, such as lists with many values or bindings to different CRM entities.
- Go to the CRM section.
- Expand Settings and select CRM settings.
- Open the Form and report settings tab.
- Click the Custom Fields block.
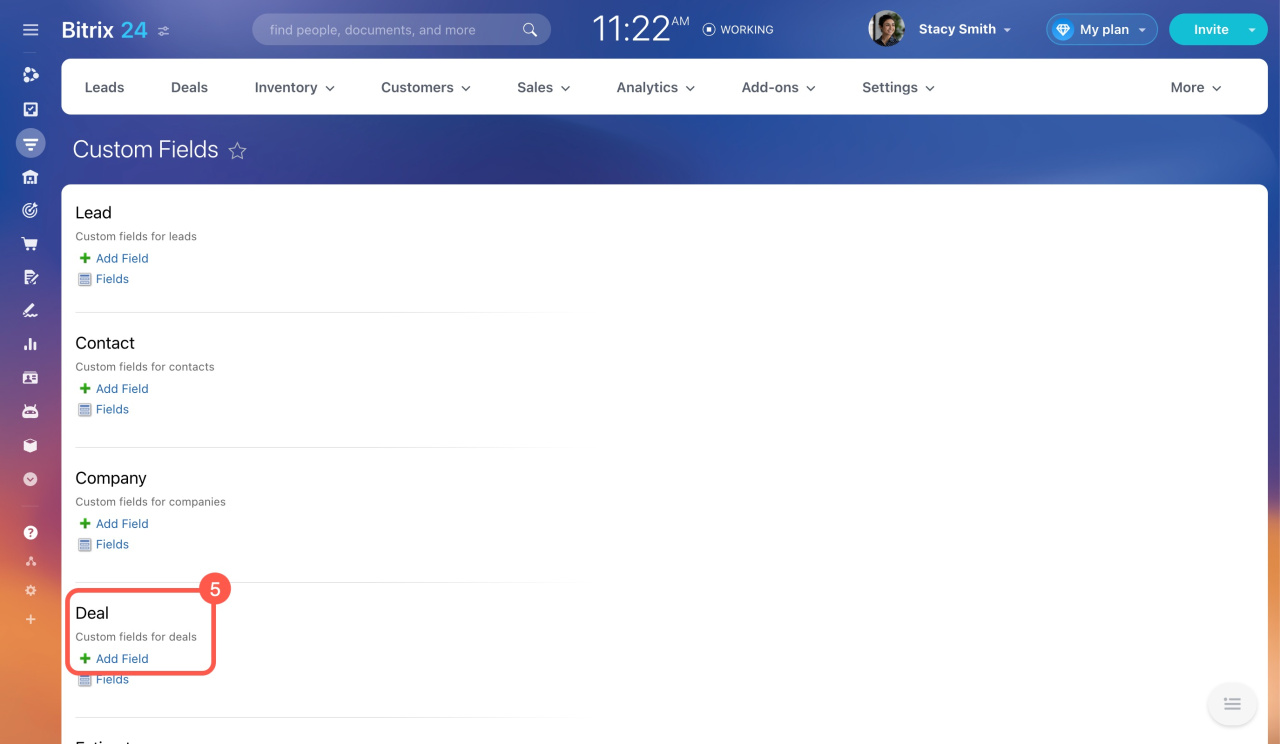
- Select a CRM item and click Add Field.
Configure the field parameters. They may differ depending on the field type. Here's how to configure them using the List type as an example:
-
Sorting: Determines the order of the field in the field list. Lower numbers place the field higher.
-
Assign names in all languages: Specify the field name in all languages used by employees. The value must be specified for all languages at once.
-
Name: It is displayed in the CRM entity form.
-
Required: Users cannot save the CRM entity form without filling in this field.
-
Multiple: Allows users to enter multiple values in the field.
-
Show in filter: Enables filtering CRM entities by this field's value. If disabled, the field won't appear in the filter.
Search for CRM items using a filter -
Show in list: Displays the field in the list of CRM entities immediately after creation. If disabled, manually select the field in the item list view settings.
-
Type: Choose the type of data stored in the field.
Types of custom fields -
Design: Affects how the list of values appears in the CRM entity form.
-
List Height: Specify how many list values are displayed in the selection window. To see other values, scroll down the list.
-
Use caption when value is empty: Displays a caption if no value is selected from the list.
-
Default Value: The value is automatically filled in the field. Users can leave or replace this value.
-
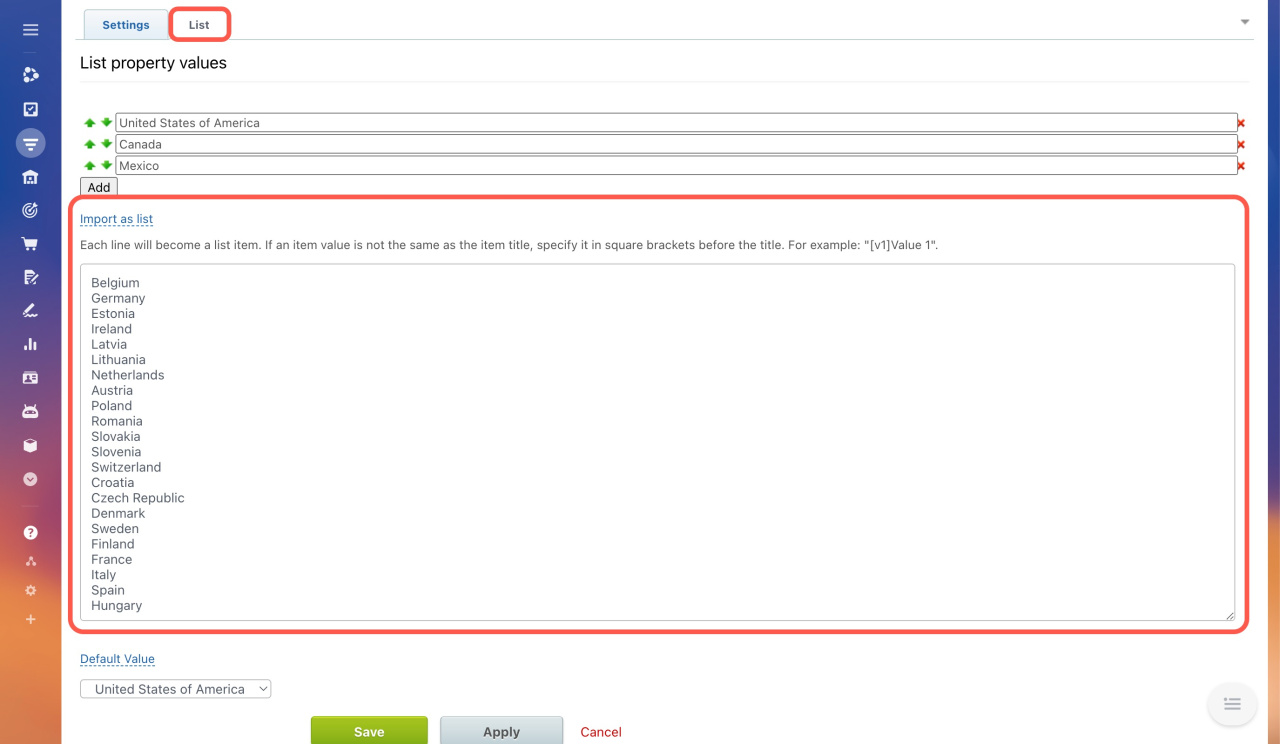
List property values: In the List tab, enter each value in a separate field.
To add many values at once,
- Click Import as list.
- Paste the values into the field, placing each on a separate line.
- Click Save. Each row will become a list item.
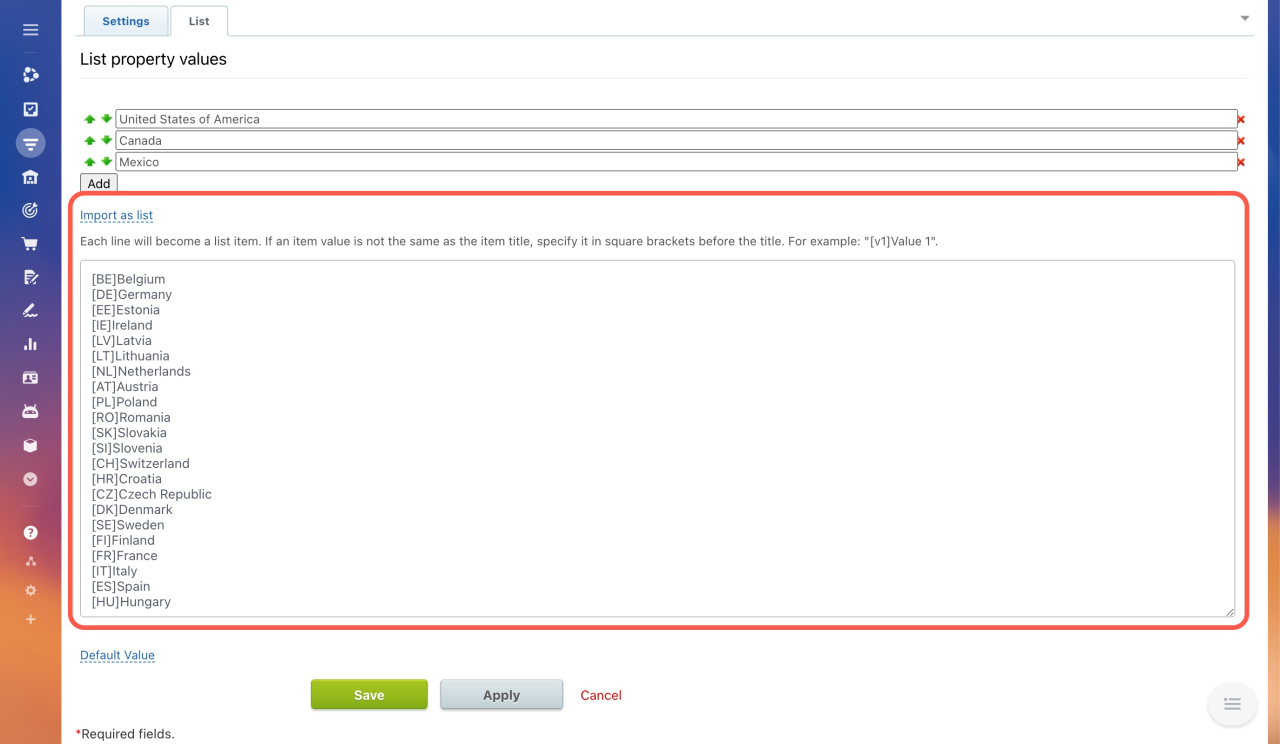
To exchange data between Bitrix24 and external systems, you may need to specify a code value for each list item. For example, [MX]Mexico, where Mexico is the item title in Bitrix24, and [MX] is the code for system exchange.
After creating the field, complete it in the CRM entity form.
How to edit or delete a custom field
You can edit field settings in the entity form or CRM settings. Deleting custom fields is only possible in CRM settings.
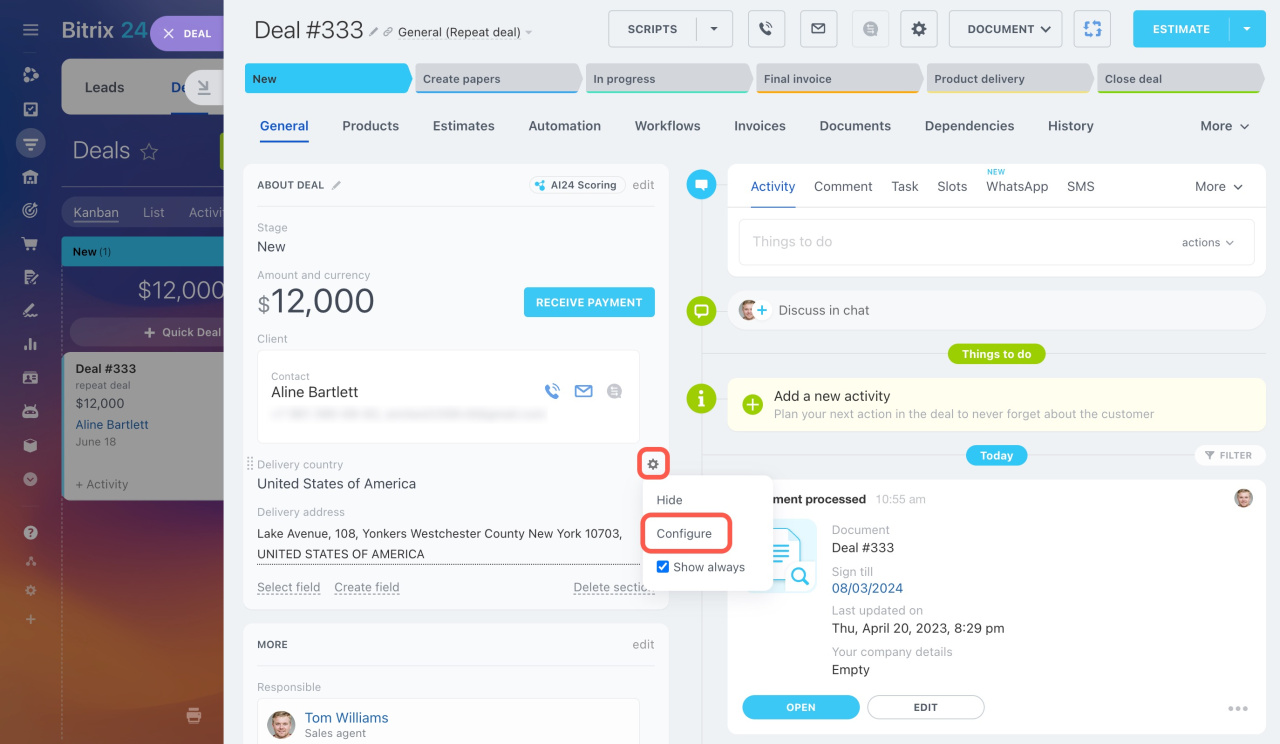
To edit a field in the CRM entity form,
- Open a CRM entity form.
- Click the Settings icon (⚙️) next to the field.
- Select Configure.
- Make your changes and click Save.
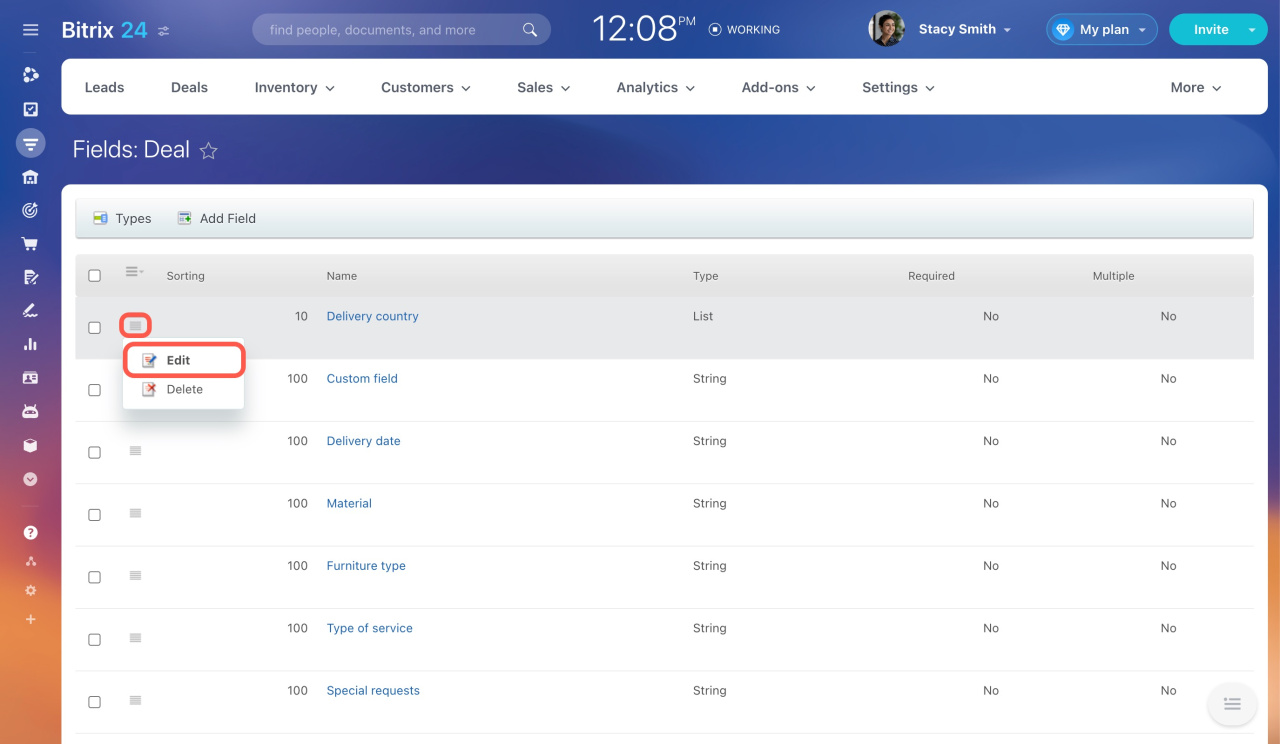
To edit a field in CRM settings,
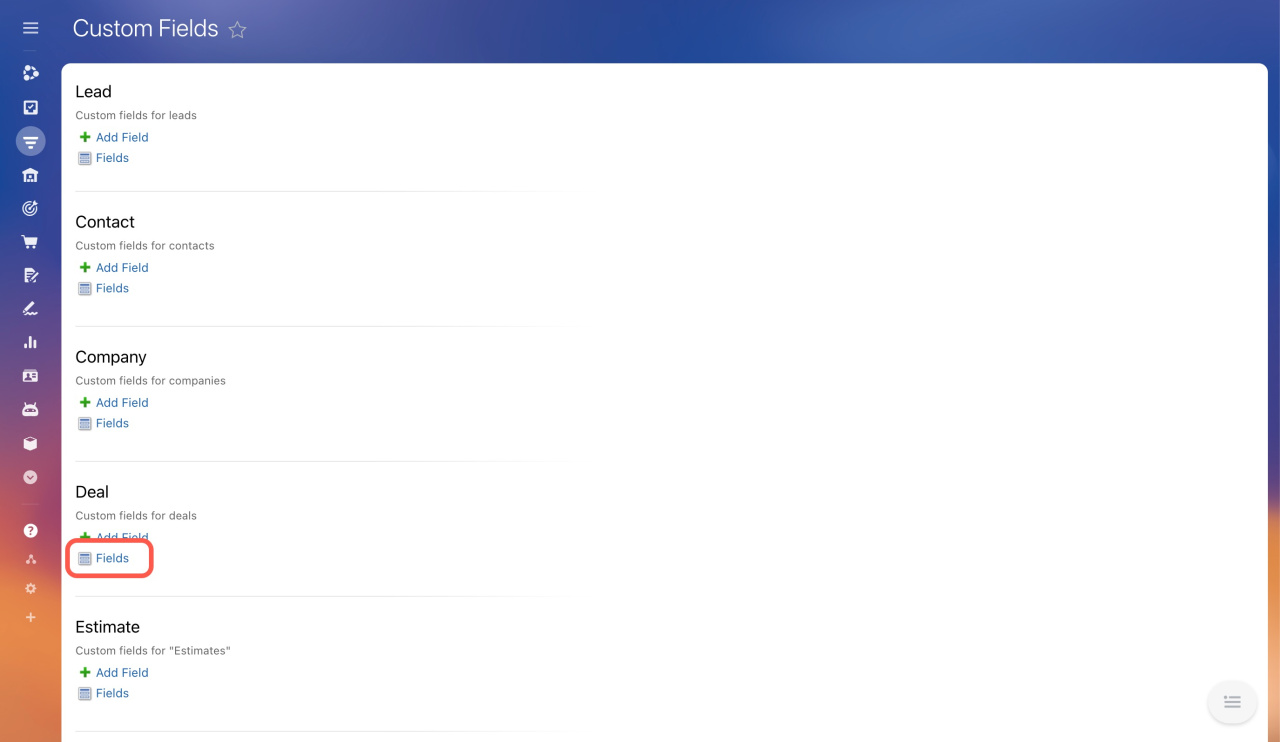
- Go to CRM > Settings > CRM settings > Form and report settings > Custom Fields.
- Find the list of fields for the desired item.
- Click the menu (≡) next to the field.
- Select Edit.
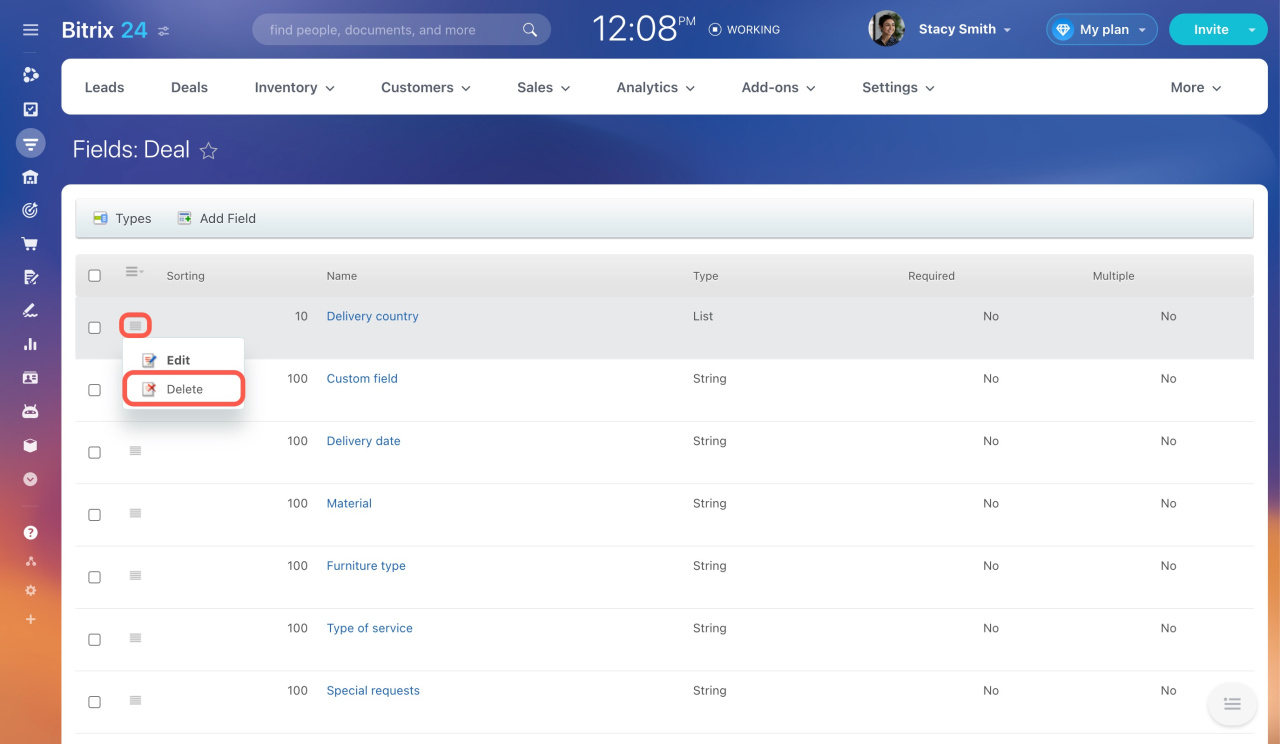
To delete a field,
- Open the list of fields for the desired item.
- Click the menu (≡) next to the field.
- Select Delete.
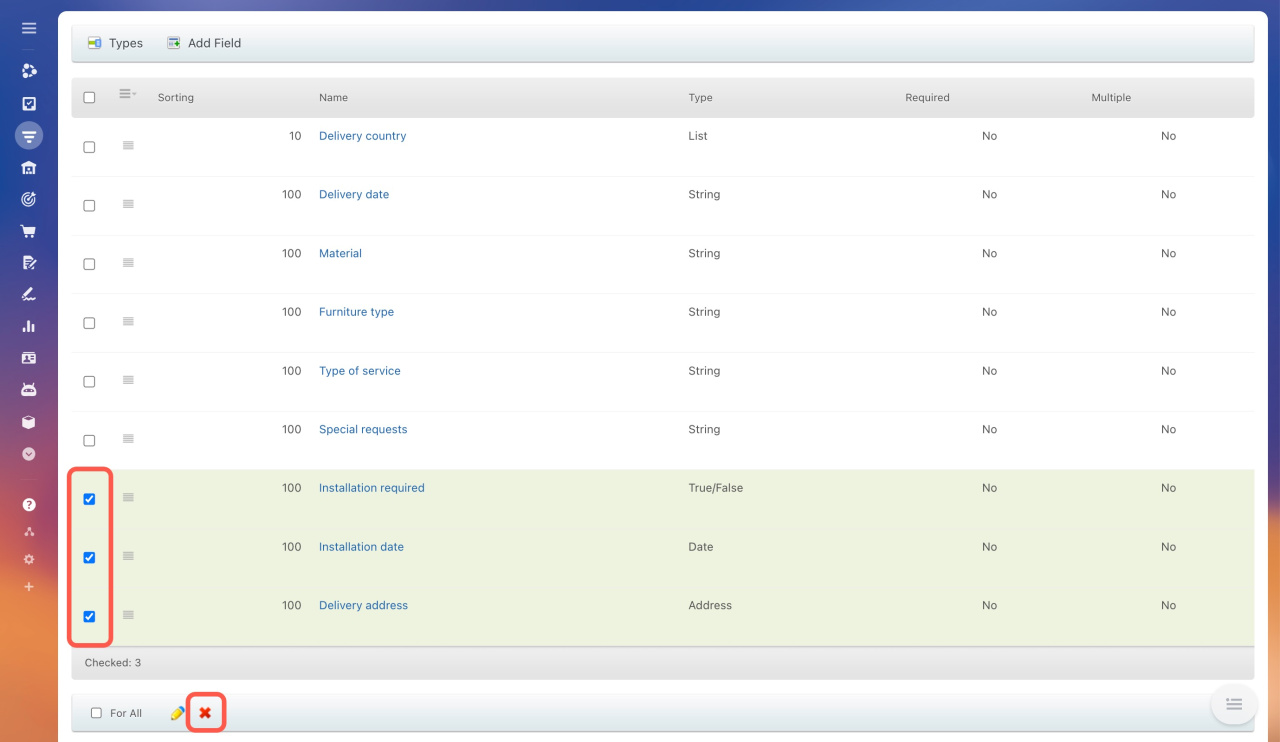
To delete several fields at once, select them from the list and click on the cross (X).
In brief
-
Use custom fields to store additional customer information when standard fields are not enough.
-
Only Bitrix24 administrators and employees with permission to edit CRM settings can create custom fields.
-
You can create a field in the entity form or CRM settings.
-
Choose the field type and set its parameters: required, multiple, visible to selected users, etc.
-
After creation, you can edit any field parameter, except for Multiple and Type.
-
When you delete a field, all the data bound to it will also be deleted.

