An auto numbering is a set of rules that Bitrix24 uses to assign a unique number to each document. Numbers can include digits, dates, prefixes, and other values. This simplifies searches, eliminates duplicates, and helps employees work with documents more efficiently.
In Bitrix24, you can configure separate numbering for documents, invoices, and estimates. Standard one is used for leads and deals, and it cannot be changed.
Role-based access permissions in CRM
In this article:
- Сreate an auto numbering template
- Сonfigure it
- Edit or delete a c
- Check and change the next numbering
- Resolve issues if the numbering malfunctions
Сreate an auto numbering template
You can create a numbering in CRM settings or document templates.
In CRM settings.
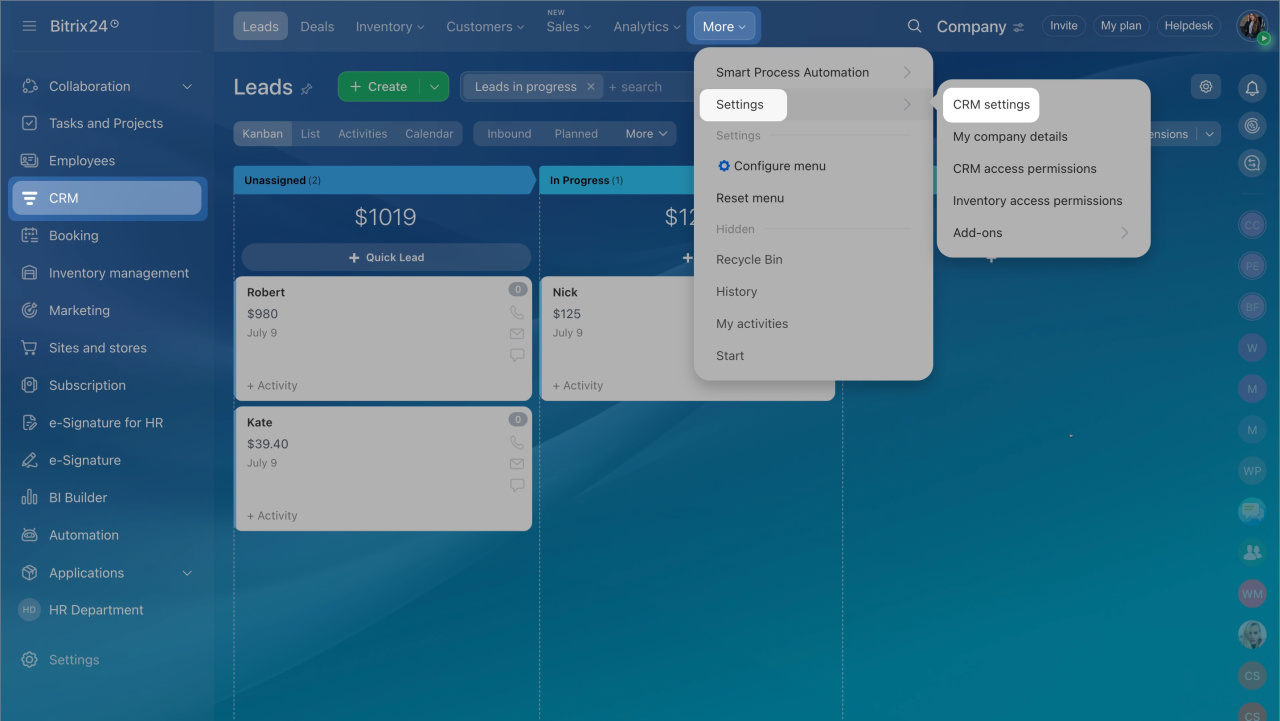
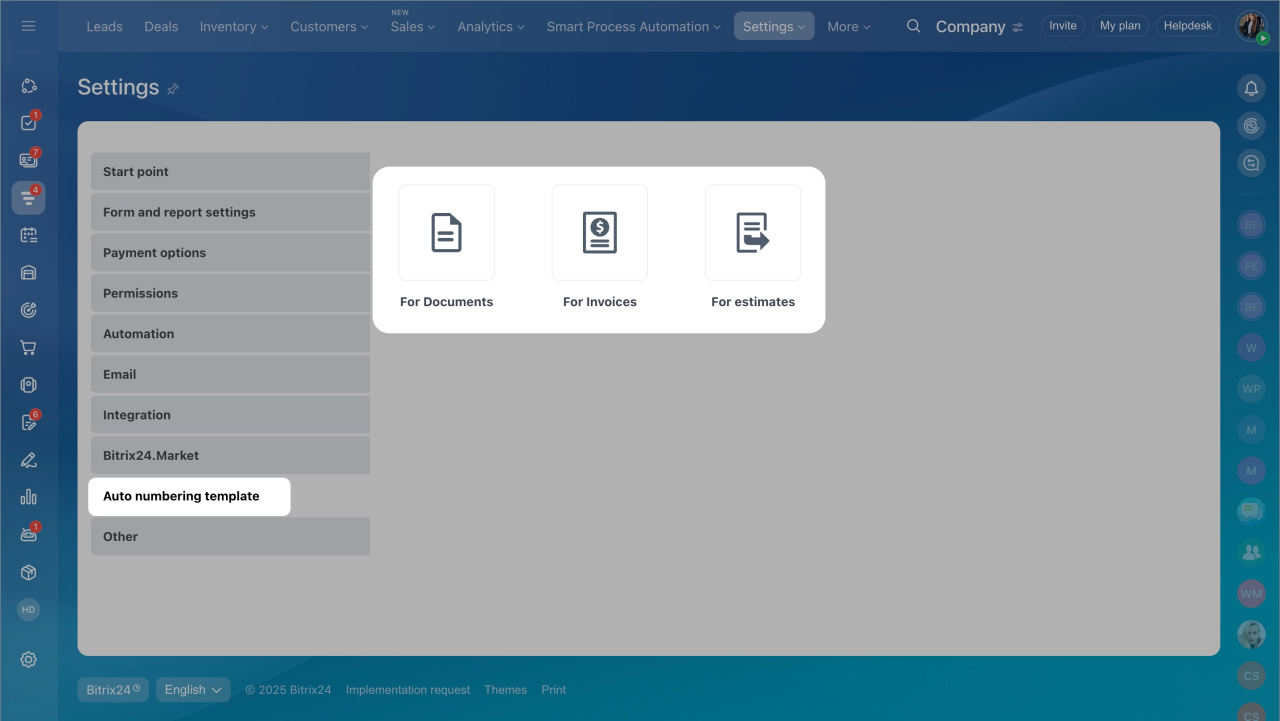
- Go to the CRM section > More > Settings > CRM settings > Auto numbering template.
- Select the item for which you want to configure a numerator: documents, invoices, or estimates.
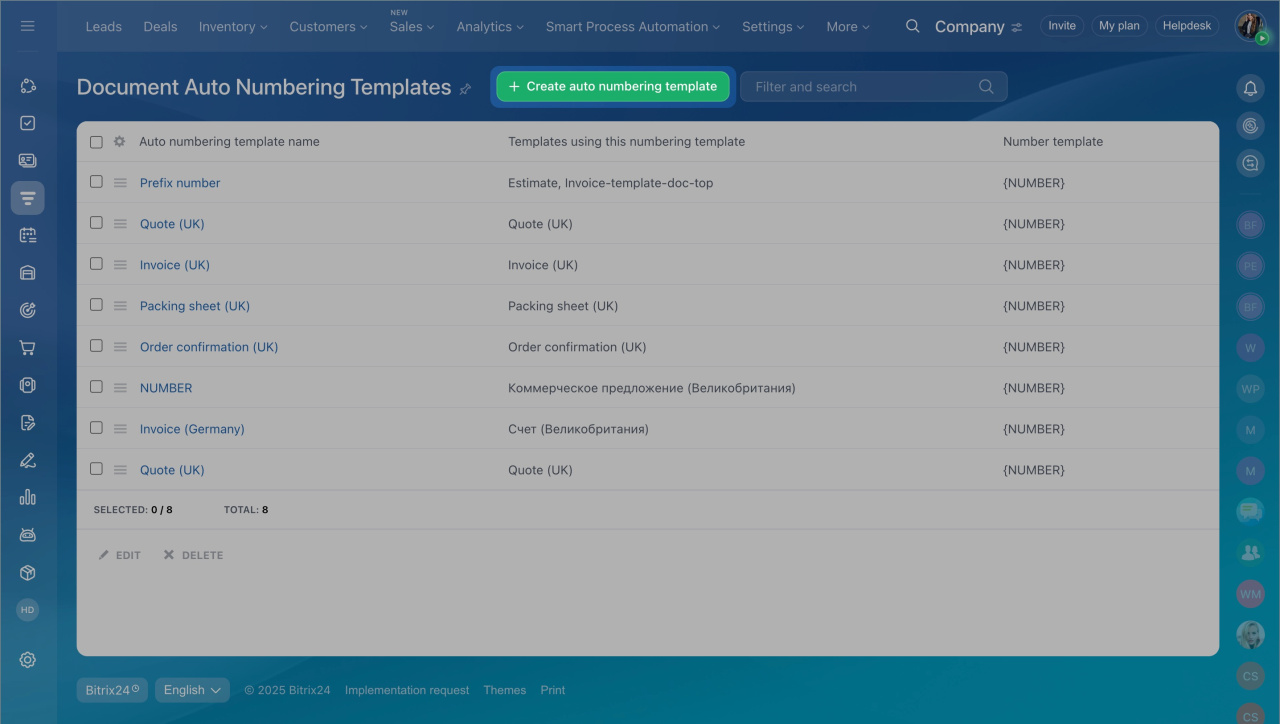
- Click Create auto numbering template.
In document templates.
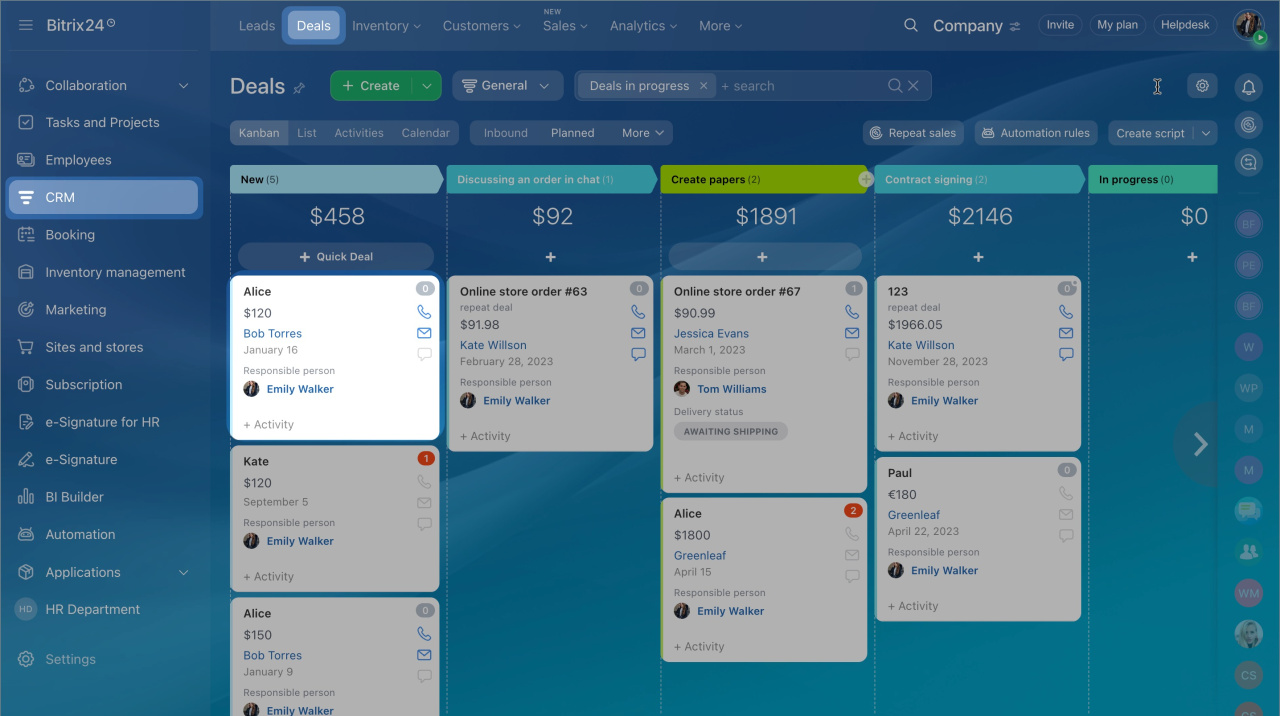
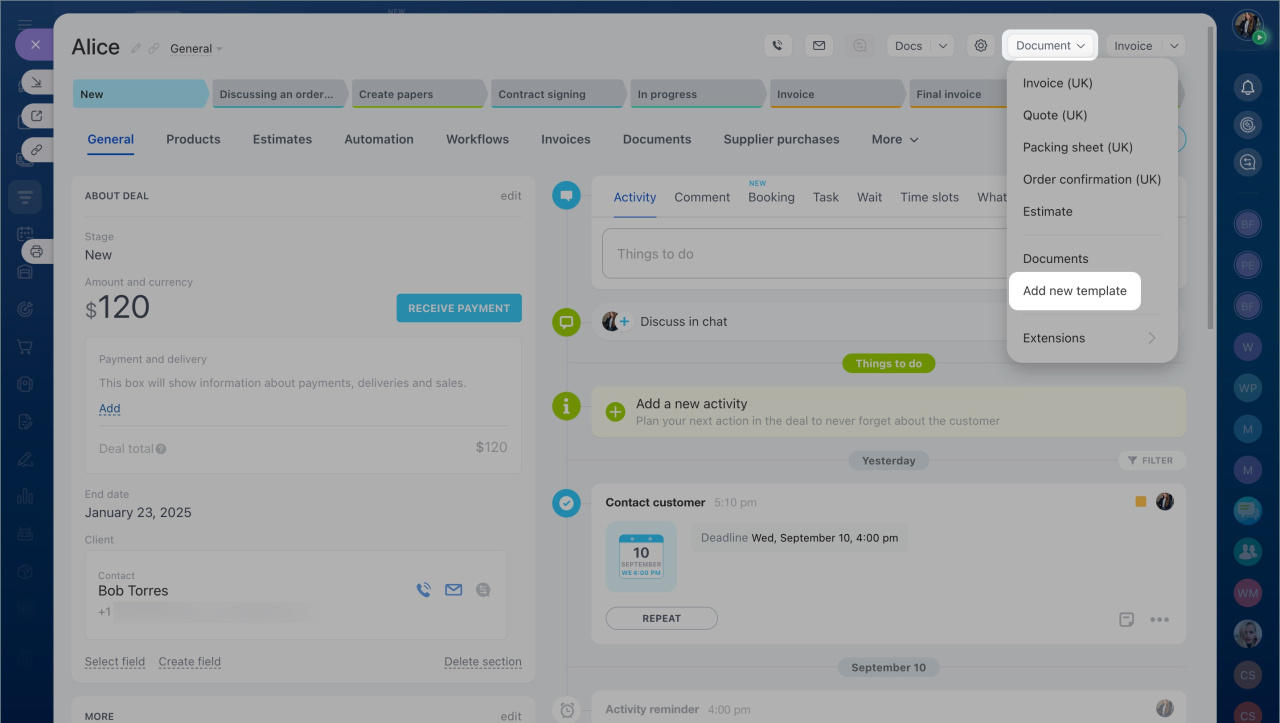
- Go to the CRM section > Deals tab and open any deal form.
- Click Document > Add new template.
- Select a template and click Edit.
- Click Create next to the Use auto numbering template field.
Configure an auto numbering template
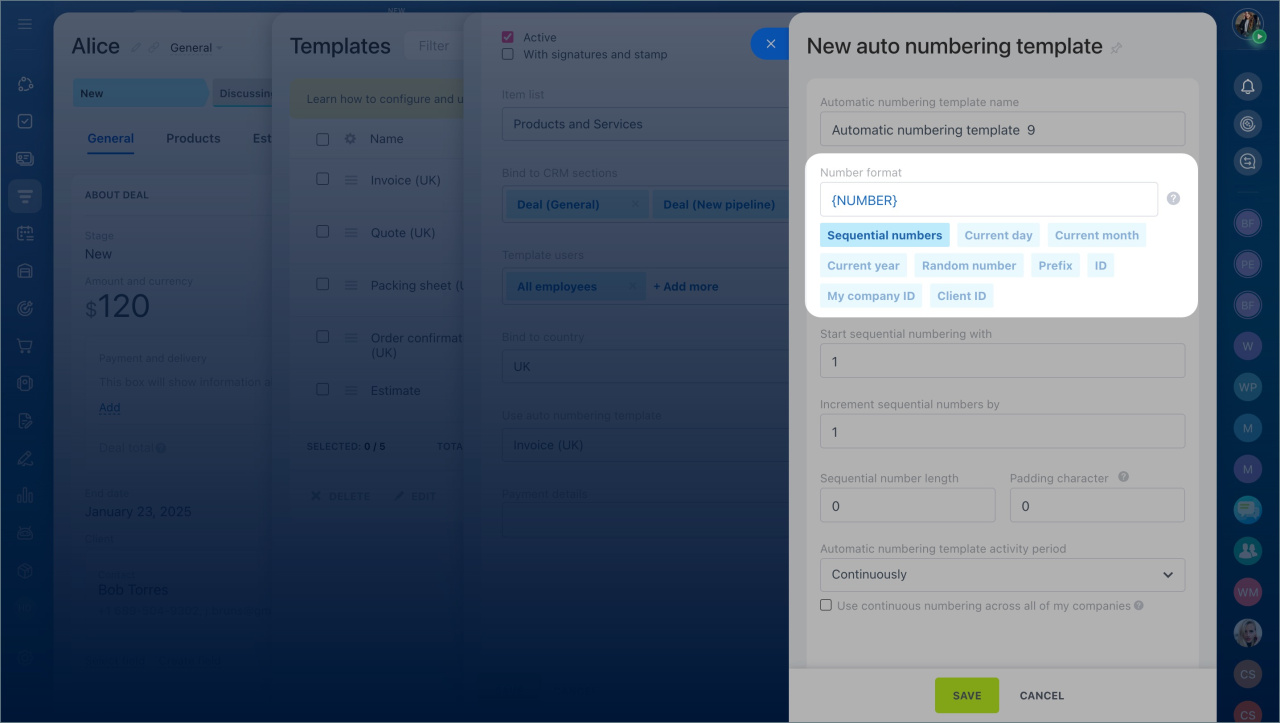
Set parameters. Create a name that will help you easily find the template in the list. Then choose and arrange one or more variables to be included into the number.
Sequential number is a number that increases with each document, such as 1, 2, 3, and so on. It is suitable for basic numbering when document creation chronology is important.
Sequential number settings
Start sequential numbering with — the number from which numbering will begin in the current period, such as 101.
Increment sequential numbers by — the step by which the number increases. For example, if the step is 3, the next number after 101 will be 104.
Sequential number length — the number of characters in the number. For example, with a length of 3, numbers will be in the 001, 002 format.
Padding character — a character added before the number if its length is less than the specified length. For example, with a length of 2 and a filler of 0, numbers will be 01, 02, 03.
Automatic numbering template activity period — how often numbering restarts: continuously, daily, monthly, or yearly. For example, if the period is Daily and the number starts at 1, numbers will restart at 1 each day. To avoid confusion with documents from different periods, use a format with the date: Current day, month, and year + Sequential number.
Time zone — by default, server time is used, so number resets may not occur at midnight in your region. To align numbering with your workday and avoid duplicates, select your time zone.
Use continuous numbering across all of my companies — if enabled, all your companies will share the same numbering. If disabled, each company will have its own numbering.
Current day, month, or year adds the document creation date to the number. This is useful for tracking the creation period of documents like contracts or acts.
Random number is a random combination of digits and uppercase letters, such as 4C2FW. You can configure the number length. This template is suitable for documents wh ere security is important and guessing the number must be avoided.
Prefix is any word or digits added before the number, such as DOC. Fill in the Prefix field. This template helps identify the document type or associate it with a project or department.
ID is the identifier of the CRM item from which the document is created, such as a deal or lead ID. Use this template when it is important to link the document to a specific CRM item for quick searches and interaction analysis.
My company ID is the identifier of your company in CRM. This is convenient when working with multiple legal entities to immediately understand which company the document belongs to.
Add company details
Client ID is the identifier of the company or contact specified in the CRM form. This allows you to quickly find a document for a specific client.
Edit or delete an auto numbering template
You can edit or delete a template through CRM settings. Select it from the list and click Edit or Delete.
In a document template, you can only edit an auto numbering template. Select it from the list and click Configure.
Check and change the next number
If you need to continue numbering from another program or set your own sequence, you can manually change the next document number.
For templates used across multiple companies, open a template in edit mode and click Edit current number.
A panel will slide out on the right, showing the list of next numbers for each company. The Numbering template key column displays your companies' IDs. Company_ID_ is the key for documents created without a company connection, while Company_ID_1 is the key for the company with ID 1.
Company details
To edit the next document number:
- Select a company from the list.
- Click Edit.
- Enter a new number in the Next number will be column.
- Save the changes.
Troubleshoot incorrect document numbering
If you've set up numbering a while ago and suddenly notice unexpected values when creating a document, the numbering might have gone wrong.
Reasons: This often happens if the Use continuous numbering across all of my companies option isn't enabled. Changes in CRM > Settings > My company details can also impact numbering, such as:
-
Not adding any companies under My company details. If you first set up auto numbering and then add a company, the numbering will restart.
-
Having two companies and changing the default seller to the other company, which resets the numbering.
-
Adding a company and later deleting it, causing the numbering to start over.
-
Enabling the Use continuous numbering across all of my companies option with multiple companies, which restarts the numbering.
Solution: If numbering goes wrong, create a new template, enter the desired current number, and enable the Use continuous numbering across all of my companies option.
In brief
-
Auto numbering templates in Bitrix24 can include numbers, the current date, and other values. You can customize these templates for documents, invoices, and estimates to fit your needs.
-
You can create and edit these templates in both CRM settings and document template settings.
-
Combine different formats and create auto numbering templates according to your company needs.
-
If numbering goes wrong, create a new template, enter the desired current number, and enable the Use continuous numbering across all of my companies option.

