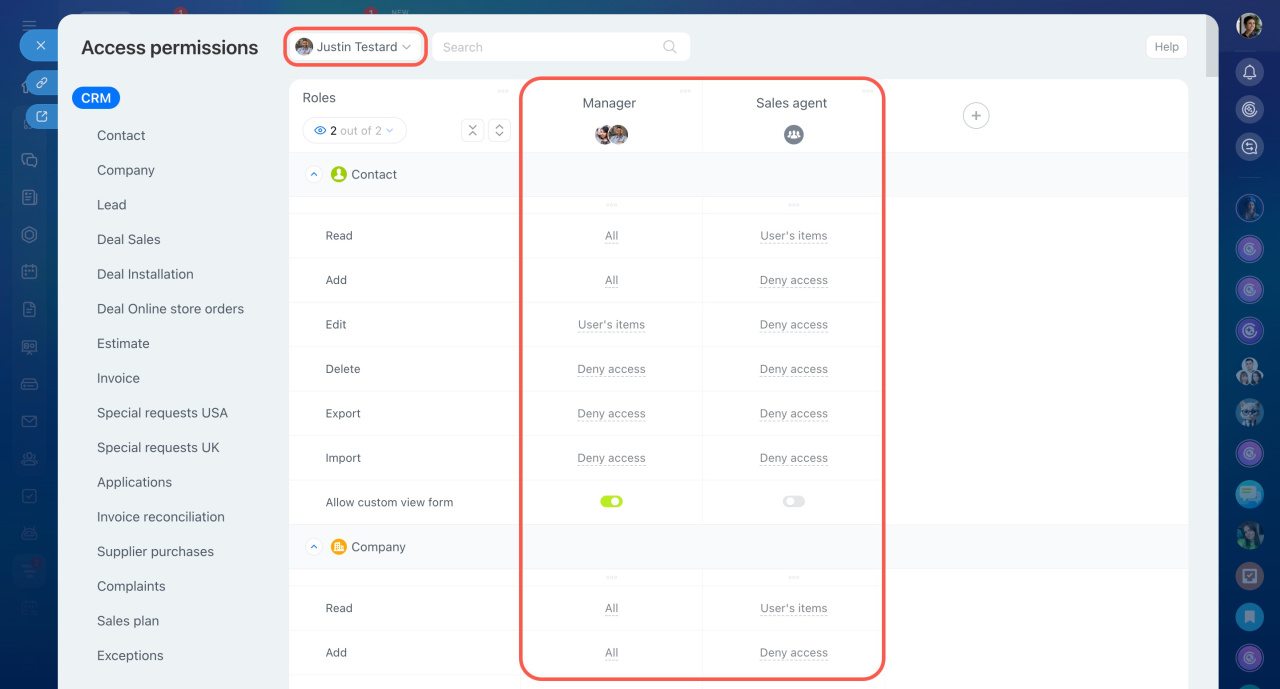
Role-based access permissions allow you to set up specific permissions to the CRM section. Create roles with different access levels for departments and employees. For example, the head of the sales department might have full access to CRM items, while agents may only manage their own deals.
Bitrix24 plans and pricing
Only Bitrix24 administrators and employees with access to edit CRM settings can configure these permissions.
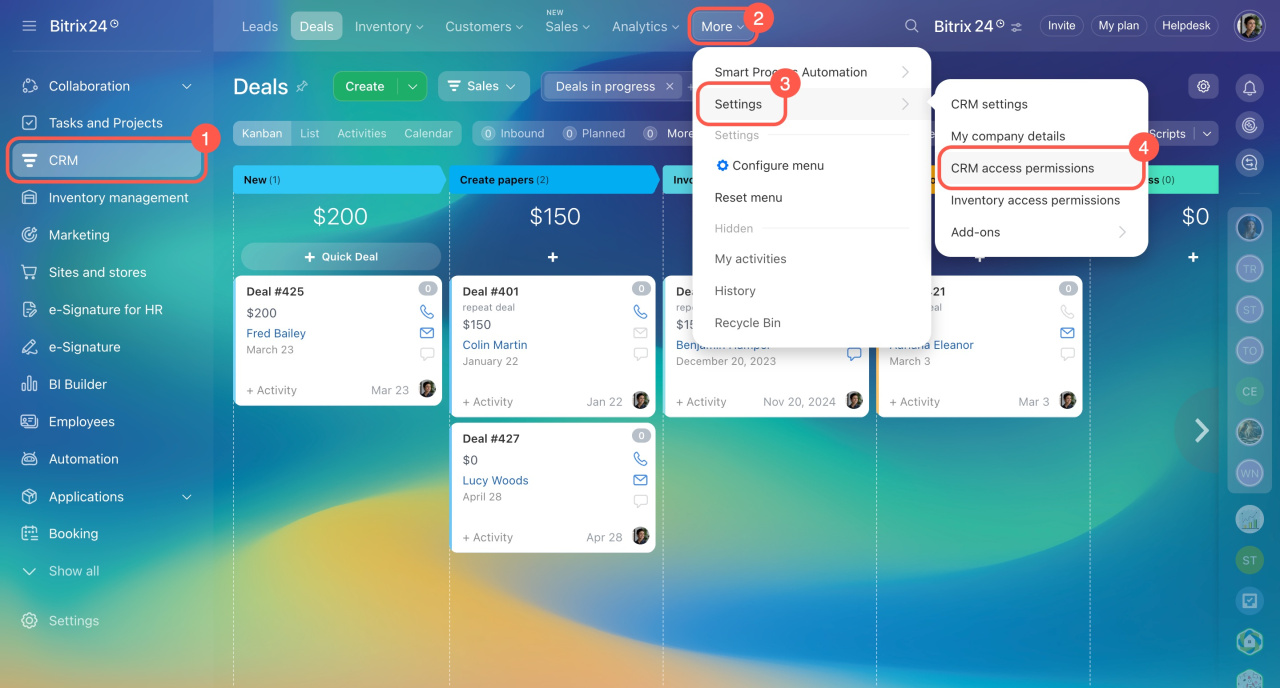
To set up access permissions:
- Go to CRM.
- Click More.
- Expand Settings.
- Select CRM access permissions.
Select standard roles
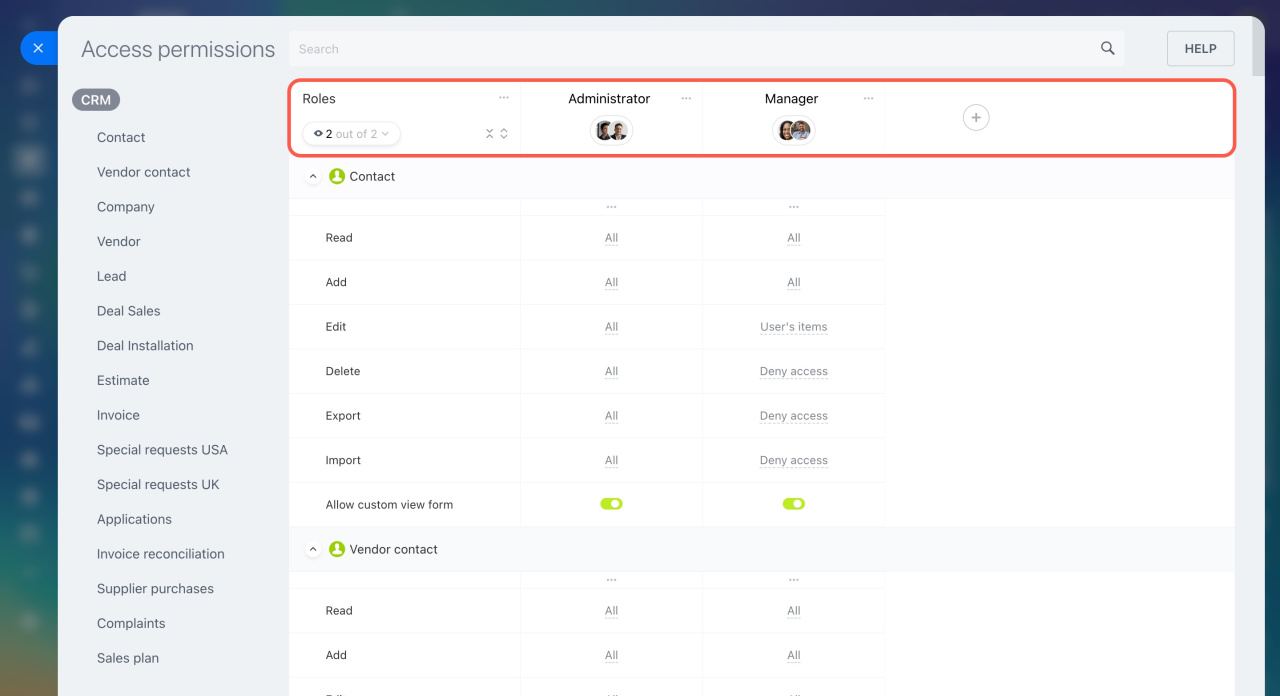
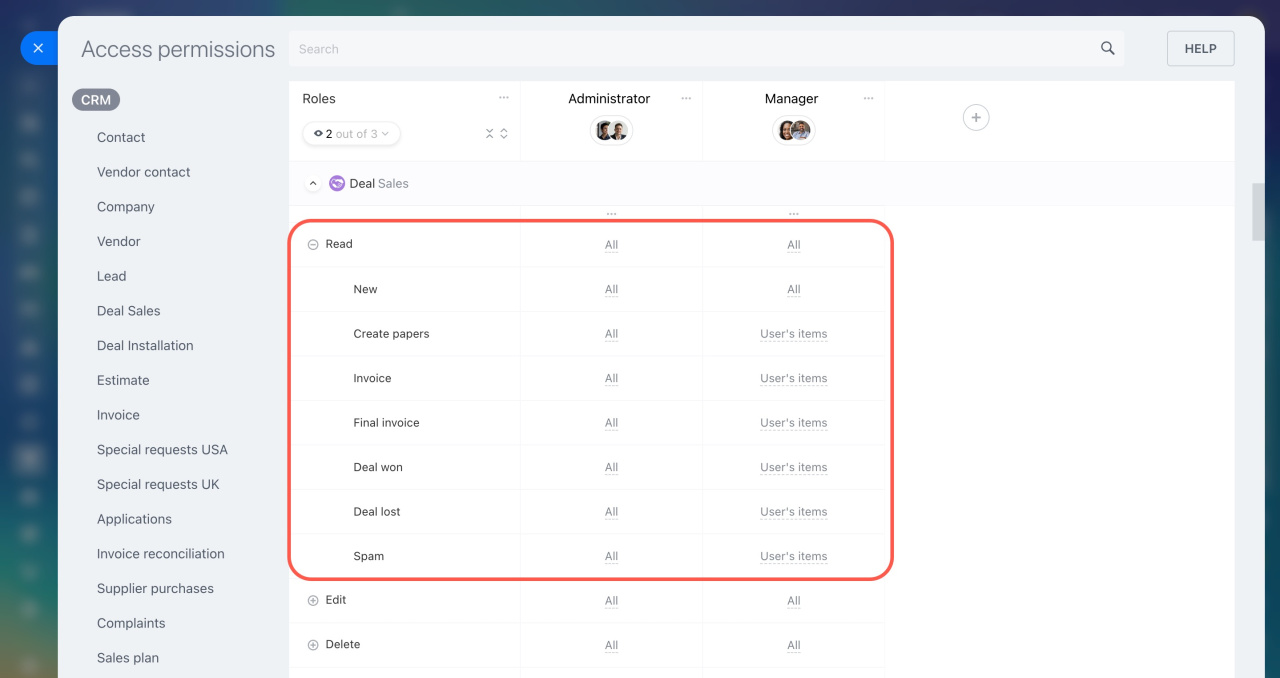
By default, there are two roles in CRM:
-
Administrator: Users have full access to all items, including CRM access permission setup.
-
Manager: Users have access to view, create, and modify their CRM items.
Configure roles
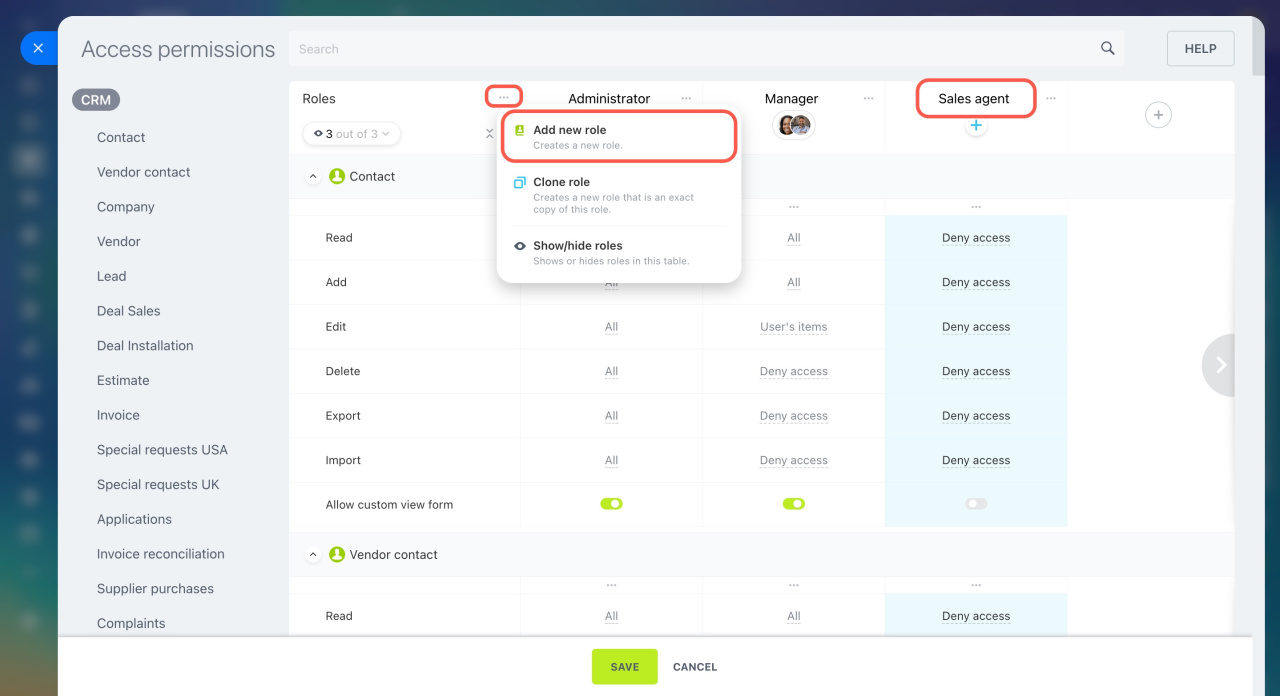
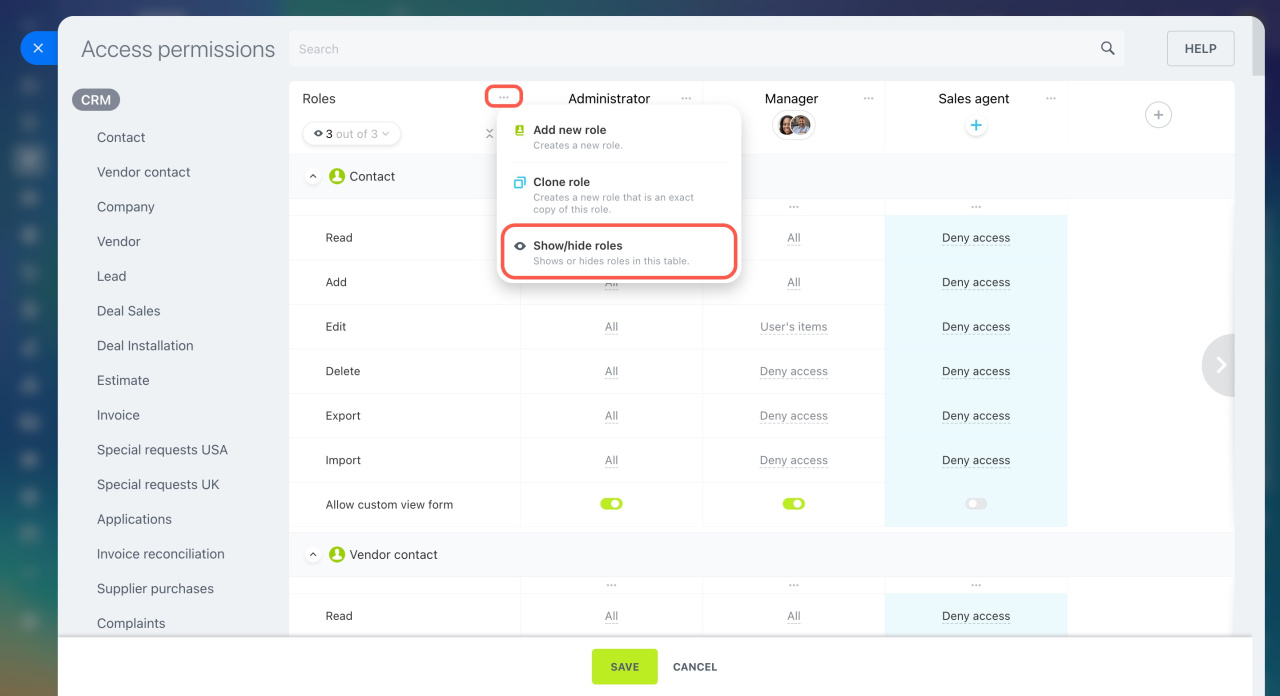
If the standard roles don't suit your needs, you can copy, edit, or create your own. Click the three dots (...) and select an action.
Create a role. Select Add new role and give it a name.
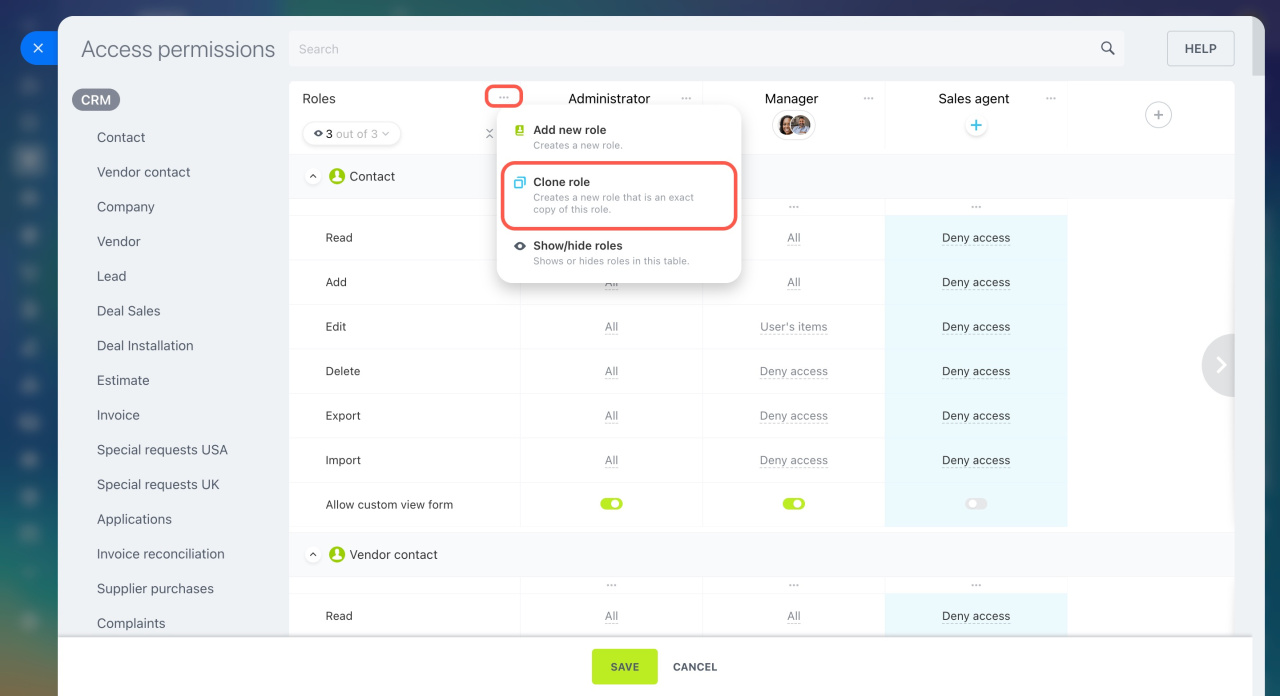
Clone a role. This is handy if you need a new role with minor changes.
- Click Clone role.
- Select the role you want to clone.
- All permission settings will be copied to the new role.
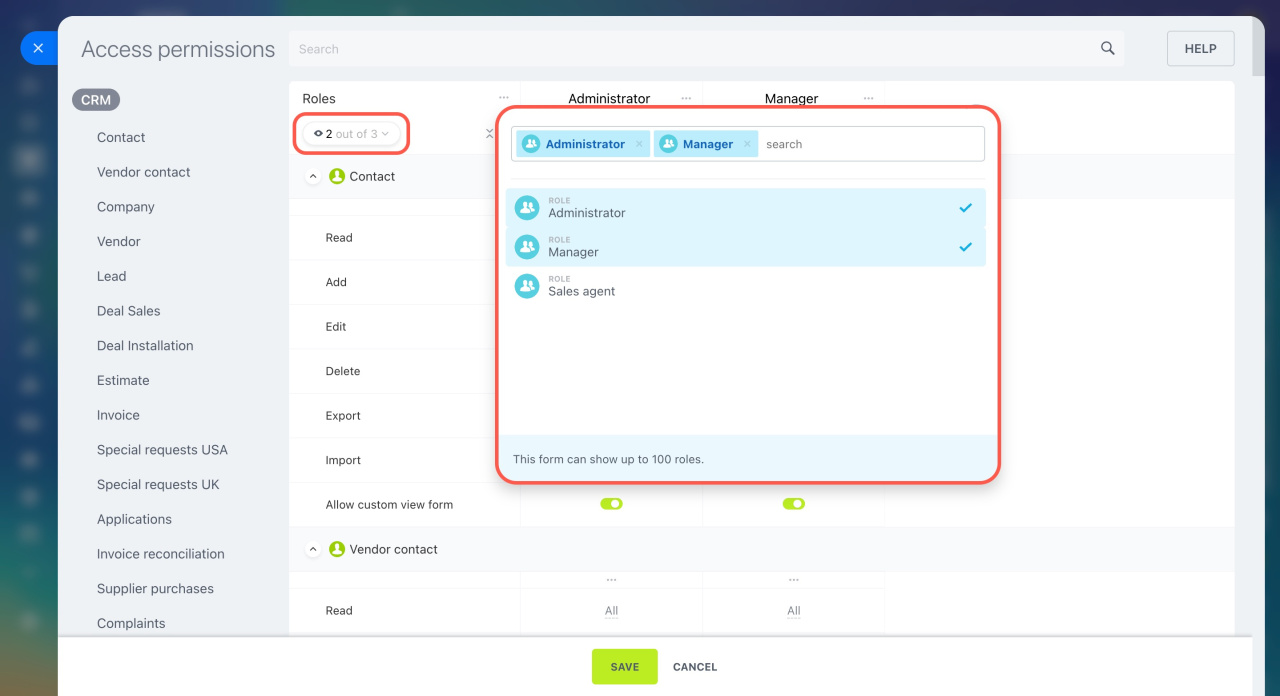
Show or hide roles. Keep only the necessary roles visible and hide the others. This is useful for comparing or editing multiple roles.
Click Show/hide roles and select the roles you need.
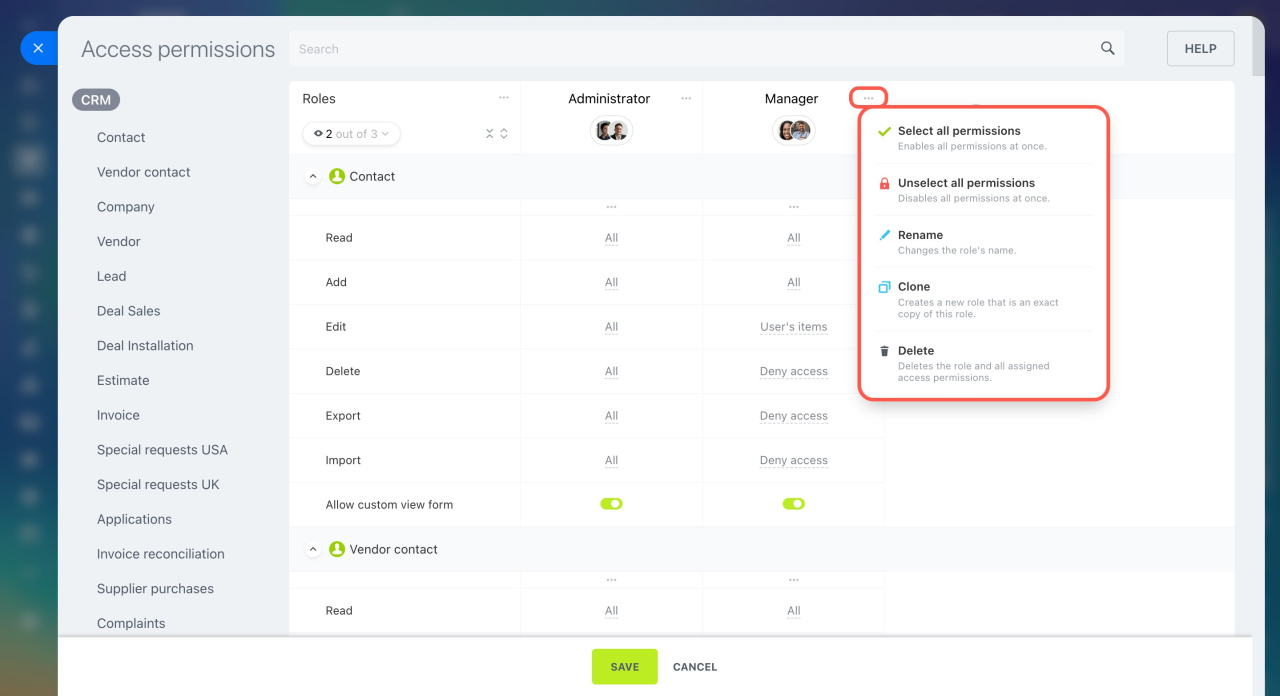
Set up a role. Click the three dots (...) next to the role name and select an action:
- Select all permissions: Gives full access to all CRM sections for the selected role.
- Unselect all permissions: Denies access to all CRM sections.
- Rename: Change the role name.
- Clone: Create a copy of the selected role.
- Delete: Remove the role and all its settings.
Set up permissions
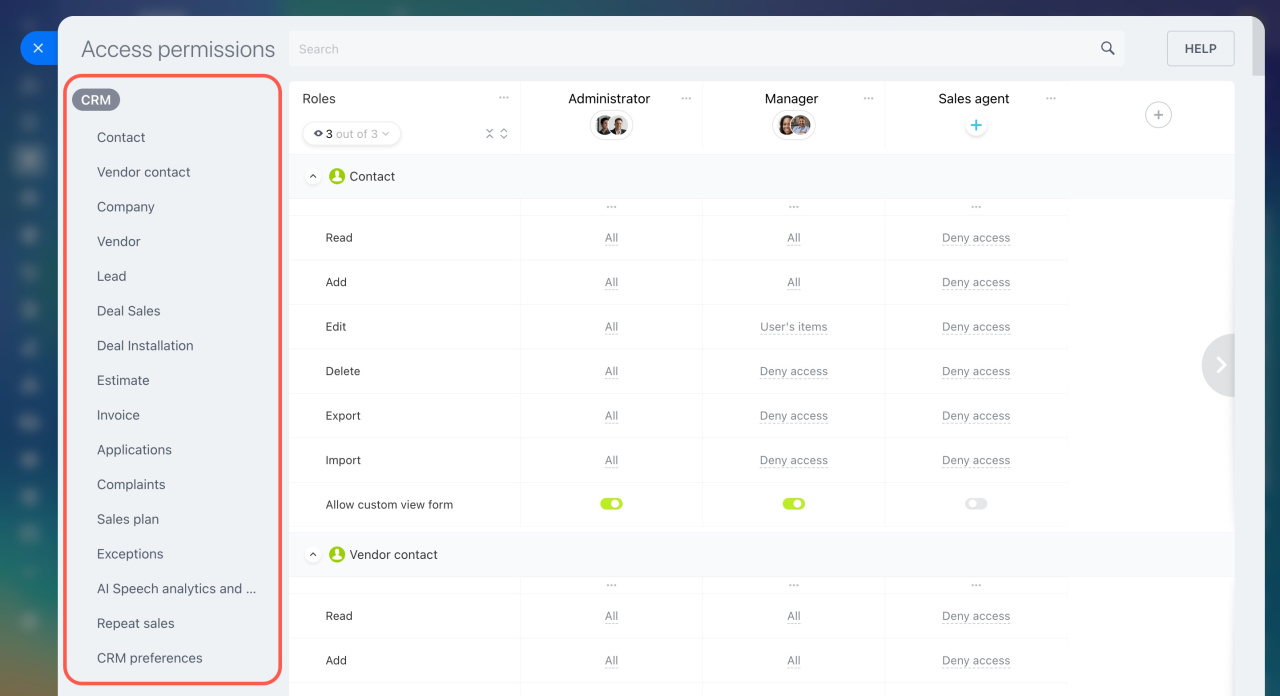
For each role, you can configure access permissions to actions with specific CRM item. Set up permissions to the following elements:
- Contacts
- Vendors and vendor contacts
- Companies
- Leads
- Deals in multiple pipelines
- Estimates
- Invoices
- SPA
- Sales plan
- Exceptions
- AI Speech analytics and Sales scripts
- Repeat sales
- CRM preferences
Actions with CRM items.
-
Read: Allows users to view CRM items.
-
Add: Allows users to create CRM items. They won't see the items after creating them unless they have the Read permission.
-
Edit: Allows users to modify CRM items.
-
Delete: Allows users to delete items from CRM.
-
Export: Allows users to download CRM items from Bitrix24.
Export CRM data -
Import: Allows users to upload CRM items to Bitrix24.
Import to Bitrix24 CRM -
Allow custom view form: Allows users to customize the CRM item form. Without this permission, they can only use the item form layout configured by an administrator.
CRM item form features and settings - Automation rules: Allows users to set up, edit, or view automation rules, which are available in leads, deals, invoices, estimates, and SPA items.
Automation rules in CRM -
Amount on kanban stages: Hides or shows the total amount at the kanban stages. For example, you can allow users to see the amount of deals only at the In progress stage.
- Move to stage: Specify whether users can move CRM items to any stage or only specific ones.
Actions in the Sales plan block.
- Read: Allows users to view the sales plan.
- Edit: Allows users to edit the settings of the sales plan.
Sales plan
Actions in the Exceptions block.
- Read: Allows users to view the list of exceptions.
- Edit: Allows users to add phone numbers and emails to exceptions and delete them.
Exceptions
Actions in the AI Speech analytics and Sales scripts block.
- View settings: Allows users to view sales scripts and their settings without editing them.
- Edit settings: Allows users to edit and delete sales scripts.
AI Speech analytics and Sales scripts in CRM
Actions in the Repeat sales block.
- View settings: Allows users to view repeat sales statistics.
- Edit settings: Allows users to edit and delete repeat sales scripts.
AI-powered repeat sales in CRM
Actions in the CRM preferences block. The User can edit preferences permission gives users full access to change the settings and access permissions in CRM.
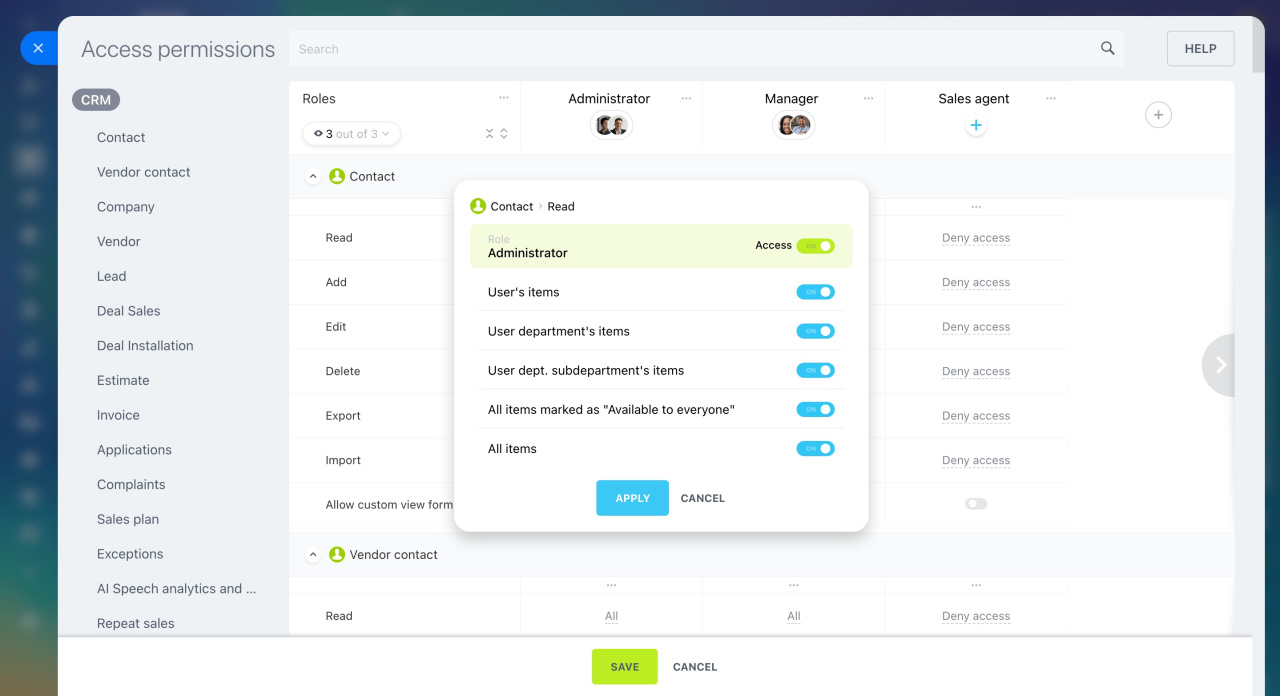
Access levels. Select an access level for each action with CRM items:
-
Access: Gives full access or denies access to the selected action, like modifying all deals.
-
User's items: Allows users to access the items where they are responsible.
-
User department's items: Allows users to access the items of their department's employees.
-
User dept. subdepartment's items: Allows users to access the items of employees in all subdepartments of their department.
-
All items marked as "Available to everyone": Allows users to access the items with the Available to everyone option enabled.
Standard fields in CRM -
All items: Allows users to access all items of a certain type, such as all contacts.
Assign employees to roles
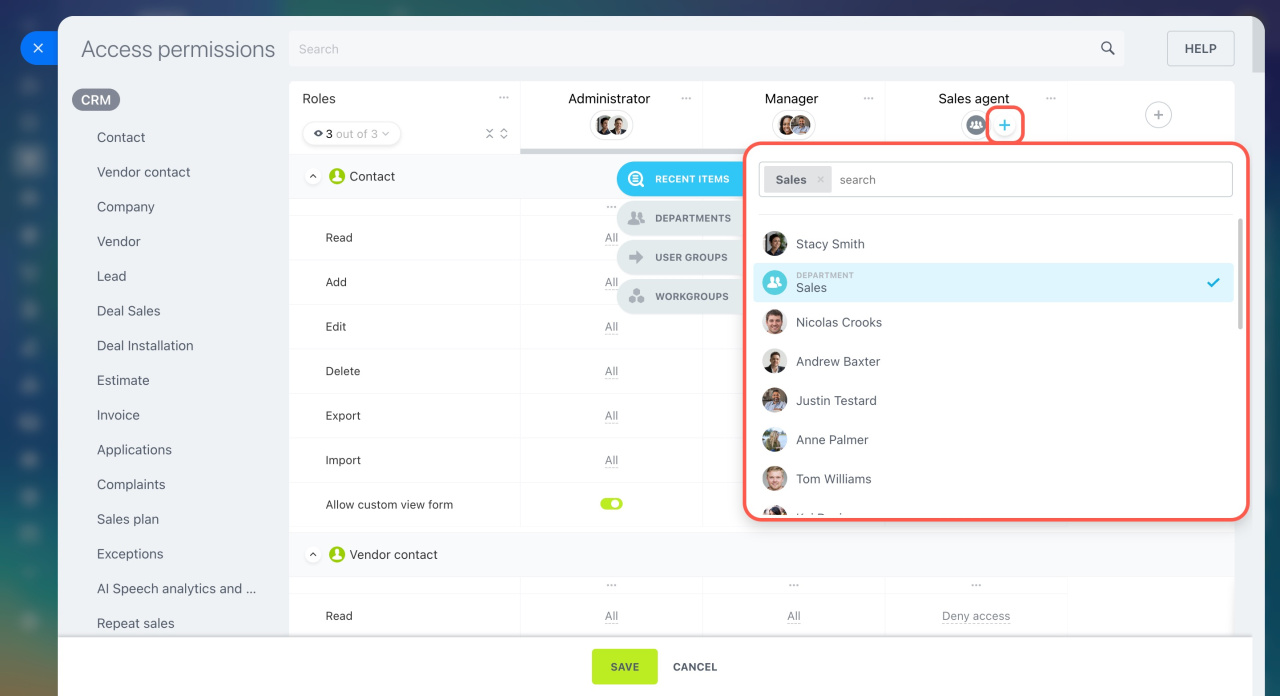
Click the Plus (+) icon under the role name and choose users to assign it to:
-
Recent items: Employees, departments, and workgroups you searched for in any Bitrix24 sections are displayed. Find any employee from the company structure by entering their name in the search bar.
-
Departments: Select a department from the company structure.
-
Workgroups: Select a workgroup or project. Decide whether to add all workgroup members, or only its owner or moderator.
-
User groups: These are preset user groups that cannot be changed, such as Administrators, All employees, or Bitrix24 partners.
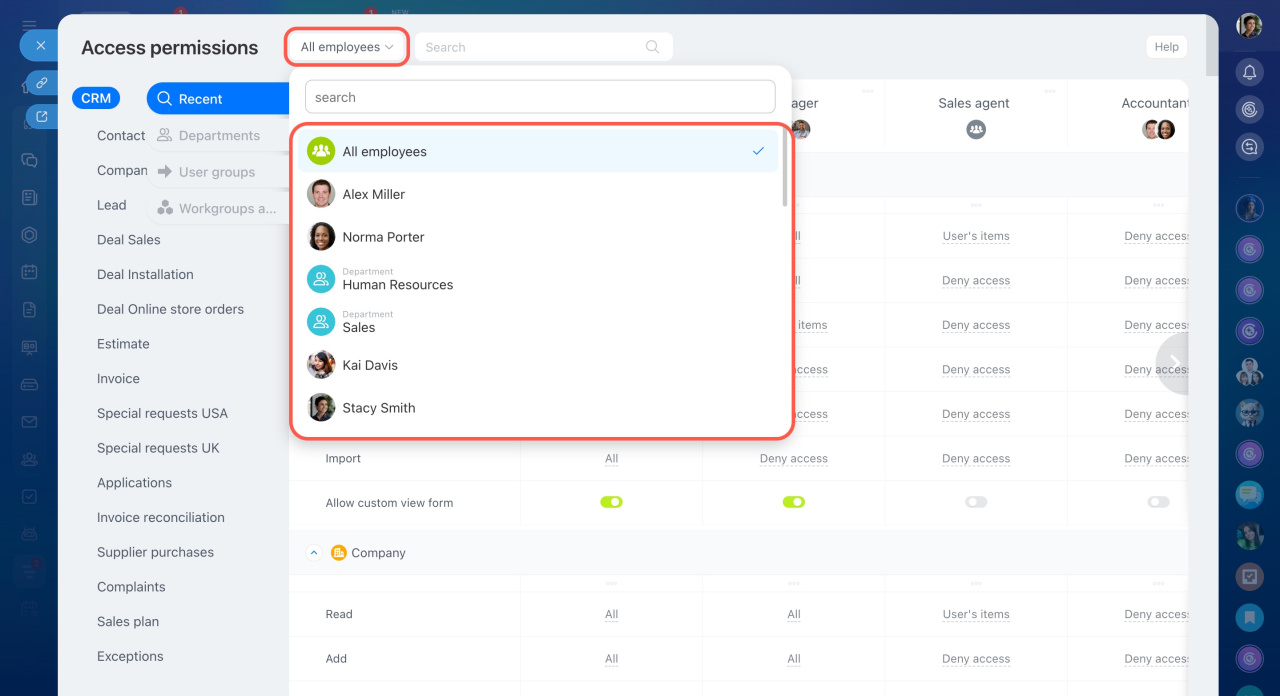
To check overlapping access permissions, select an employee from the field next to the search bar. A slider will show their assigned roles. This helps you review their permissions and adjust settings if needed.
Use the search
To quickly set up permissions to a specific item or find the desired action, use the search bar.
CRM items. Enter the item name, such as lead or company. All permissions you can set up for them will appear.
CRM item stages. To set up permissions for a specific stage, enter its name. For example, you can find all the items having the In progress stage.
Actions with CRM items. Use the search to display a specific permission like Read for all CRM items.
In brief
-
Role-based access permissions allow you to set up specific permissions to the CRM section. Create roles with different access levels for departments and employees.
-
You can set up separate access permissions to CRM, CRM forms, widgets, and automated solutions.
-
By default, there are two roles in the CRM access settings: administrator and manager.
-
If the standard roles don't suit your needs, you can copy, edit, or create your own.
-
For each role, you can configure access permissions to actions with CRM items. For example, allow a user to view all CRM items, but change only their own.
-
If a user has multiple roles with different access levels, the role with more permissions will apply. For example, if one role restricts adding leads while another allows it, employees will be able to create leads.

