Open Channel is a tool for managing customer communication across various platforms like messengers, social networks, and live chat. It helps you:
- Handle enquiries: All customer conversations are automatically distributed among agents.
- Automate tasks: Set up an Open Channel to send automatic replies in chats and save customer data in CRM.
- Monitor quality: Track response times, resolution rates, and get customer feedback after each conversation.
In this article:
Create an Open Channel
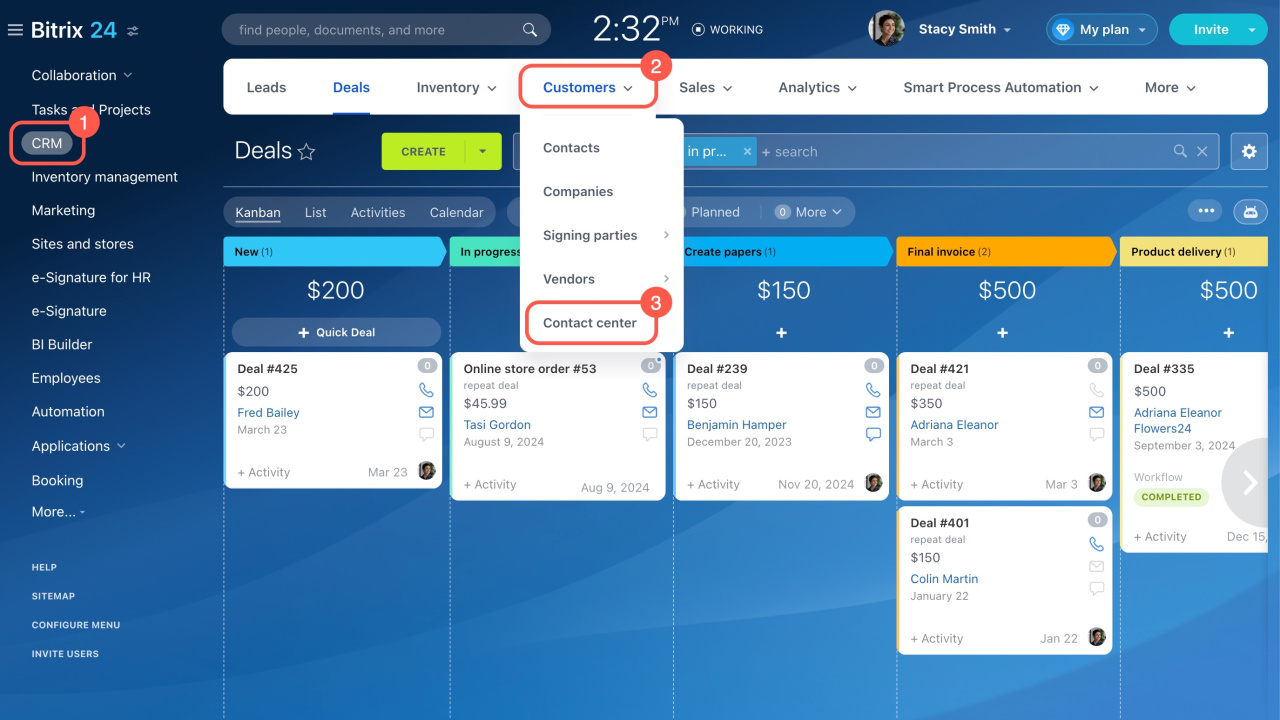
- Go to CRM.
- Expand Customers.
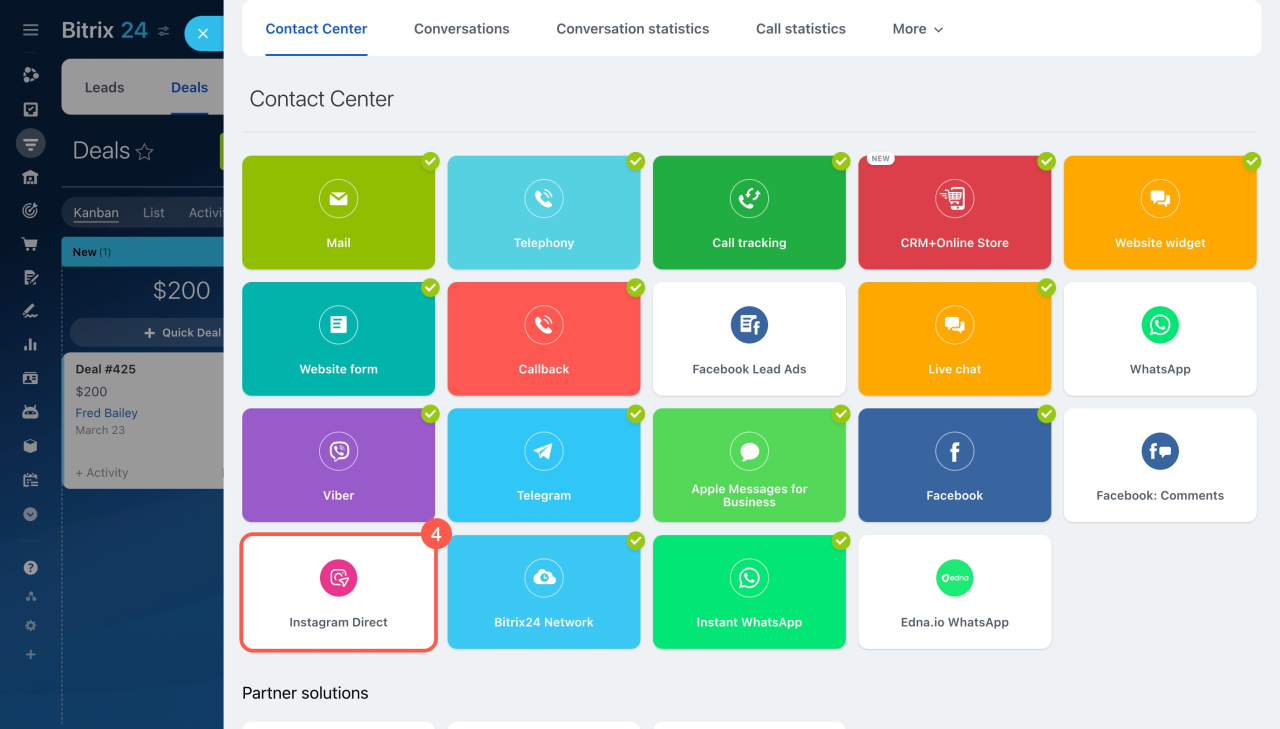
- Select Contact Center.
- Choose a communication channel, like WhatsApp or Facebook.
- Click Create Open Channel.
The number of Open Channels you can create depends on your plan.
Bitrix24 plans and pricing
Configure an Open Channel
Only Bitrix24 administrators and employees with the Administrator role in access permissions can configure Open Channels.
Access permissions for Open Channels
Once you create or select an Open Channel, you need to configure it. All settings are divided into sections.
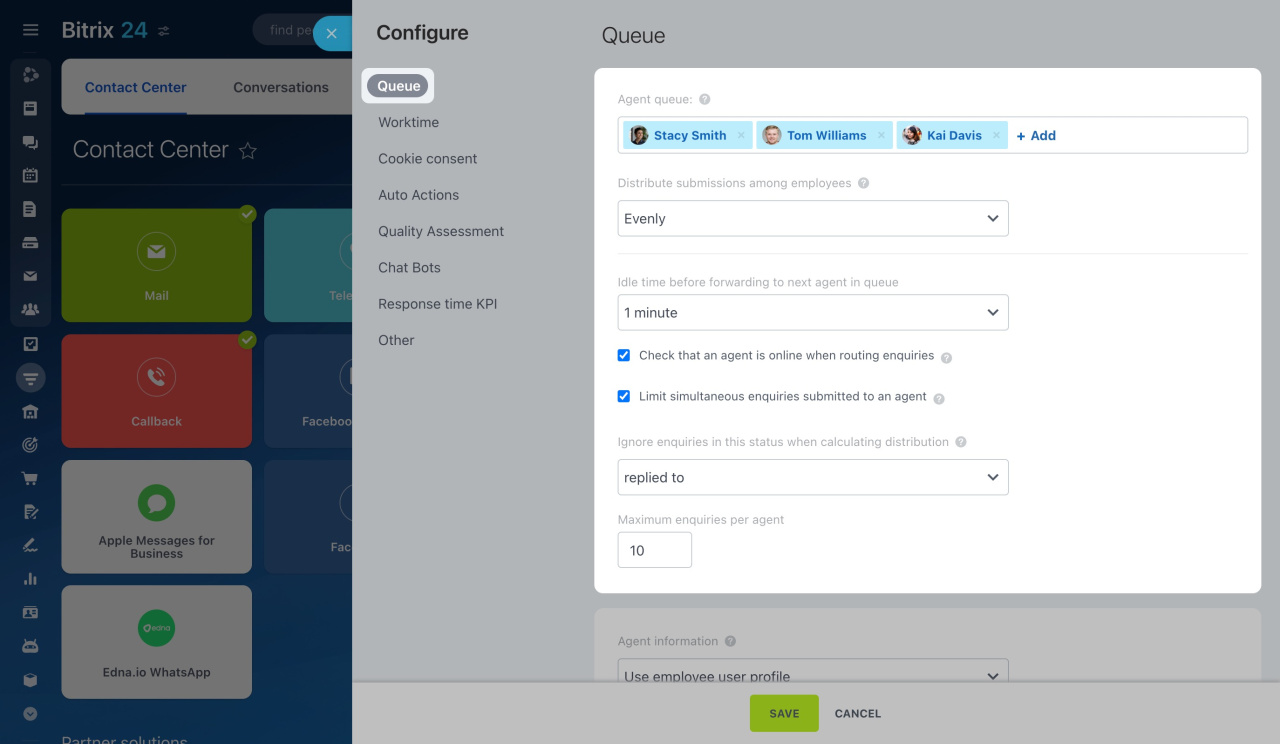
Queue
Set up the queue of employees who will handle customer enquiries.
Agent queue: Choose the users who will respond to incoming enquiries. These can be specific employees or an entire department.
Distribute submissions among employees: Select a distribution mode:
- Evenly: Enquiries are evenly distributed among employees in the queue.
- Exactly as enqueued: Each new enquiry is assigned to the first employee in the queue. If they don't respond, it moves to the next.
- To everybody: Enquiries are sent to all employees in the queue at once, and anyone can respond.
Idle time before forwarding to next agent in queue: Set how long to wait for an agent's response before moving the conversation to the next employee. This applies to the Evenly or Exactly as enqueued distribution modes.
Check that an agent is online when routing enquiries: Enable this option to ensure:
- The employee is not dismissed
- The employee is not on leave
- The employee is online or has clocked in
If the agent is unavailable, they won't receive incoming enquiries.
Check Open Channel agent availability
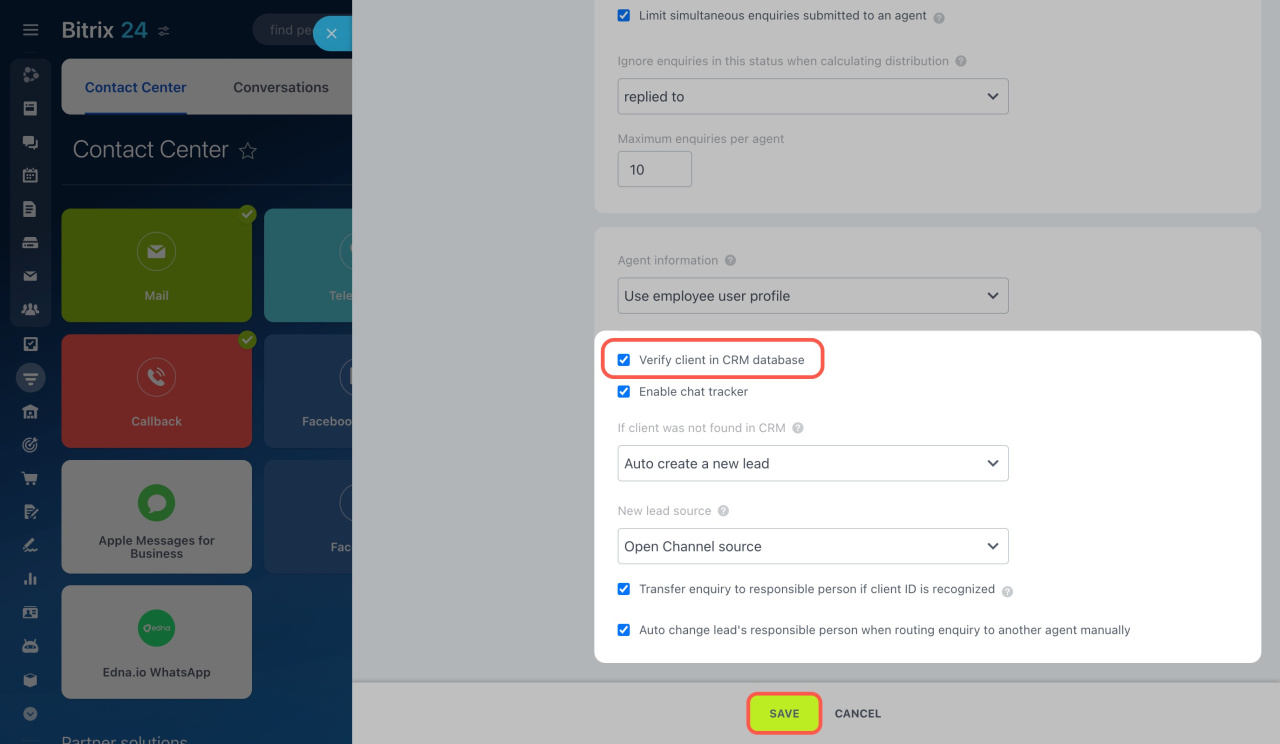
Limit simultaneous enquiries submitted to an agent: Manage employees' workload by setting a limit on how many conversations they can handle at once.
-
Ignore enquiries in this status when calculating distribution: Choose which conversations (replied to, closed, or waiting for user reaction) not to count in the limit.
-
Maximum enquiries per agent: Specify the number of simultaneous conversations each employee can handle.
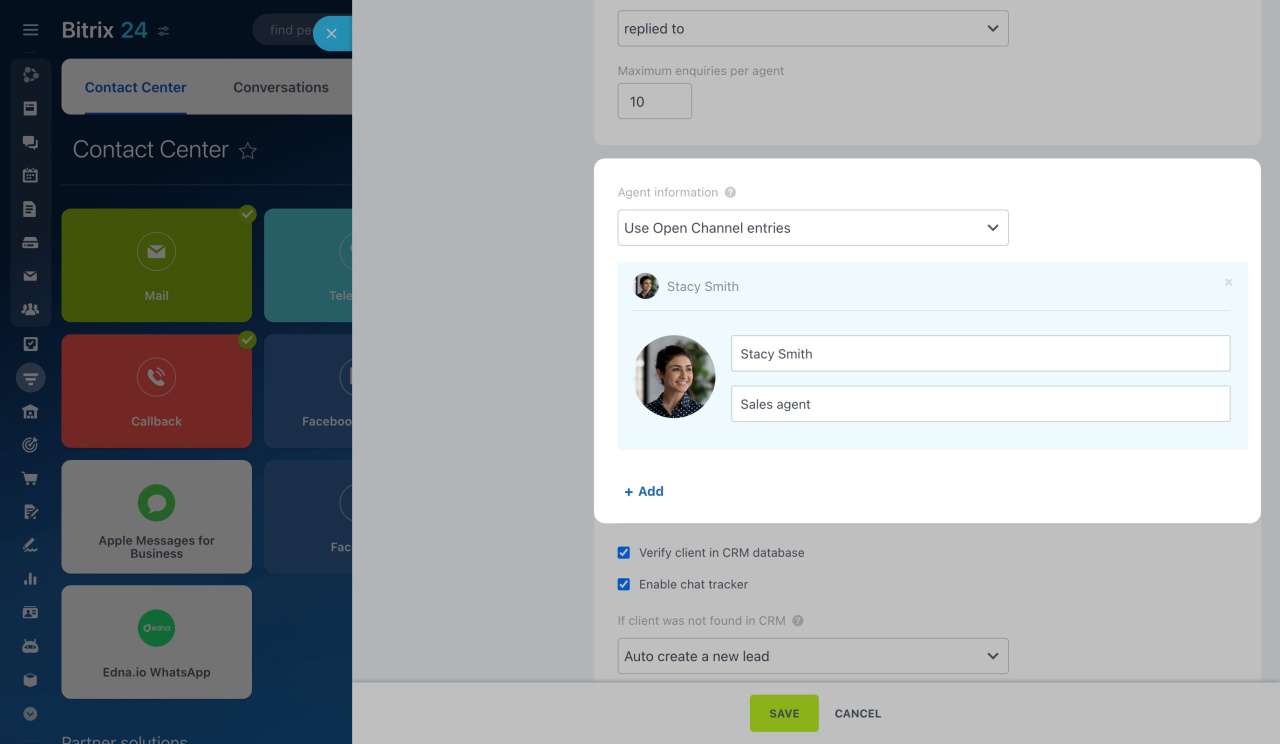
Agent information: Decide what information about the employee customers will see:
- Use employee user profile: Customers will see the name and photo from the employee's personal profile.
- Use Open Channel entries: Set a different name and photo for chats.
- Hide agent information: Show only the employee's name or leave these fields blank.
Verify client in CRM database: This helps prevent duplicate customer data.
Enable chat tracker: Bitrix24 can automatically identify a customer and save the chat history in their form, even if they use different communication channels.
Chat tracker
If client was not found in CRM database: Decide whether to create a new item automatically or manually. Leads or deals will be created automatically. If you choose Manually, a link to create a lead or deal will appear in the customer chat. The item form will include the customer's first and last names along with the chat history.
New lead source: Bitrix24 automatically indicates the communication source, like Facebook, Instagram, Telegram, etc.
Statuses and dropdowns in CRM
Transfer enquiry to responsible person if client ID is recognized: If a customer is found in CRM, the conversation goes to the employee responsible for them.
Auto change lead's responsible person when routing enquiry to another agent manually: If you transfer a conversation to another agent, Bitrix24 will automatically assign them as responsible for the CRM item form. If the option is disabled, the person who first accepted the conversation remains responsible for the customer.
When you're done setting up the Queue tab, click Save.
Worktime
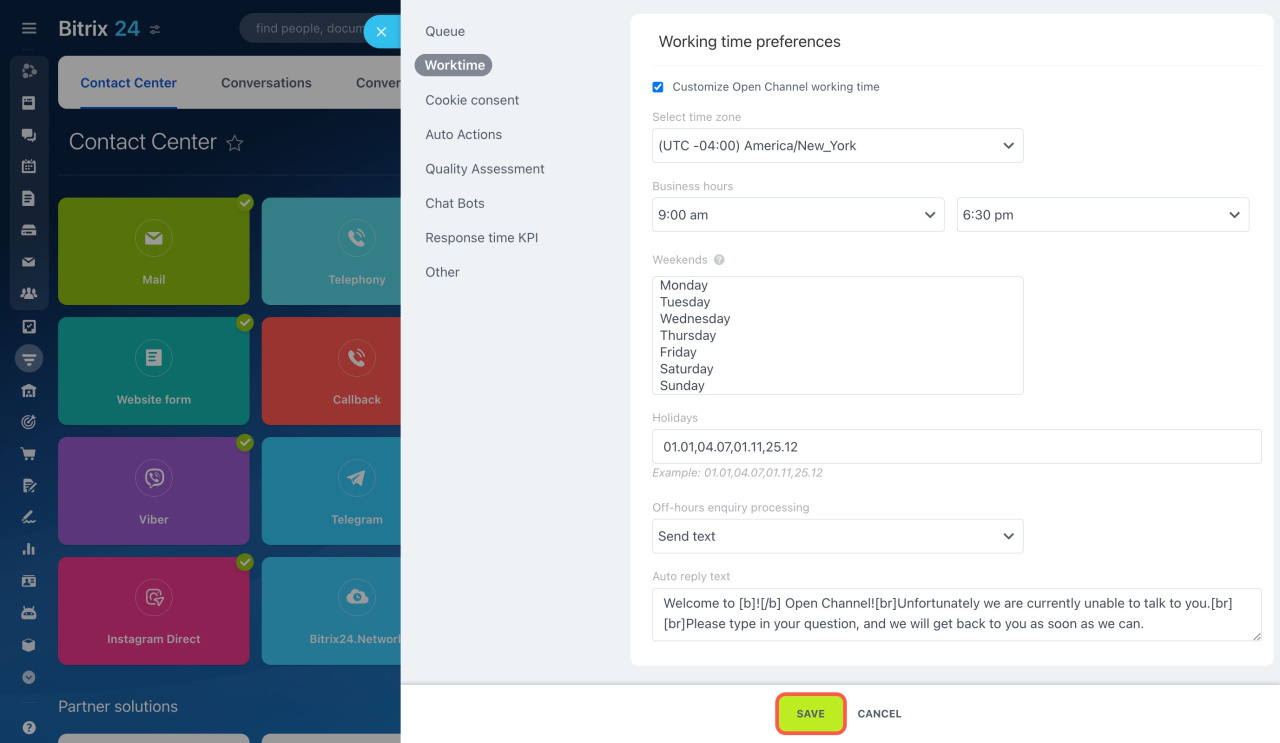
Enable the option to customize the Open Channel working hours:
-
Time zone: Select your time zone. This is useful if you work with customers from different cities.
-
Business hours: Set your business hours, like 9 AM to 6 PM. Set up an auto-reply for messages received outside these hours. Customers can still send messages but will be notified that they'll get a response during business hours.
-
Weekends: Select your weekends, such as Saturday and Sunday. Choose multiple days by holding Ctrl on Windows (Cmd on Mac). You can also set up an auto-reply for customers who contact you on weekends.
-
Holidays: Enter holidays separated by commas. For example, to mark December 25th as a holiday, enter 25.12 in the field.
-
Off-hours enquiry processing: Decide if you want to send an auto-reply. If so, specify the message text. This shows customers that their enquiry is acknowledged and allows agents to stick to their schedule.
Website widget
When you're done setting up the Worktime tab, click Save.
Cookie consent
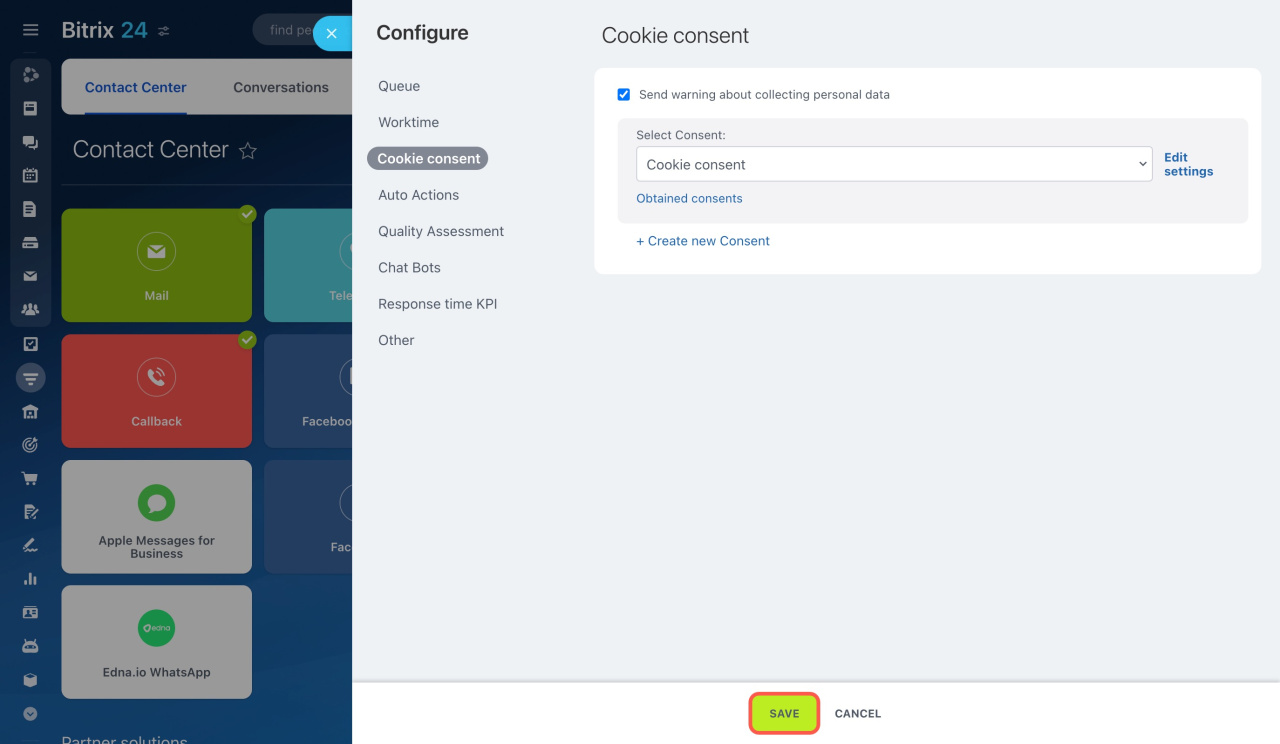
Enable the Send warning about collecting personal data option to automatically send customers a message asking for their consent. You can use a ready-made agreement or create your own.
When a customer starts a chat, they'll receive this warning. This helps your company comply with laws and builds customer trust.
Add a GDPR agreement
Click Save.
Auto Actions
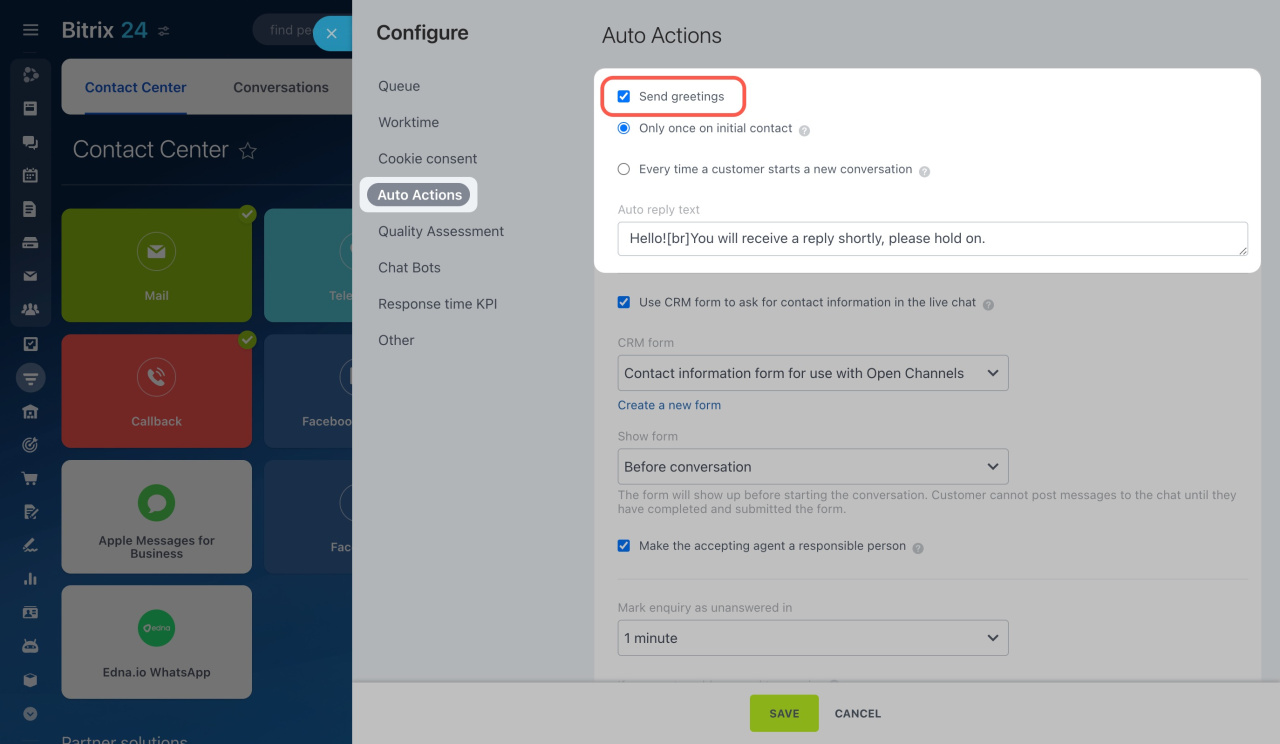
Send greetings: Enable this option to instantly send a greeting or important info in the chat. Configure these extra settings:
-
Only once on initial contact: The auto-reply is sent only the first time a customer contacts you through a new communication channel. If they start another chat later, the greeting won't be sent again.
-
Every time a customer starts a new conversation: Customers will receive an auto-reply each time they start a new chat.
-
Auto reply text: Write the message customers will receive.
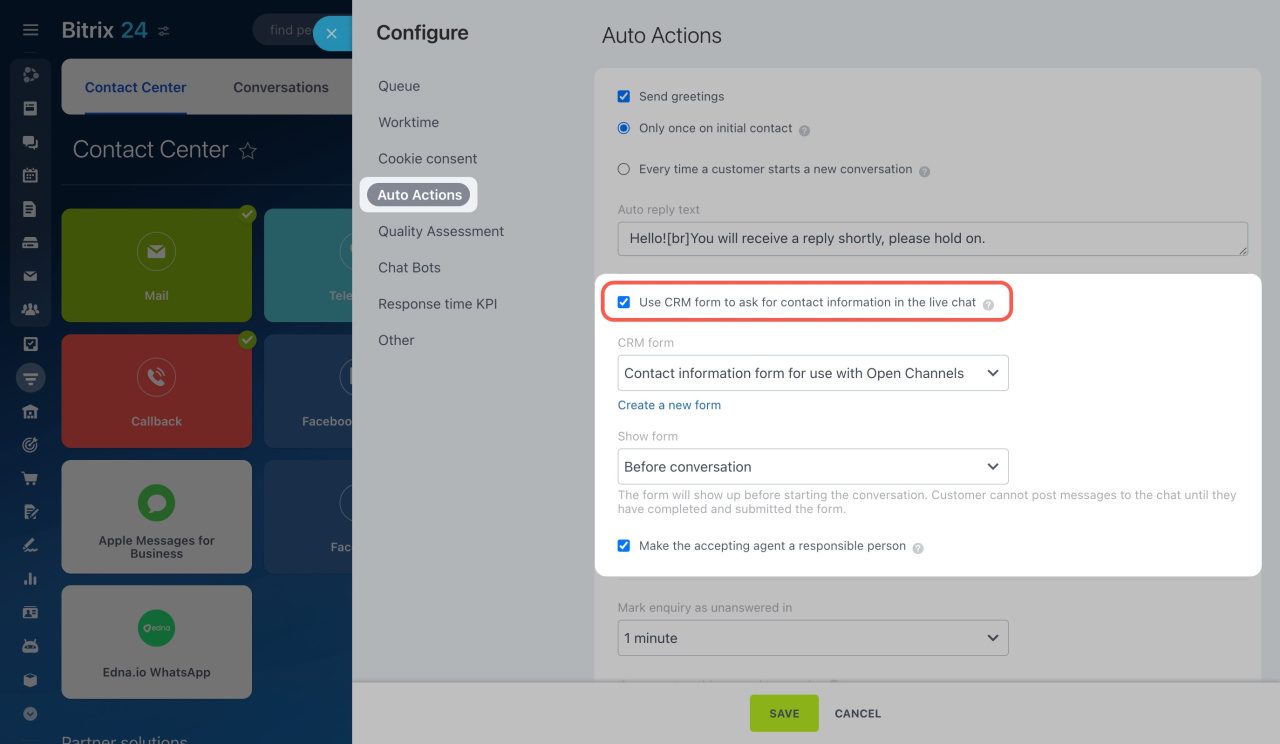
Use CRM form to ask for contact information in the live chat: Enable this option to automatically send customers a form to fill out their contact details in the live chat. The data is automatically saved in CRM.
-
CRM form: Select a form from the list or create a new one.
-
Show form: Choose when the form will appear in the chat, either before the conversation starts or after the first message.
-
Make the accepting agent a responsible person: If enabled, the employee who accepts the conversation will be responsible for the CRM item. If disabled, the responsible person will be the one specified in the CRM form settings.
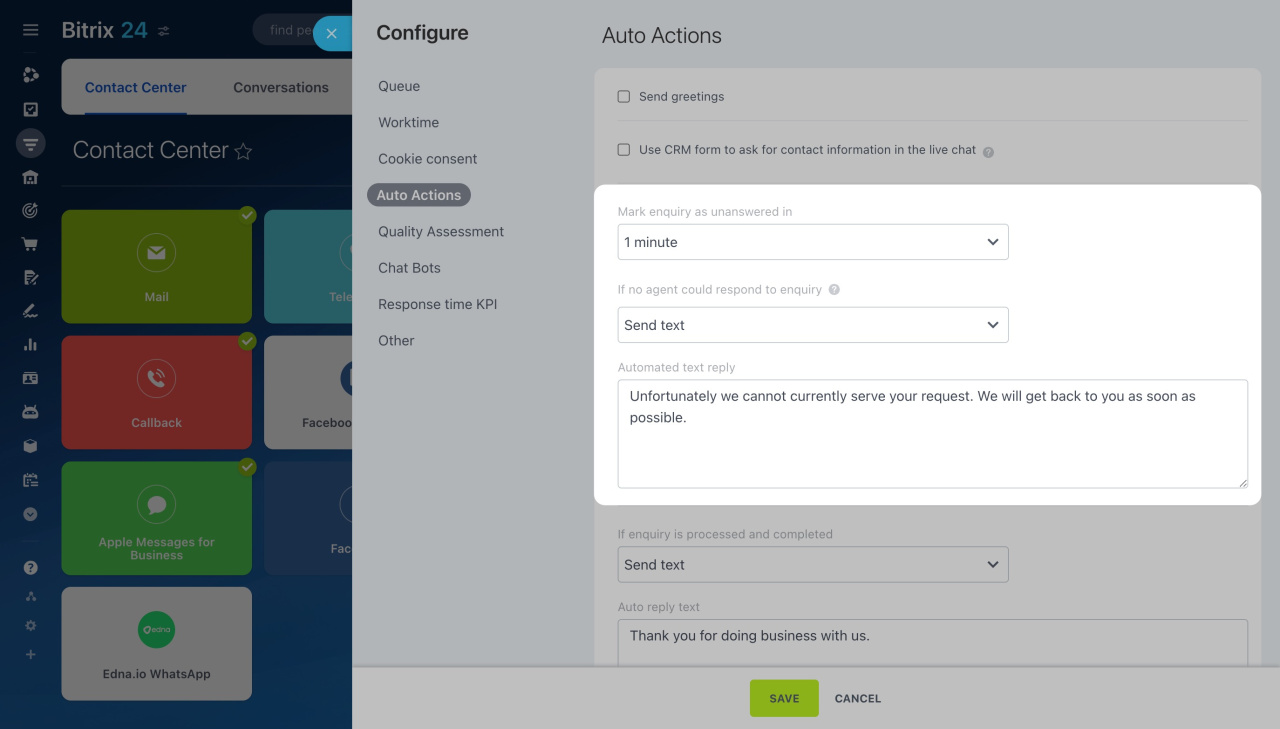
Mark enquiry as unanswered in: Set the time to mark enquiries as unanswered, like five minutes or an hour. The countdown begins when the customer's first message comes in.
If no agent could respond to an enquiry: If no one replies within the set time, send an auto-reply in the chat, such as a message asking the customer to wait. Customize the standard text to fit your needs.
If enquiry is processed and completed: Enable an auto-reply to be sent to the customer after the conversation ends. For example, you might thank them for reaching out to your company. Select Send text and enter your message.
Delay until enquiry is completely closed (after it was marked as closed by agent): Specify how long the customer can rate the agent's performance after the chat ends. Set a duration from a minute to a day, or disable feedback by closing chats immediately.
Conversation timeout: Decide how long to wait before automatically closing the chat if the customer doesn't reply.
Perform action: Send a message after the chat is automatically closed. For example, you might thank the customer for reaching out and let them know the chat is closed.
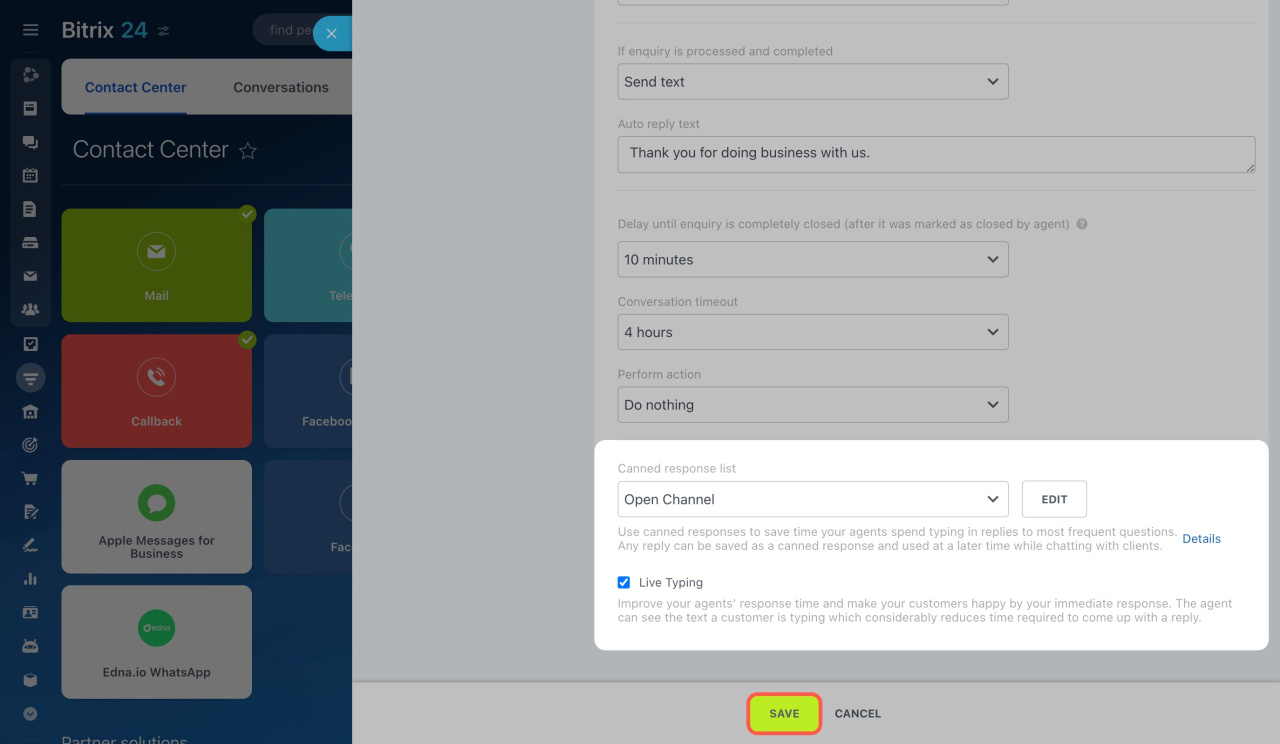
Canned response list: Select or create a list of canned responses for this Open Channel. Canned responses help agents quickly answer common customer questions. You can create them using the Lists tool.
Canned responses
Live Typing: This option allows you to see what the customer is typing in the chat, so you can prepare your response in advance.
When you're done setting up the Auto Actions tab, click Save.
Quality Assessment
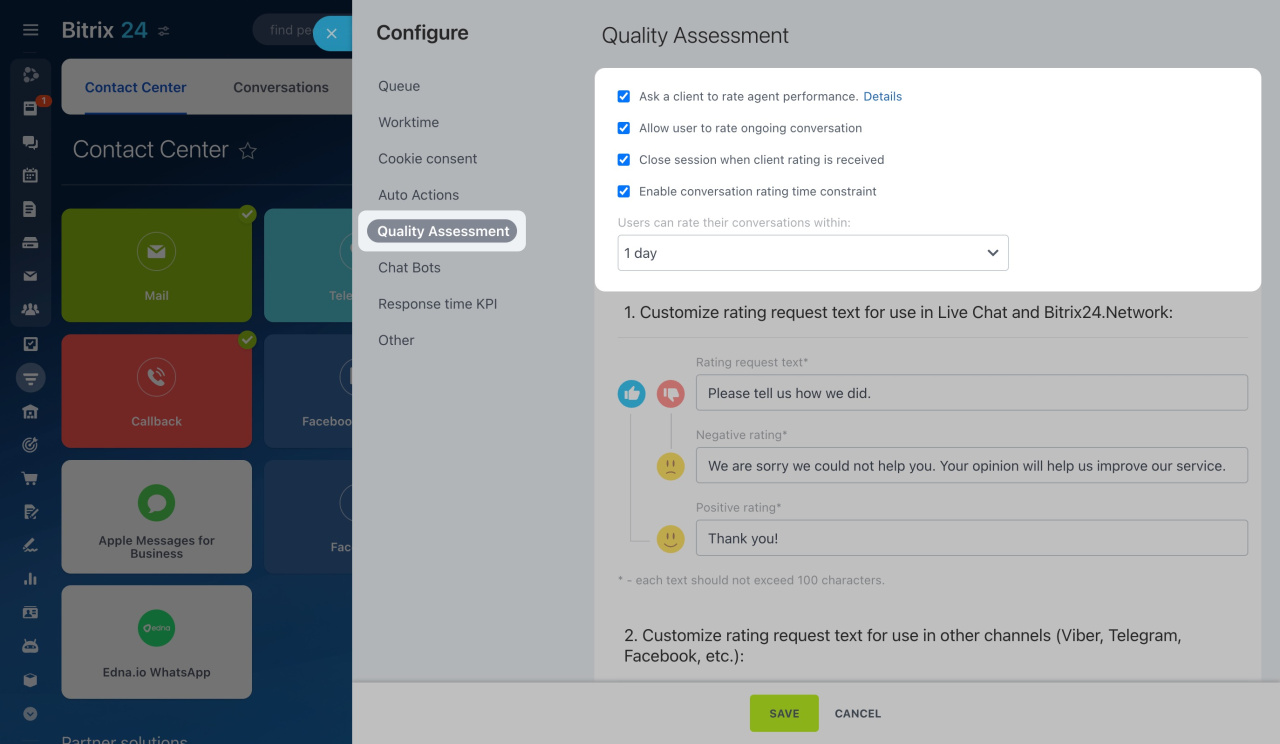
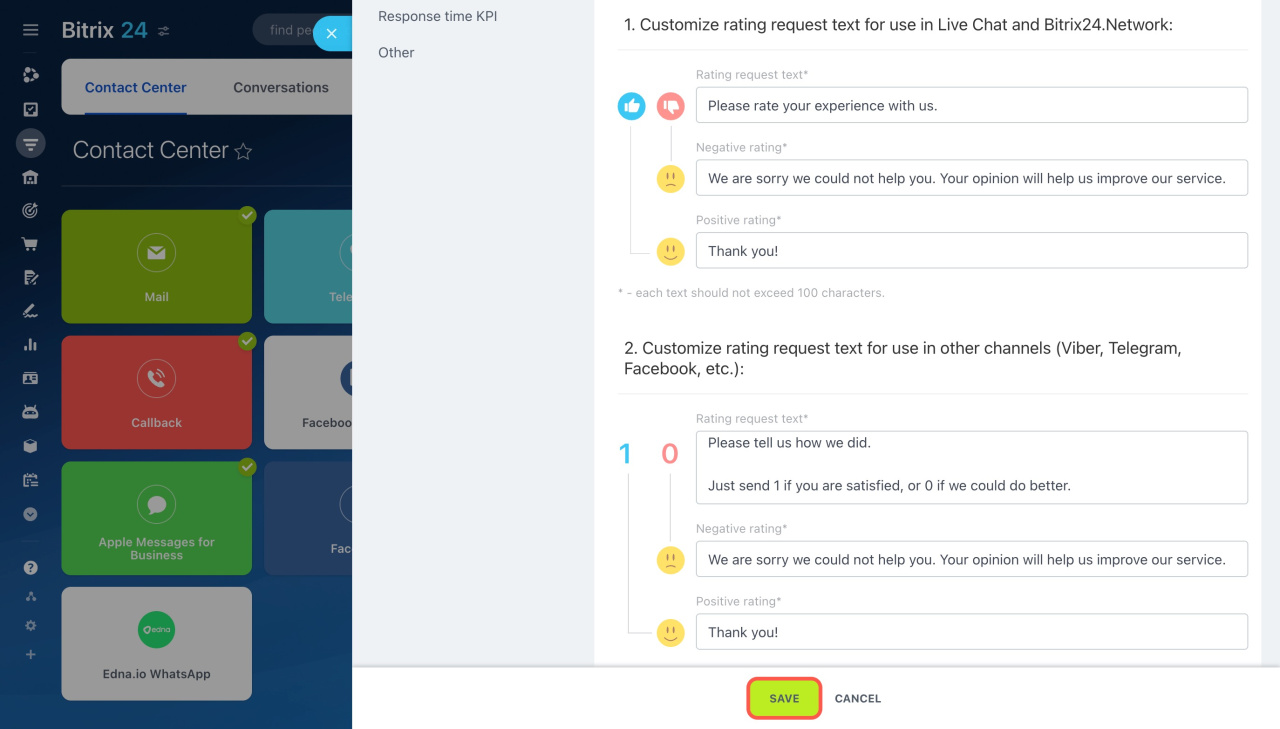
Ask a client to rate agent performance: An automatic message will be sent in the chat asking the customer to rate the agent's performance. Both the customer and the supervisor can provide feedback.
Open Channels: Quality Assessment
Allow user to rate ongoing conversation: The customer can rate the agent's performance while the conversation is still active.
Close session when client rating is received: The chat will automatically close once the customer rates the agent's performance.
Enable conversation rating time constraint: Turn on this option to set the time for the customer to rate the agent's performance.
Specify the text for quality assessment in the Live chat, Bitrix24 Network, and other communication channels. Click Save.
Chat Bots
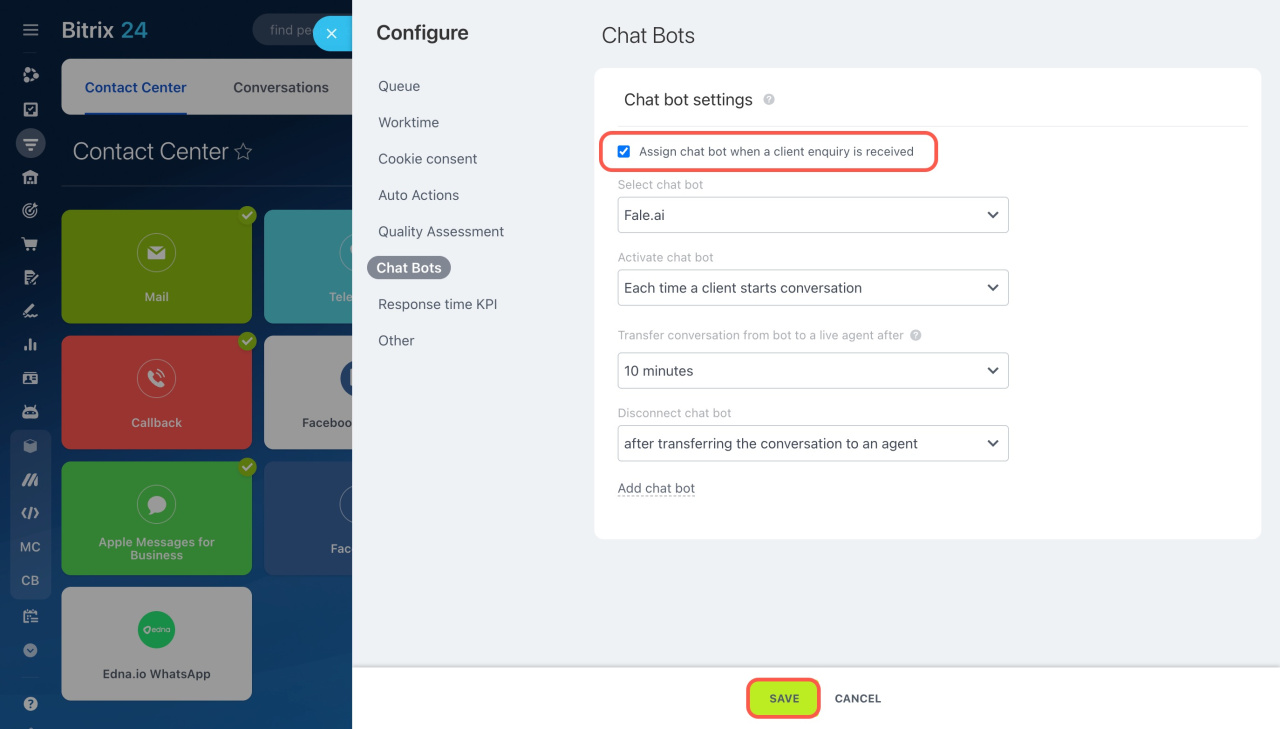
Assign chat bot when a client enquiry is received: Enable this option to let the chat bot automatically handle initial messages from customers. This helps quickly answer common questions and passes only complex requests to employees.
Chatbots in Bitrix24: how to install and use them
-
Select chat bot: The list shows all chat bot apps available in your Bitrix24.
-
Activate chat bot: The bot can activate only on the customer's first enquiry or in each new conversation.
-
Transfer conversation from bot to a live agent after: Set the time after which the conversation will automatically go to an agent. The customer can switch to an agent earlier by sending a message with the number 0.
-
Disconnect chat bot: The bot will disconnect after transferring to an agent or ending the conversation.
You can install new chat bots from Bitrix24 Market.
Find and install Bitrix24 Market applications
Click Save.
Response time KPI
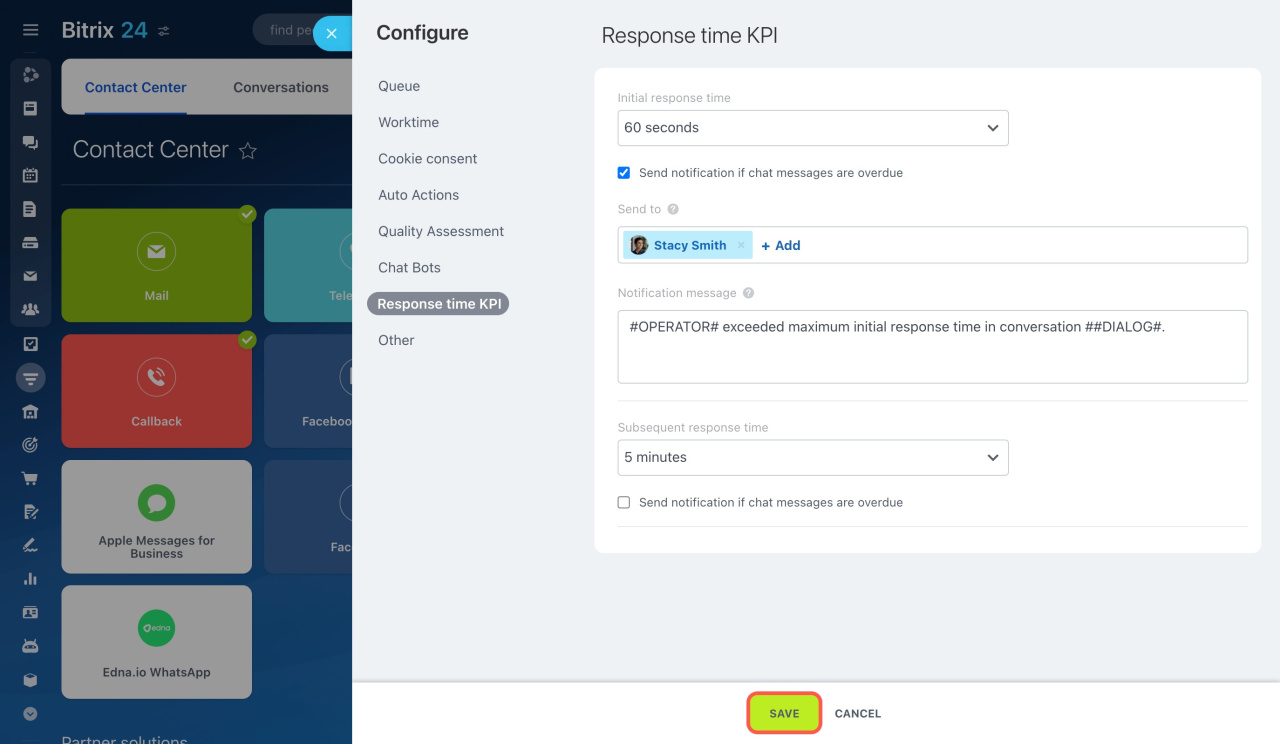
Set up KPIs to evaluate employee efficiency and monitor service quality.
Initial response time: Set the time for the employee to respond to the customer's first message in the chat.
Subsequent response time: Set the time for the employee to respond to the customer's follow-up messages in the chat.
Send notification if chat messages are overdue: Enable this option to automatically send notifications if the agent doesn't respond on time.
- Send to: Choose the employees who will receive the notification.
- Notification message: Use the standard text or write your own.
#OPERATOR#: Name of the responsible employee.
#DIALOG#: Conversation ID and link to it.
Click Save.
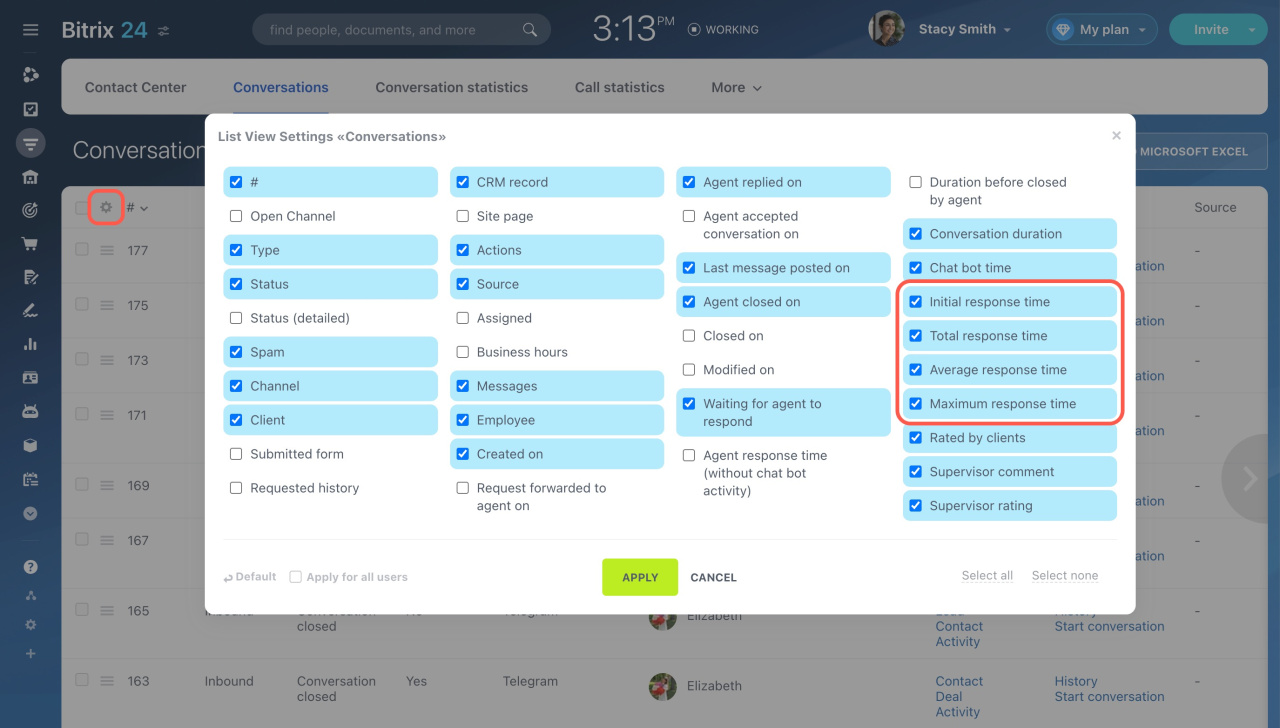
KPIs can be tracked in the Conversations section. In the list settings, choose which data to display:
- Initial response time
- Total response time
- Average response time
- Maximum response time
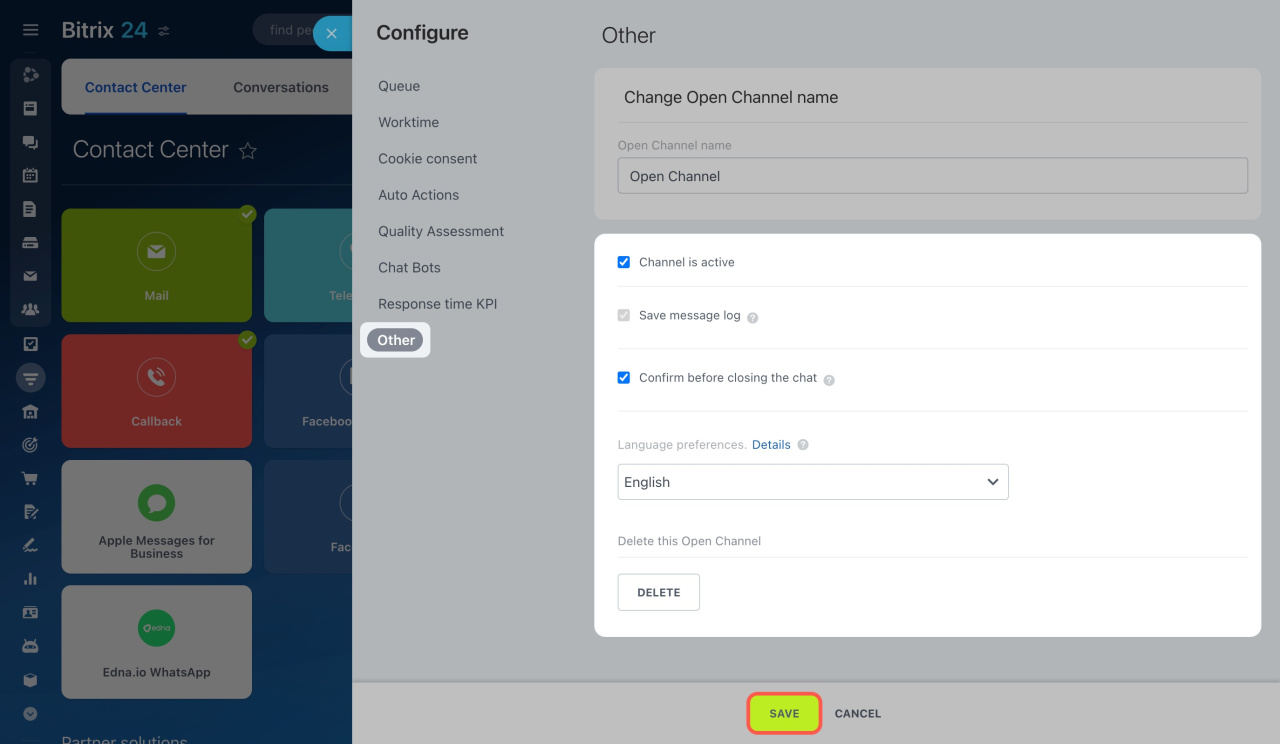
Other
Open Channel name: This is what customers will see in the chat.
Connect Bitrix24 Live Chat
Channel is active: Use this option to enable or disable the Open Channel.
To completely stop receiving messages, disconnect the communication channel, like Telegram or WhatsApp.
To redirect messages to another Open Channel, connect the communication channel to it.
Save message log: Messages are automatically saved and can be found in the chat, the linked CRM item, or the Conversations section.
Confirm before closing the chat: Enable this option to notify agents before closing conversations, preventing accidental closures.
Language preferences: Select the language for email messages sent to clients when they request a message log or receive a notification. By default, your Bitrix24 language is used.
Delete this Open Channel: If you delete an Open Channel, all related conversations will be removed.
Click Save.
Configure access permissions for Open Channels
In the Open Channel and permissions > Access permissions section, click Configure and select employees who can change settings and view chat history.
Access permissions for Open Channels
When you finish setting up permissions, click Save.
In brief
-
Open Channel is a tool for managing customer communication across various platforms like messengers, social networks, and live chat.
-
Use Open Channels to keep all messages in one place, automatically distribute them among employees, and monitor their performance.
-
Go to CRM > Customers > Contact Center and select a communication channel. Choose an Open Channel from the list or create a new one.
-
In the Open Channel settings, specify your business hours, add automatic replies, and connect a chat bot to answer common questions.
-
In the Access permissions section, select employees allowed to change Open Channel settings and view chat history. Access settings apply immediately to all Open Channels.

