There are two types of workflows in Bitrix24: sequential and with statuses. A sequential workflow is a set of actions that are performed in order: each step starts only after the previous one. This type is suitable for simple workflows, for example, a contract agreement or a vacation request.
This article is about configuring the actions of a sequential workflow. If you are configuring a workflow for the first time, see the step-by-step example.
Example of creating a workflow template
If you need to configure workflow actions with statuses, read the following article: Status Driven Business Process Template.
To learn how to add a new workflow form, read the following article: Create a new workflow in Feed.
If a form has already been created and you need to add new fields to a workflow, check out the following article: Create fields in workflows.
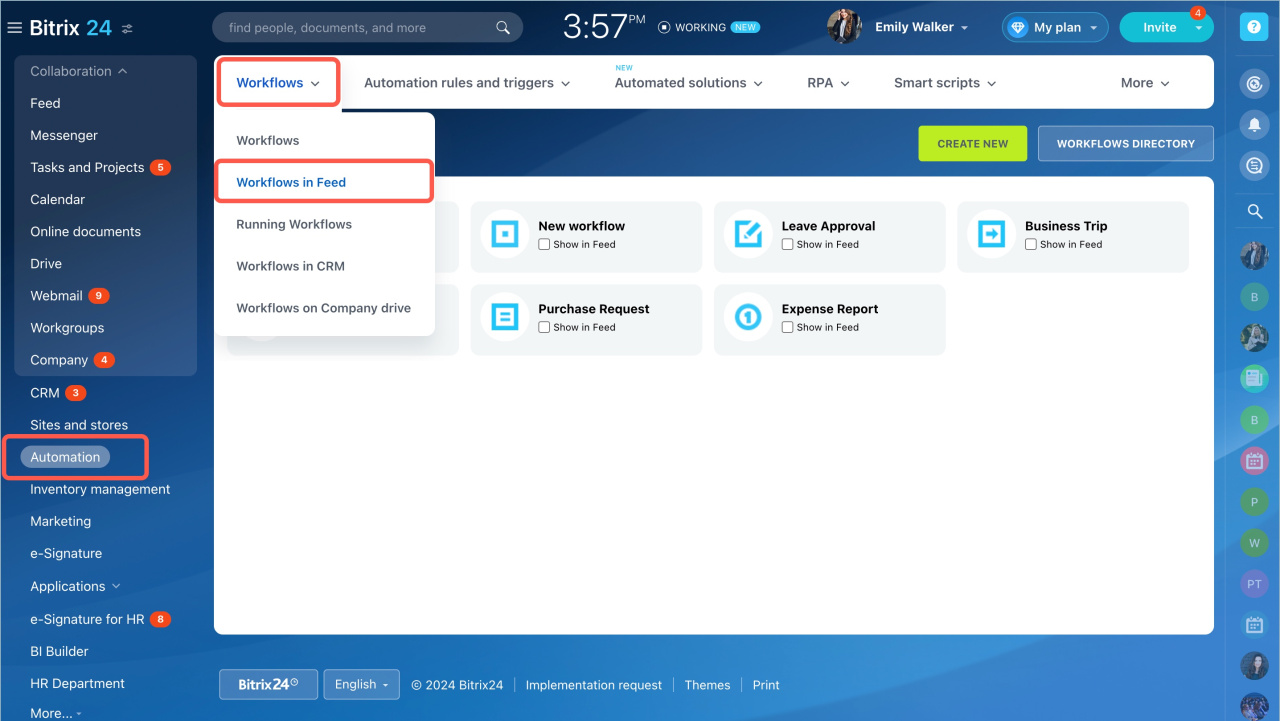
Go to the Automation section - Workflows - Workflows in Feed.
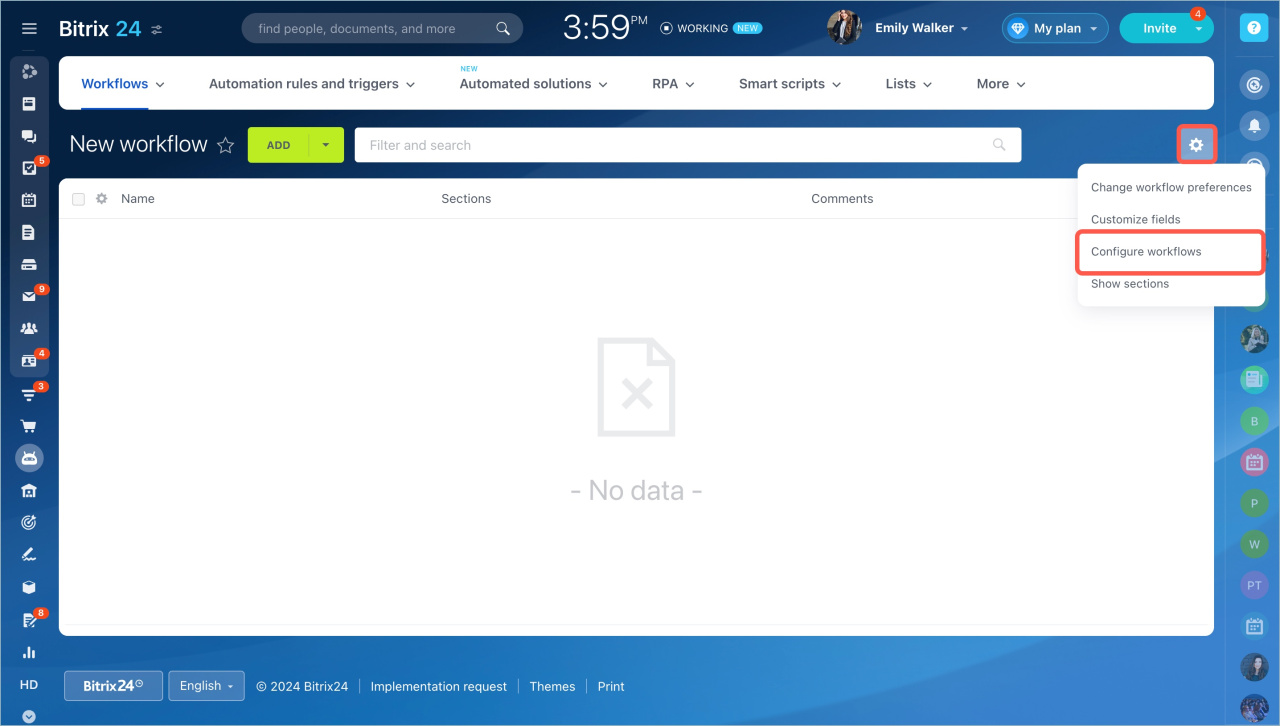
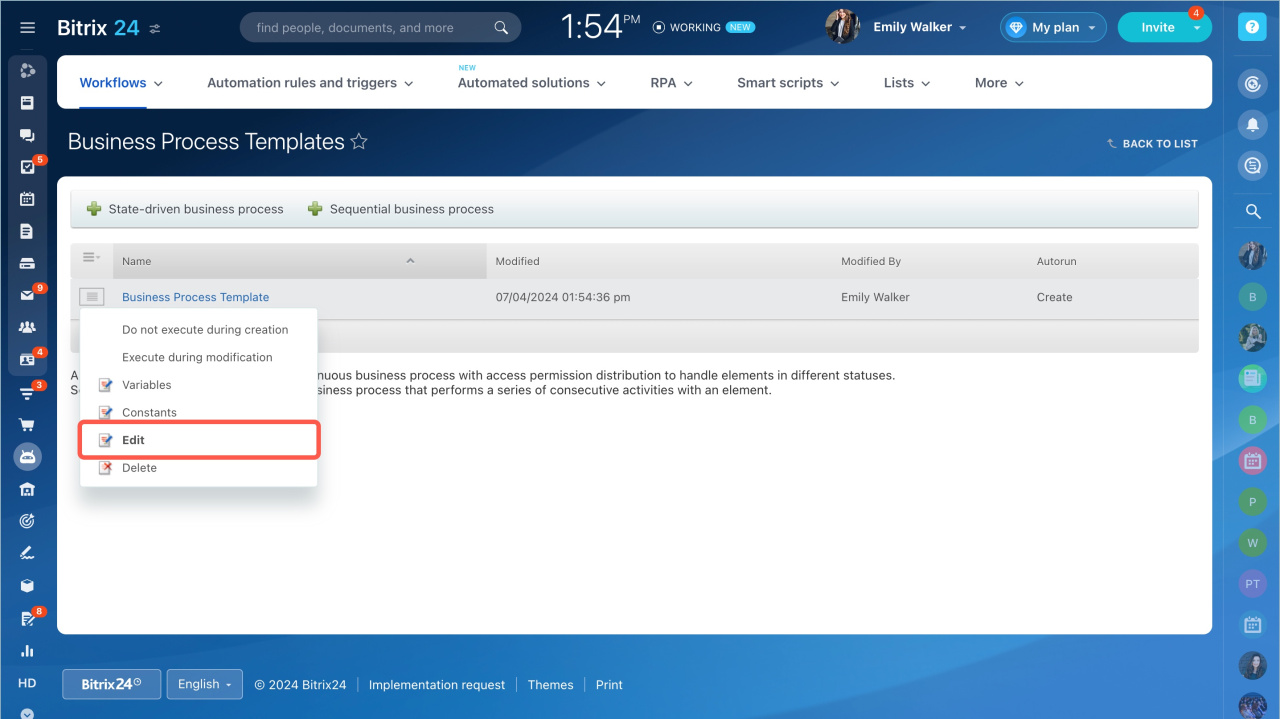
Open the workflow form, click the settings icon and select Configure workflows.
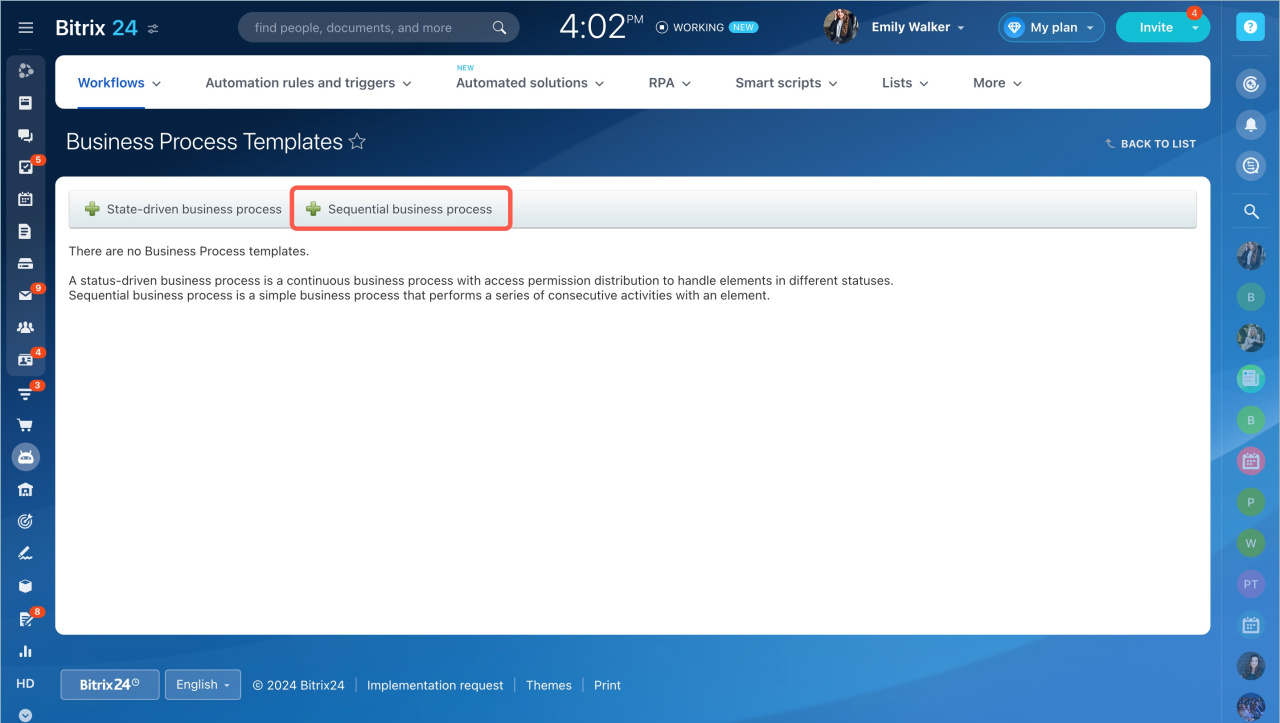
Select Sequential business process.
Fill in the template parameters and configure the workflow actions.
Configure template parameters
A workflow template is a pre-configured sequence of actions that allows you to quickly launch processes.
You need to fill in the following tabs:
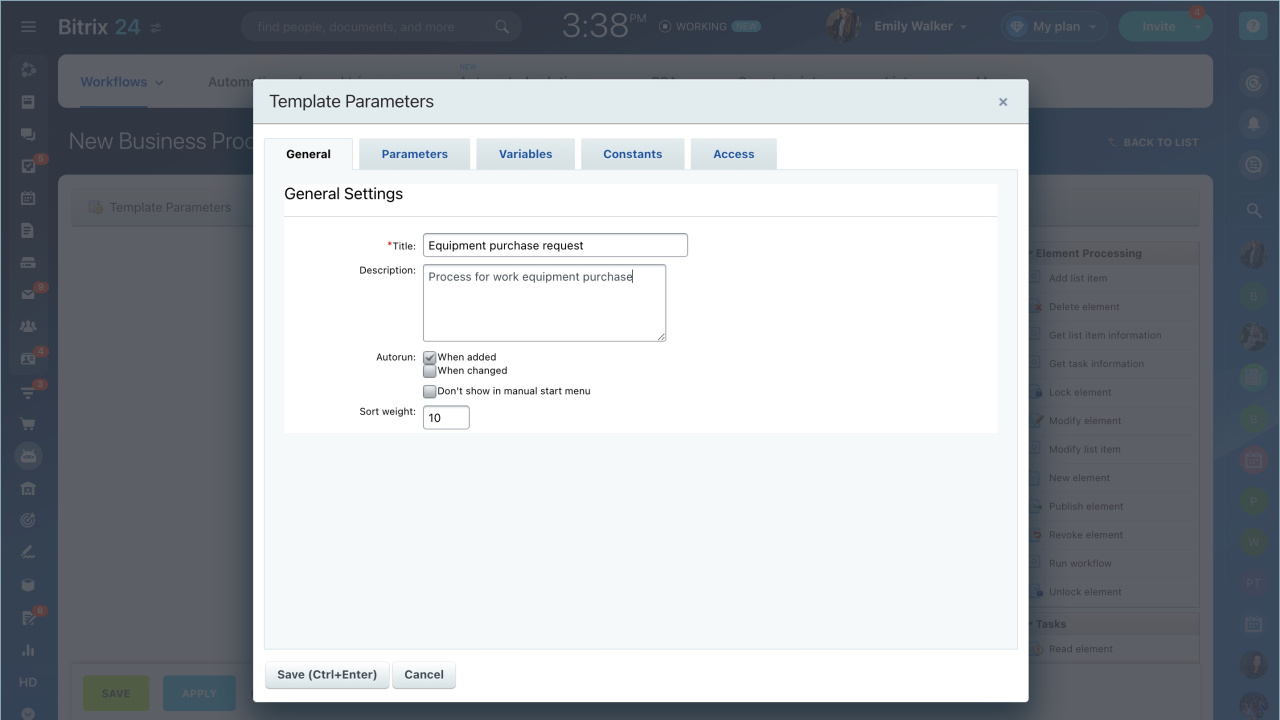
- General — the name and the description of the template. Add them and specify how to start the process: automatically or manually. Enable the Don't show in manual start menu option if needed.
- Parameters — data that the user will specify when starting the business process. Specify parameters, for example, a contract number or an equipment name. Parameter values cannot be changed after the process has been started.
- Variables — temporary values that can be changed. For example, the responsible person.
- Constants — values that cannot be changed. For example, a company name or an office address.
- Access — access permissions for employees who work with this business process template.
When you have filled in all the data, save the template parameter settings.
Configure workflow actions
Actions are the steps of a business process: approve a document, send a notification, set a task. They can be automatic or performed by employees.
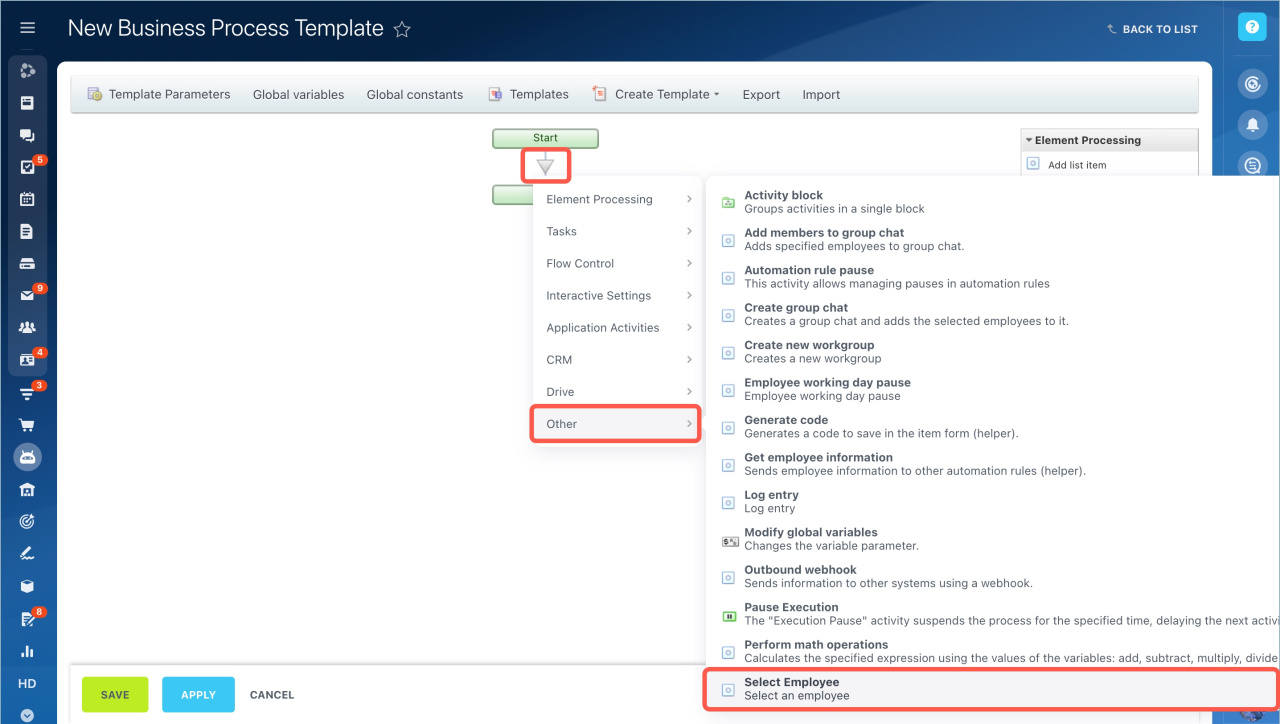
To add an action, click the triangle icon between the business process steps and select the desired action. You can also select an action from the right menu and move it to the desired location.
You need to fill in the parameters that depend on its type. To do this, click the Settings.
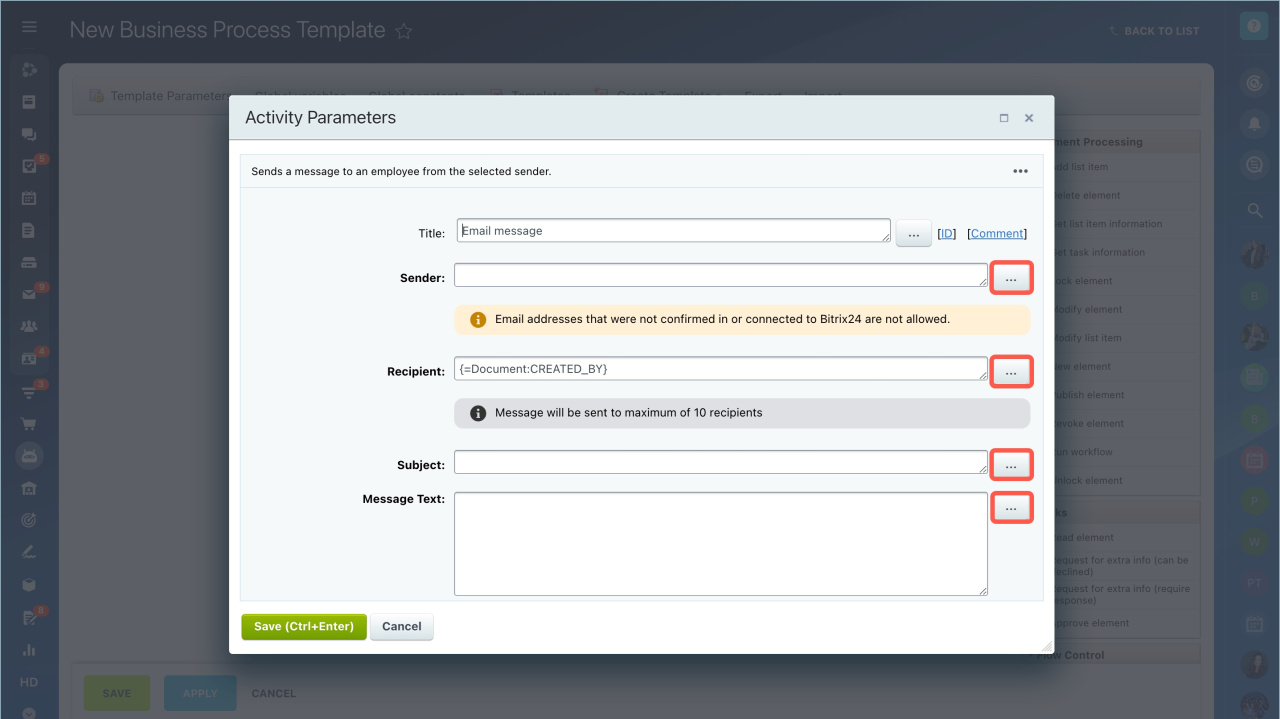
Parameters can be filled in manually or you can insert values from other fields, variables or constants. For example, in the Message recipient parameter you can automatically substitute the name of the employee who started the business process. Click three dots and select the field. You can insert the values of several fields into one parameter.
When you have configured all the actions, click Save. The template will appear in the list of business processes.
Example of creating a sequential business process template
Let's create a "Equipment purchase request" business process. Employees will be able to leave a request to the manager to purchase new equipment.
A business process consists of five actions:
- supervisor selection
- approval of equipment purchase
- purchase paperwork
- notification of rejection
- notification of approval
Configure the template parameters. Specify the name and the description, enable the Autorun: When added option.
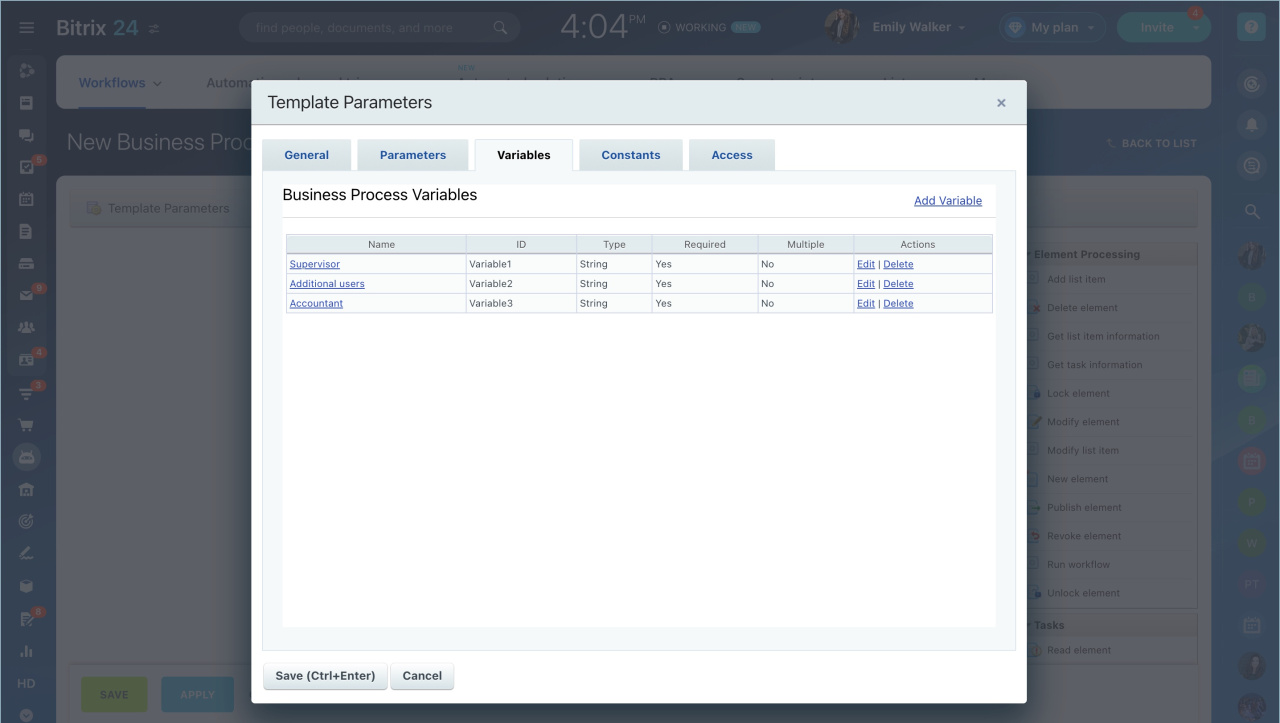
Switch to the Variables tab and add employees who coordinate the purchase of equipment. Each variable has the type - User.
- Supervisor — the user considers the request and makes a decision.
- Additional users — they make decisions if the supervisor is absent.
- Accountant — the user executes documents for the purchase of equipment.
Configure actions. Let's add business process actions and customize them.
1. Select a supervisor. Select an employee who will approve the request. Click the triangle icon, select Other - Select Employee in the action menu.
Configure the action parameters.
- Title — action name. In our example, it is Select supervisor.
- Type — the user who approves the workflow. The equipment purchase request will be approved by a supervisor from the company structure.
- For user — who needs to buy equipment. Click on the dots - Document fields - Who requests. The field will automatically be filled in by the employee who starts the business process.
- Supervisor level — the user who approves the workflow. The higher the number, the higher the supervisor is in the company structure. Let's select the immediate supervisor. The user will be automatically substituted in the field.
- Backup users — the user who approves the request if the supervisor is absent. Click on dots - Variables - Backup Users. The user will be automatically substituted in the field.
- Escalate to higher level if absent — enable the option to not select the supervisor or backup users if they are on vacation.
2. Approval of equipment purchase. At this stage, the manager makes a decision: approve or reject a purchase.
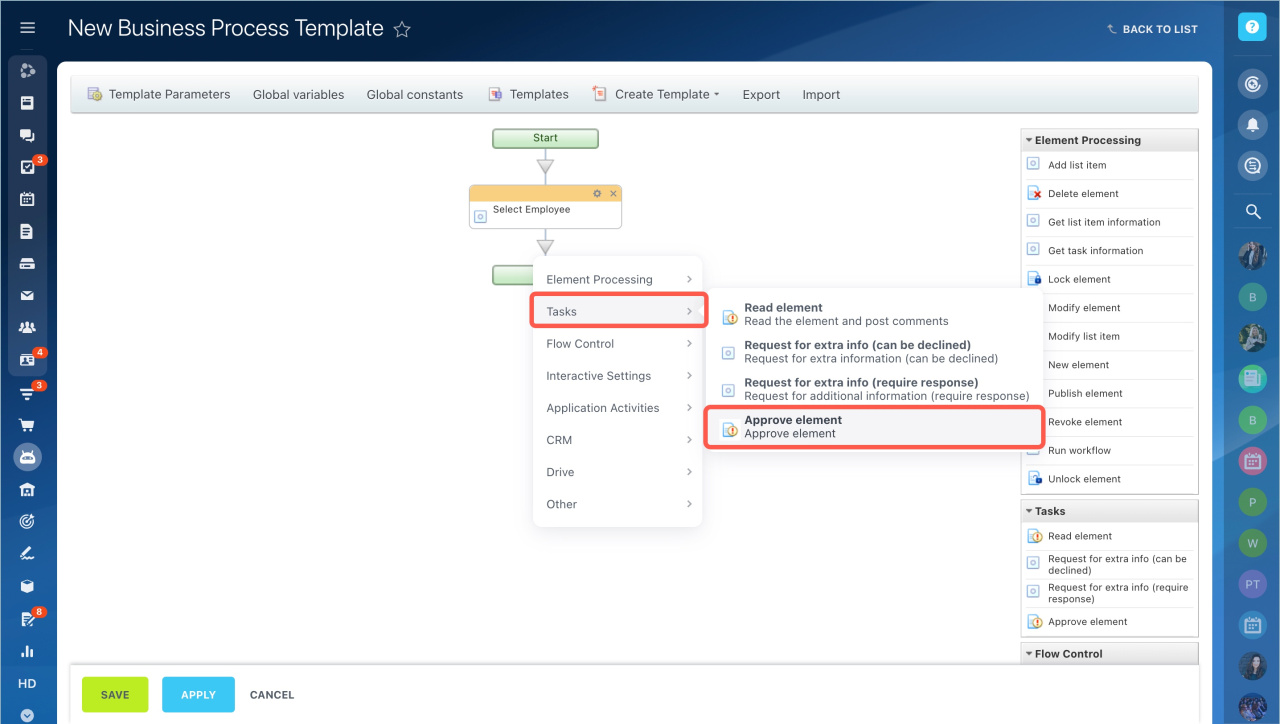
Click on the triangle icon, select Tasks - Approve element.
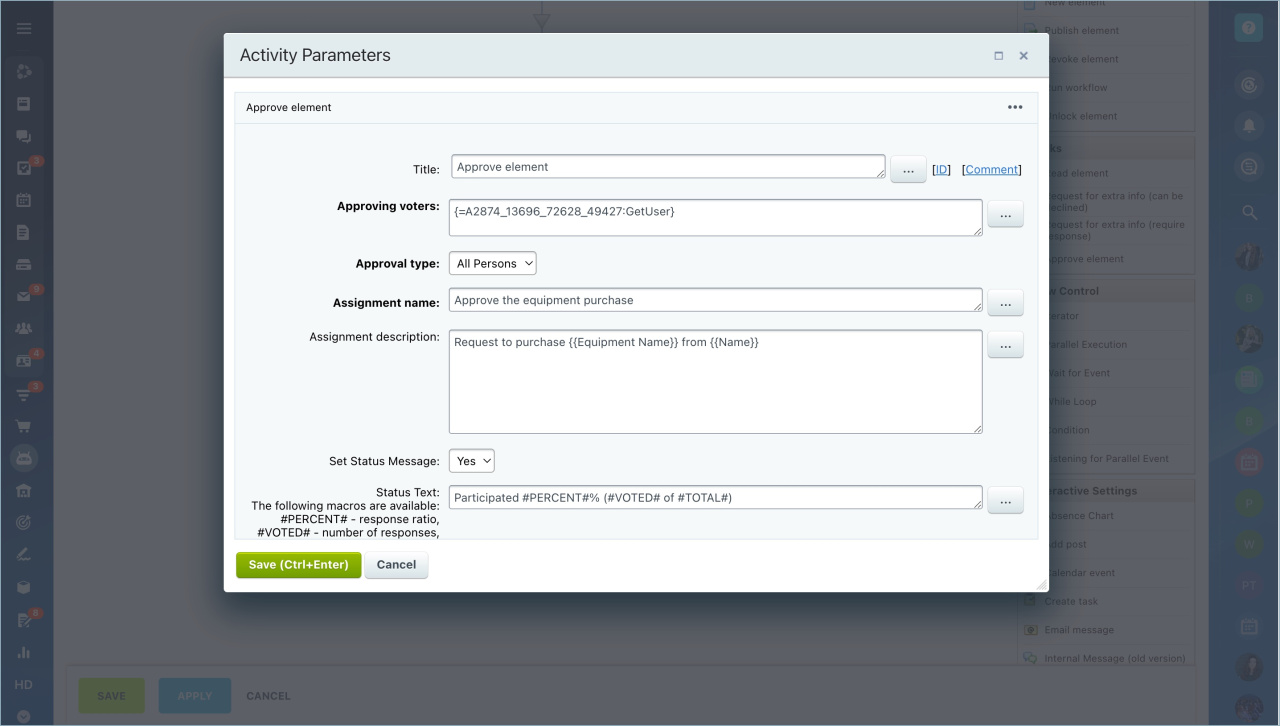
Fill in the parameters of the fields that the user will see when making a decision.
- Title — the name of the action. In our example - Equipment purchase approval.
- Approving voters — users who make the decision to purchase. Click on dots - Additional results - Select supervisor - Selected employee.
- Approval type — the way the decision should be made: voting, approval by any employee/all employees.
- Assignment name — what a supervisor or a backup user needs to do.
- Assignment description — let's specify the user and what equipment should be purchased. Click on dots - Element fields. Let's select two values: Name and Who requests. The data will be inserted automatically.
- Set Status Message — whether the workflow status should be displayed or not. Select Yes.
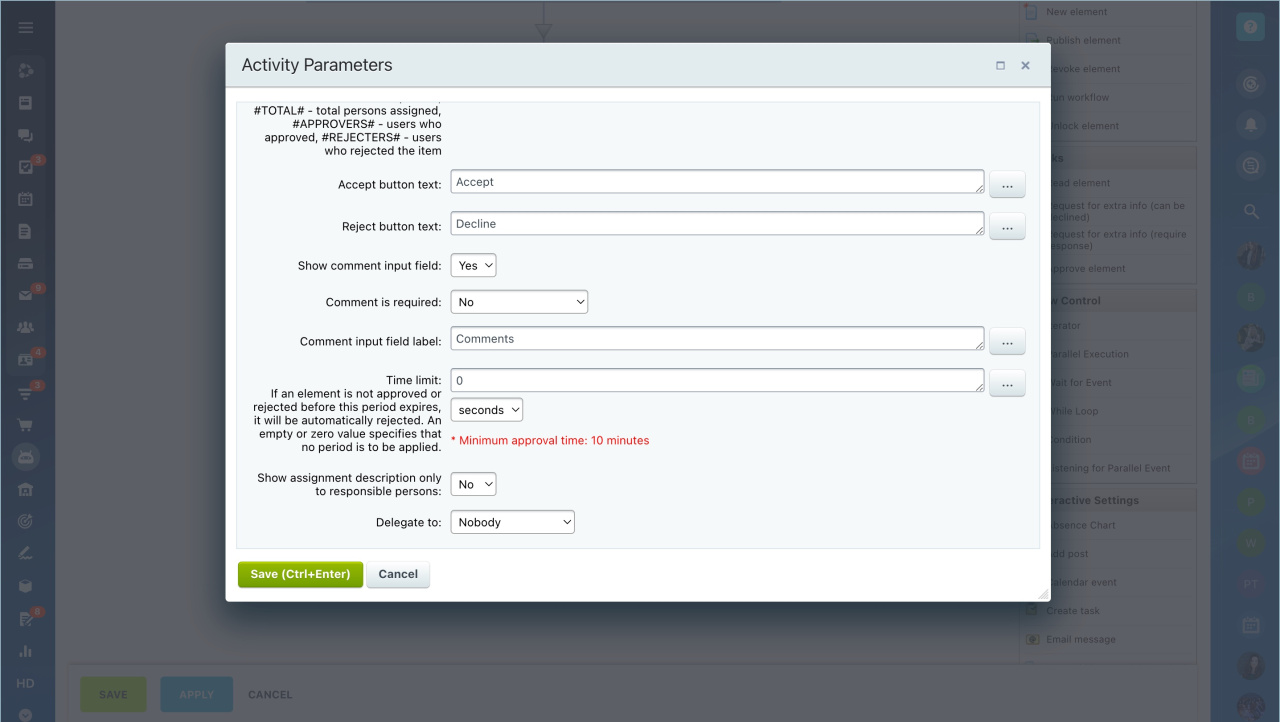
- Set status text — specify at what stage the workflow is - Waiting for approval.
- Accept button text — the supervisor will click this button to approve the purchase.
- Reject button text — the supervisor will click this button to reject the purchase.
- Time limit — If the time expires, the request will automatically be rejected. If you do not fill this field or specify 0, the action can be performed at any time.
- Show assignment description only to responsible persons — if this option is enabled, the assignment description will be visible only to the executor. This option is useful when you need to share confidential information with the executor.
- Delegate to — Let's select None - only the manager or backup users can approve the purchase of equipment.
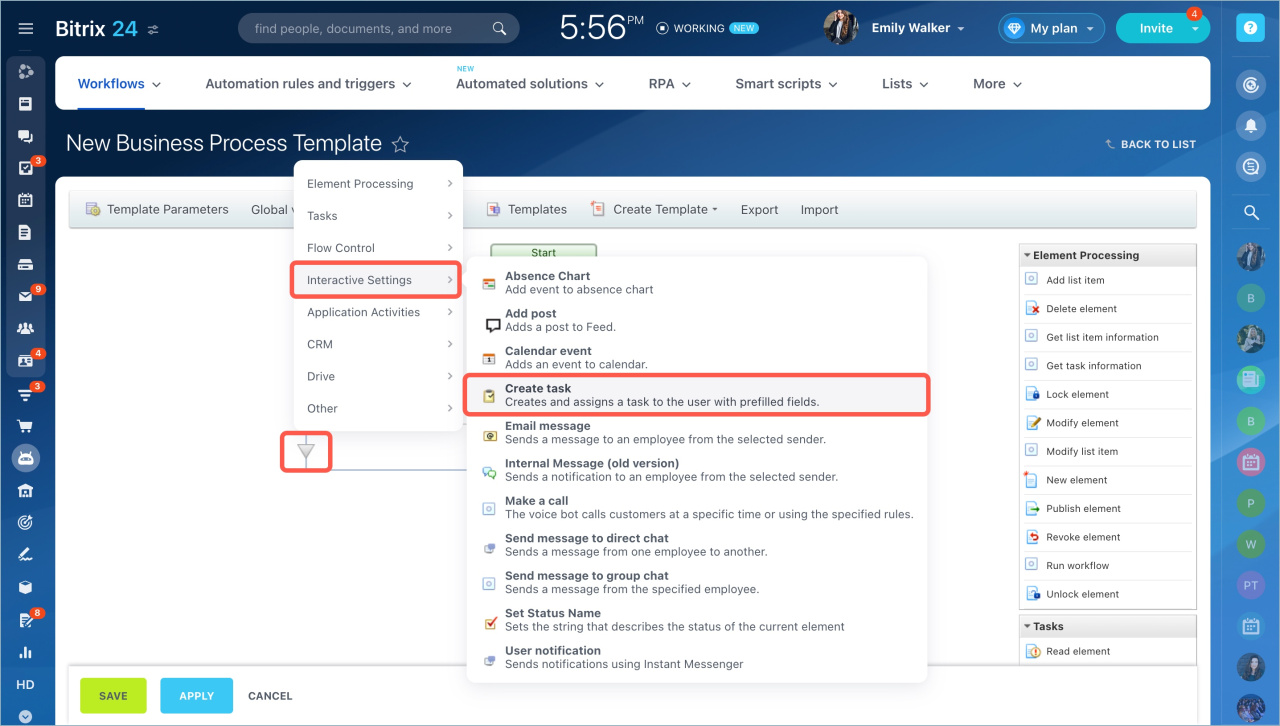
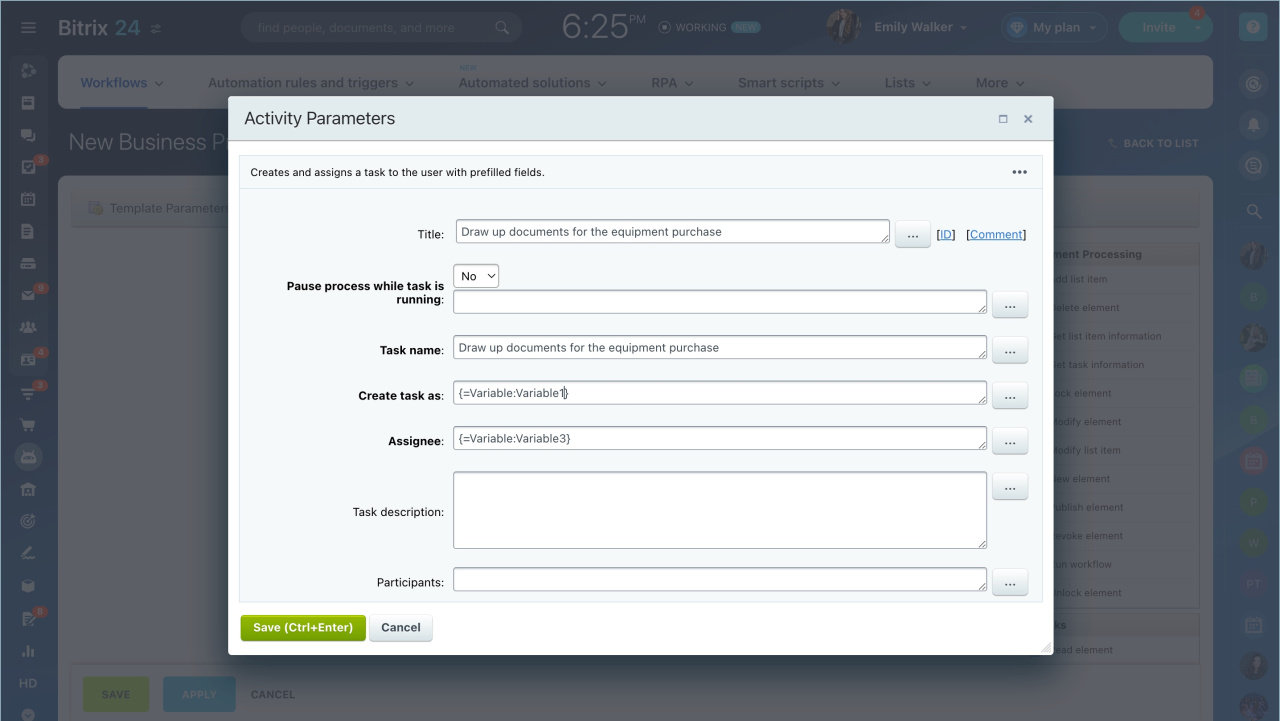
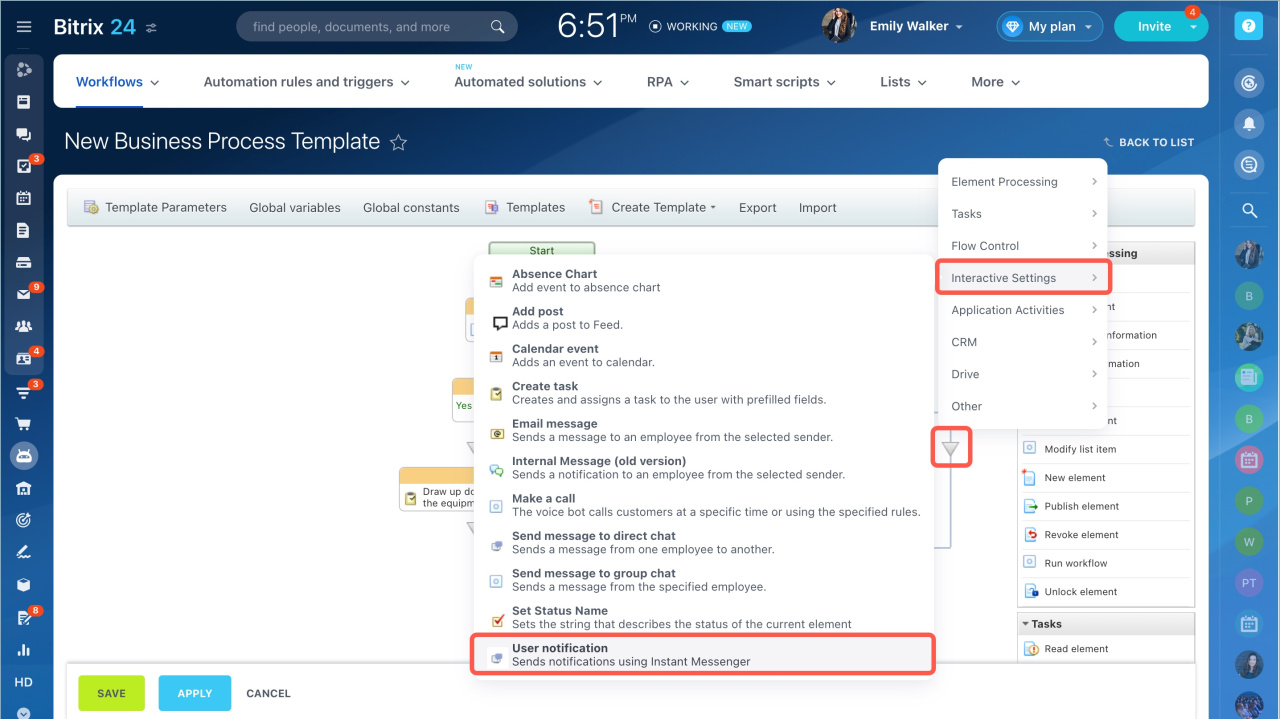
3. Drawing up documents for the purchase. Drawing up documents for the purchase. If the supervisor has approved the purchase of the equipment, the accountant needs to execute documents. Click the triangle icon in the Approve element - Yes action. Select Interactive Settings - Create task.
Fill in the fields of the task.
- Title — name of the action. Draw up documents for the purchase of equipment
- Pause process while task is running — if this option is enabled, the process will be stopped until the executor completes the task. In our example, the option is disabled.
- Task name — the assignee of the task will see it.
- Create task as — who approved the purchase of equipment. Click on dots - Additional results - Select employee - Selected employee. The user will be automatically substituted in the field.
- Assignee — who will perform the task. Click on dots - Variables - Accountant.
- Task description— the information that the accountant needs to execute the documents..
Other fields should be filled if needed.
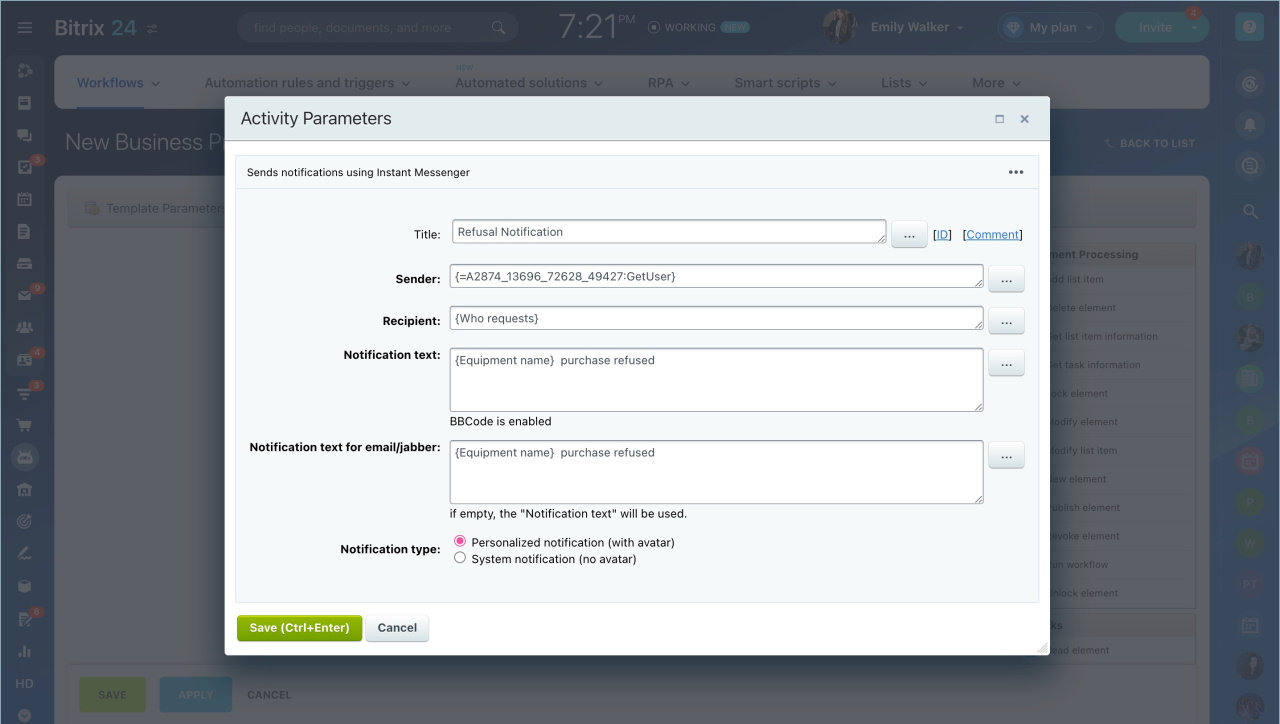
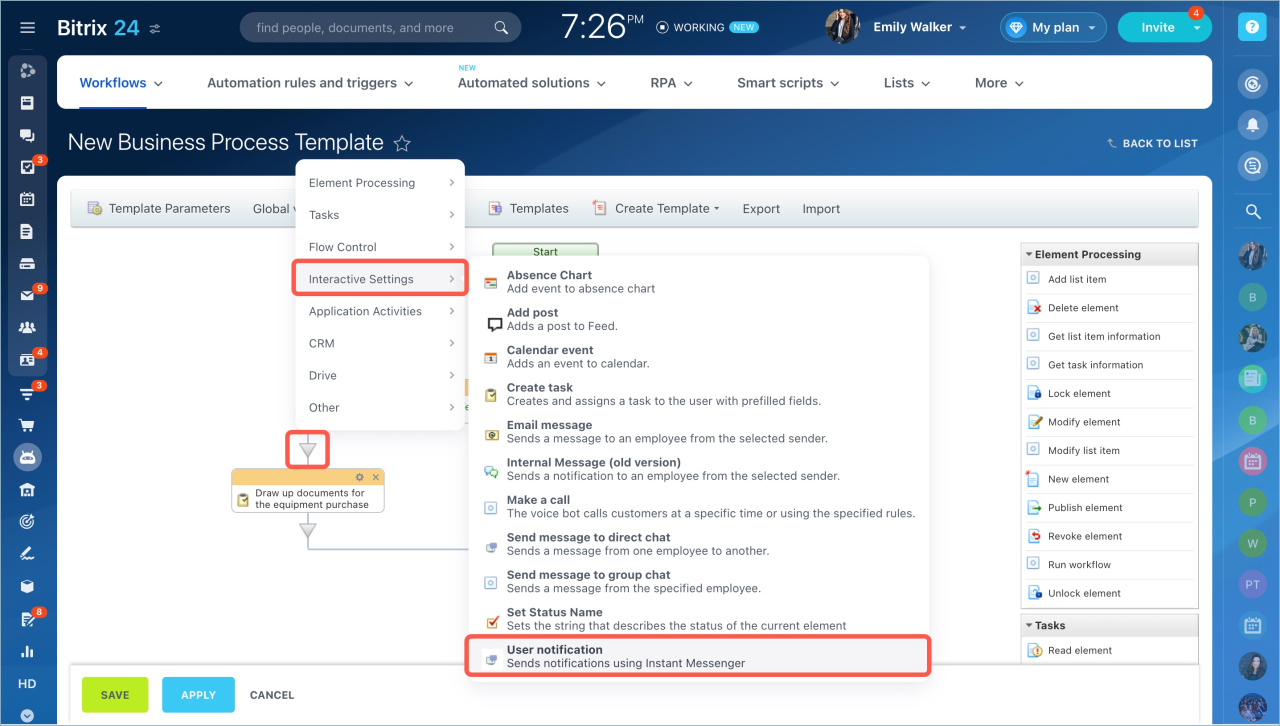
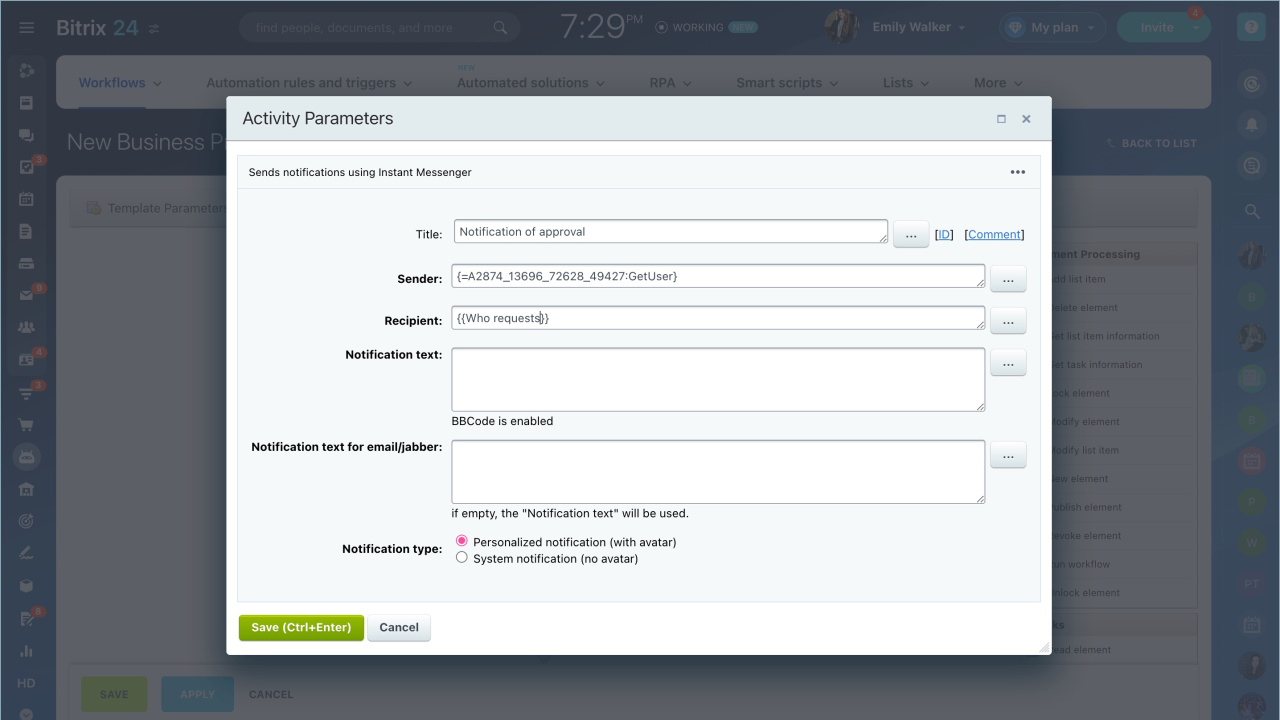
4. Refusal Notification. Configure a notification for the employee if the supervisor has not approved the equipment purchase. Click the triangle icon in the Approve equipment purchase - No action. Select Interactive Settings > User notification.
- Title — the name of the action.
- Sender — who made the purchase decision. Here we will add the supervisor we specified in the first action. Click on dots - Additional results - Select employee - Selected employee. The user will be automatically substituted in the field.
- Recipient — who needs to buy the equipment. Click on dots - Element fields - Who requests. The user will be automatically substituted in the field.
- Notification text — the employee will see this notification text in Bitrix24.
- Notification text for email/jabber— the text the user will see in the email notification.
- Notification type — system or personalized. Let's choose Personalized - the notification will come from the supervisor.
5. Notification of approval. Configure a notification for an employee if the supervisor has agreed to purchase equipment. Click the triangle icon and select Interactive Settings - User notification.
Fill in the fields the same way we did for the refusal notification.
Save the settings of the workflow template. It will appear in the list and employees will be able to use it.
- There are two types of workflows in Bitrix24: sequential and with statuses.
- A sequential workflow is a set of actions that are performed in order
- To create a sequential workflow, go to the Automation section - Workflows - Workflows in Feed.
- Specify the workflow data: name and description, variables and constants.
- If you change the actions in the template, these changes will apply only to the new workflow. Processes that were started earlier will continue to work according to the old template.
In brief:
Read also:
- Activities: Tasks
- Activities: Element Processing
- Activities: Drive
- Activities: Interactive Settings
- Activities: Flow Control
- Activities: CRM
- Activities: Other

