
A node is a block on an AI workflow diagram. Each node handles one step: it tracks an event, performs an action in Bitrix24, or checks a condition. Nodes connect to each other through links, forming the logic of the entire workflow.
In the new builder, a node checks conditions, performs the needed action, and routes the workflow into different branches through exit points. For example, in the Deal node, you can set up different actions for large and regular deals and route the result into different branches.
Bitrix24 plans and pricing
In this article:
How does an AI workflow work?
A workflow in the builder consists of nodes, flows, ports, and the links between them. You’ll need these concepts to read and configure any diagram.
An AI workflow template is a diagram that describes when a workflow starts, what actions it performs, and where it sends the result. You can run a workflow from the same template multiple times.
A node is a separate block on the canvas. A node tracks an event, performs an action in Bitrix24, or checks a condition.
A flow is a sequence of connected nodes that starts with a trigger. A single template can contain several flows.
A port is a connection point on a node. A node receives the flow and data through an input port, and sends the result onward through an output port.
A data channel is an input port of a universal node with its own set of settings. A simple action node has one input and one output, so channels aren’t singled out for it. A universal node has several inputs, and each one is a separate channel with its own settings. Channels are labeled with system names: G1, G2, and so on.
A link is a line between the ports of two nodes. It defines the direction of the workflow and how data passes along it.
A workgroup is a set of conditions and actions within a node rule. A node checks groups one by one and runs the actions of the first workgroup whose check passes.
Add a node to a diagram
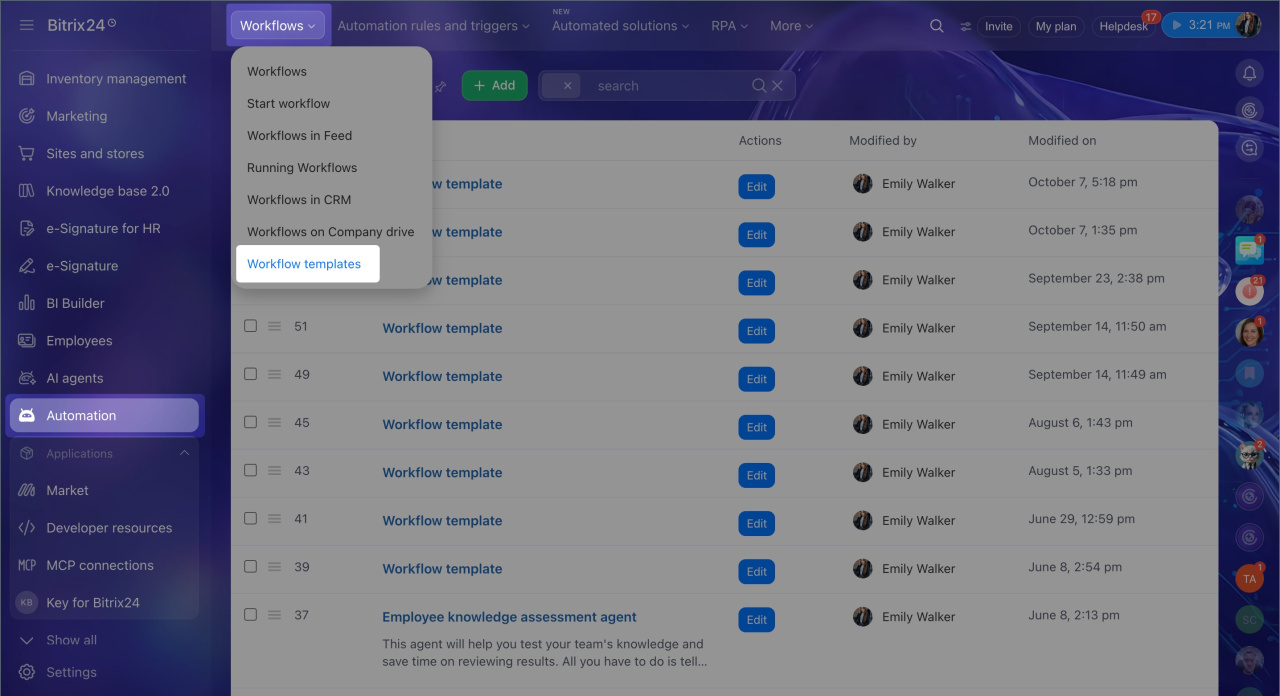
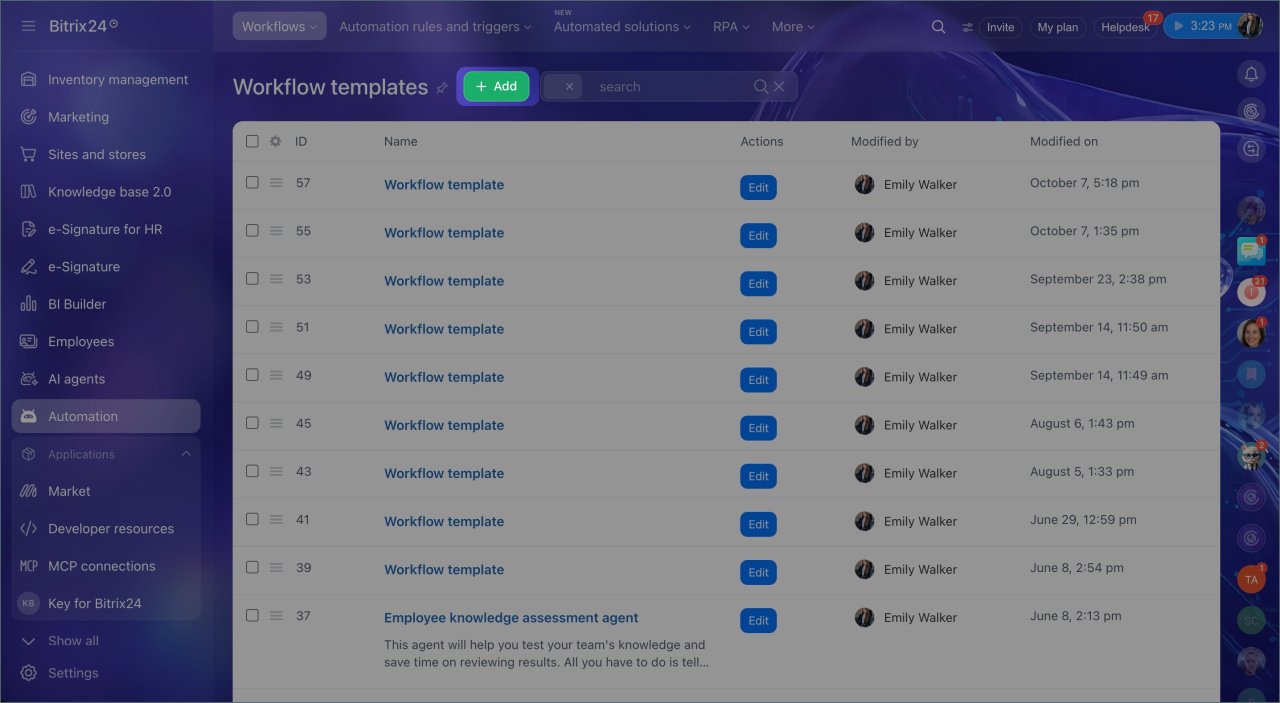
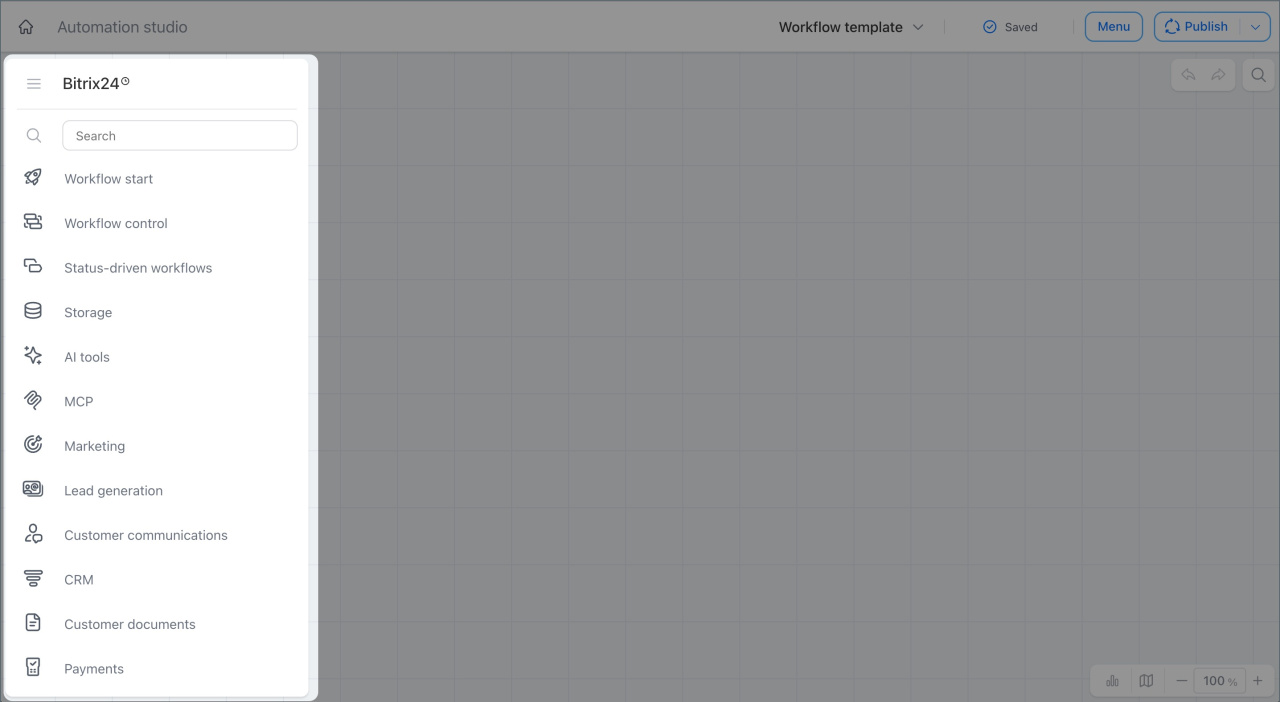
1. Open Automation > Workflows> Workflow templates > Add. An empty canvas opens — the editor’s workspace.
2. On the left is the node library. Nodes are grouped by scenario: sales and CRM, client document workflows, internal communications, HR processes, task management, and others.
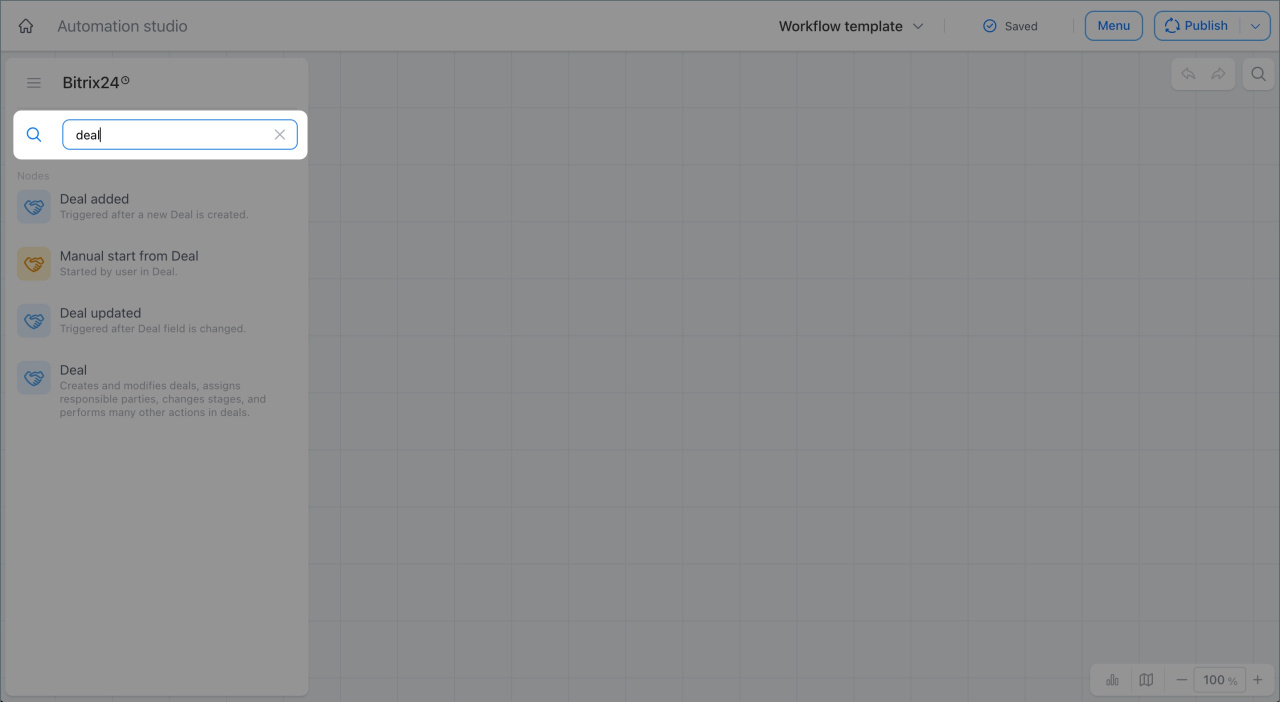
3. To find a node quickly, use the search bar.
4. Drag a node from the library onto the canvas — it appears on the diagram with input and output ports.
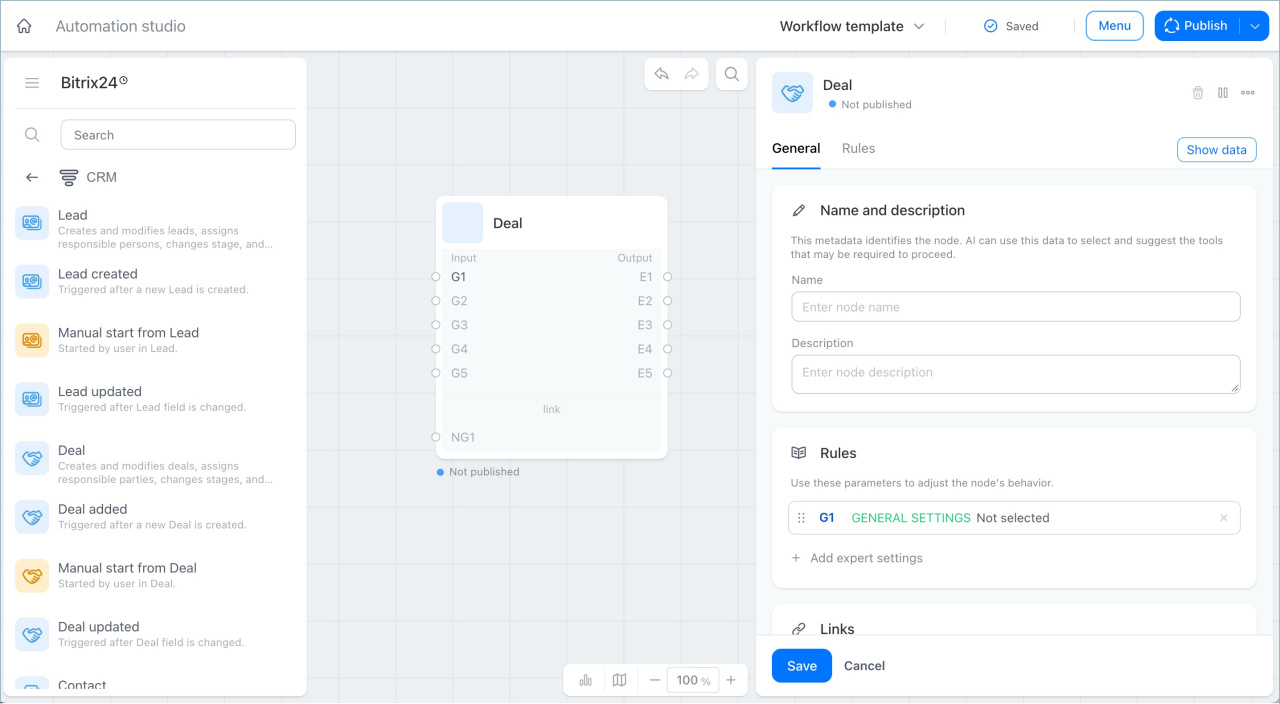
The builder has four node types:
- Trigger nodes track an event and start a flow. A trigger has no input port: it is the start of the flow. For example, the Deal created trigger.
- Simple action nodes perform one predefined action: send a notification, pause the workflow, and so on. They usually have one input and one output. For example, the Notify user node.
- Universal nodes represent Bitrix24 objects: a deal, lead, contact, company, task, SPA, and others. Inside this type of node, you choose an action on the object, set up several inputs, and route the result into different outputs. For example, the Deal node.
- Specialized nodes perform supporting operations: check a condition, repeat steps in a loop, store data, or process it through AI. For example, the Condition node.
A node’s color shows its subject area:
- Green — client communications, for example the Send email node
- Blue — product objects: deals, tasks, SPAs, for example the Deal node
- Yellow — employees and internal communications, for example the Notify user node
- Purple — AI scenarios
- Teal — storage
- Gray — technical elements: conditions, loops, iterators.
To see the exact action, check the node’s name and description in the right-hand panel.
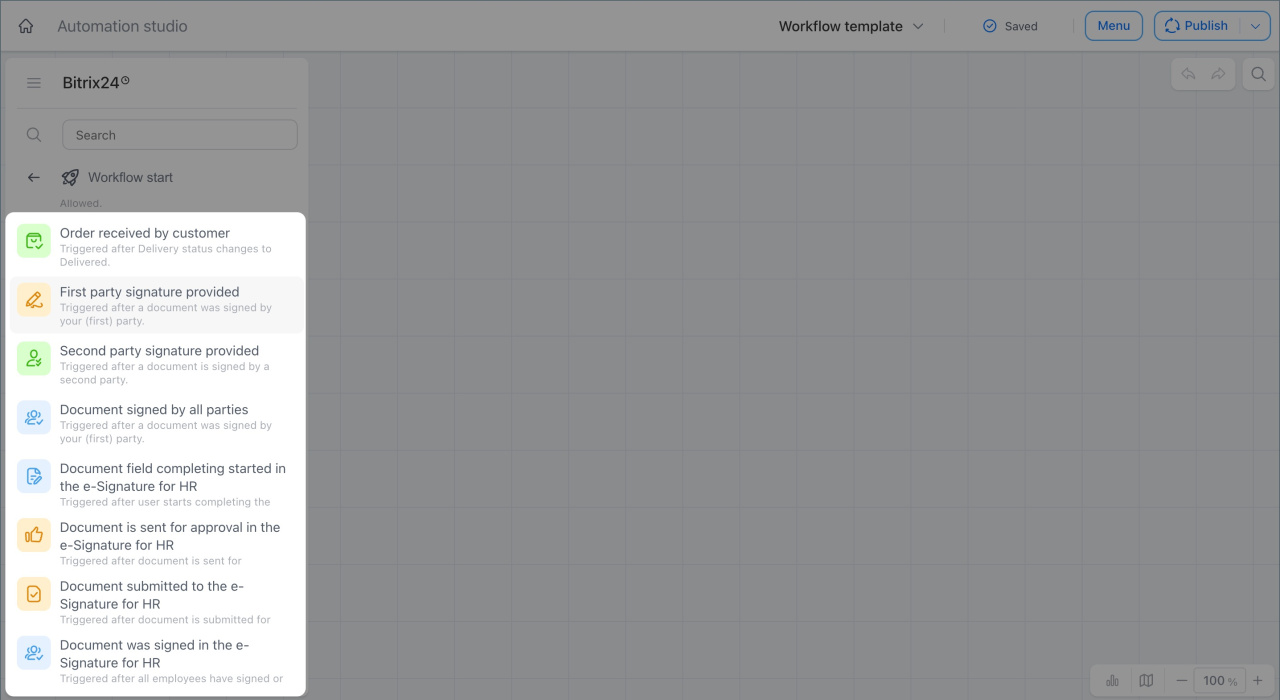
Open node settings
Click a node on the canvas to open the right-hand panel with its settings. The panel has three sections: the General tab, the Settings tab, and the Data button.
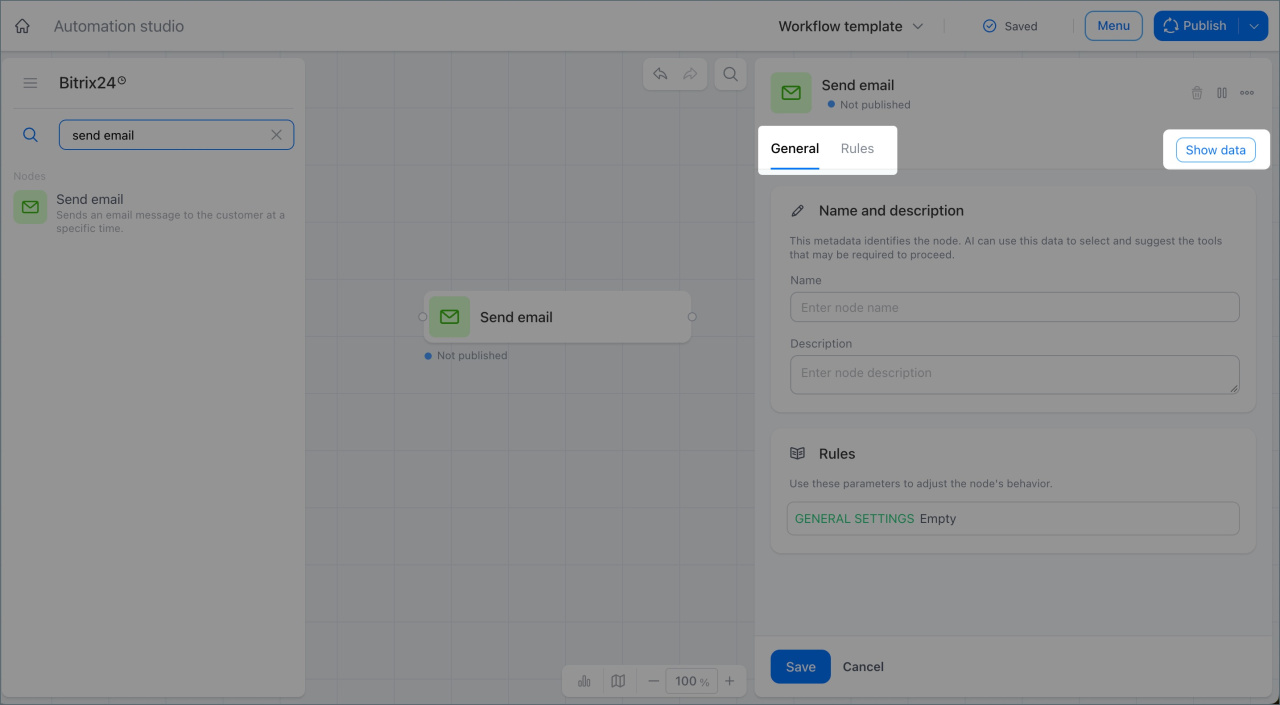
Check the node’s overall setup on the General tab. Here you see the full picture of the node’s setup: the custom name and description, available and generated data, and a list of inputs with a short summary of the configured rules. This is a convenient way to check the whole node without opening each rule separately.
Enter a name in the Custom name field and describe what the node does in the Description field — this way you won’t get confused if the diagram has several similar blocks. For example, instead of two identical Deal labels, name them after their task: Move deal to approval and Assign supervisor as responsible.
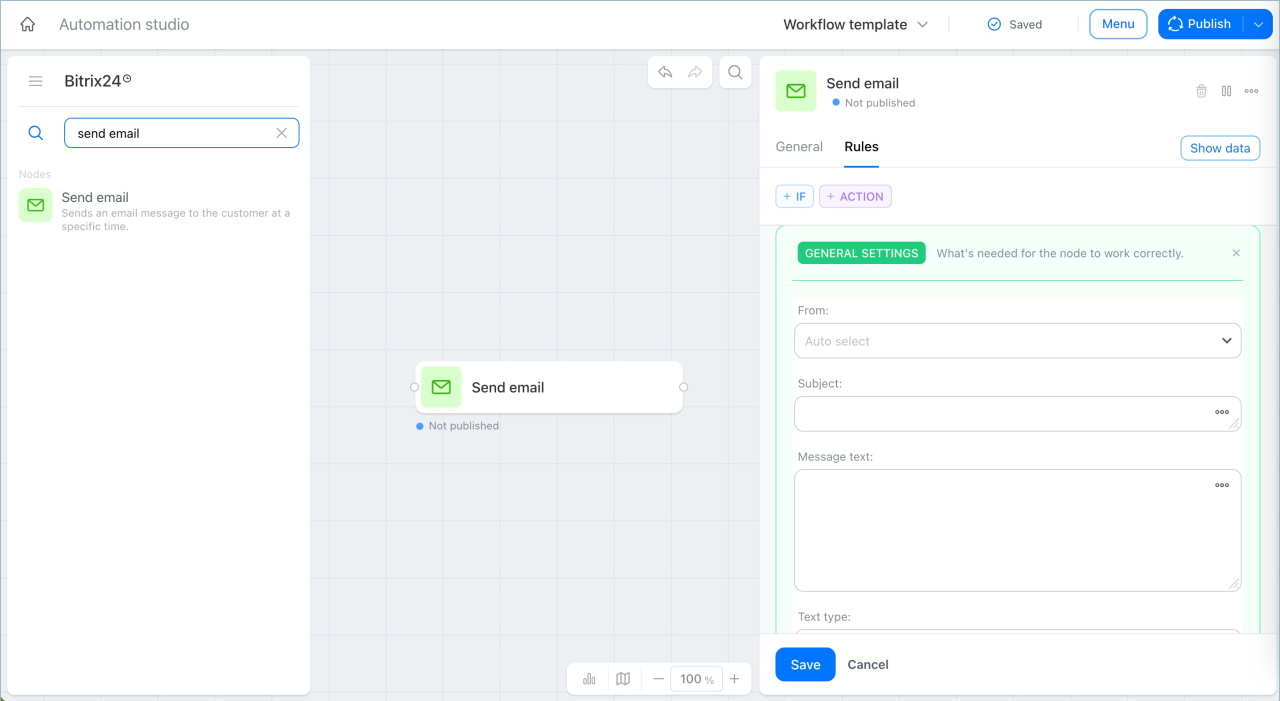
Build the node rule on the Settings tab. This is where you build the node rule — what the node does with the data coming into the channel. We’ll cover how this works in the next section.
If a node has several channels, switch to the one you need in the dropdown list at the top of the tab. Each channel is configured separately, so a node can process data differently depending on which flow it came from. Before changing settings, check that the correct channel is open: edits to G1 won’t affect G2.
For example, two triggers connect to the Deal node: Deal created goes to channel G1, and Deal field changed goes to channel G2. In the G1 settings, you can check the fields of a new deal and immediately assign a responsible person, while in G2, you can respond only to a change in the amount and notify the supervisor. Both triggers lead to the same node, but each channel has its own conditions and actions, independent of each other.
Open the available data panel. The Data button opens a panel with the values available to the selected node.
How data passes between nodes
Configure a node rule
A channel rule consists of four stages, and which ones you need depends on the node type:
- Base action — runs always, if the node has one
- Object — needed only if the node lacks data and must look up an item separately
- Condition groups — needed only if the workflow must branch depending on the data
- Output — needed to pass the result to the next node.
Base settings define what the node always does, regardless of condition workgroup. Simple action nodes already have their action set — for example, the Notify user node sends a notification.
In the Base settings card, fill in only the required fields, marked with an asterisk: for example, Notification sender and Notification recipient — you can populate both from data that came from the previous node instead of entering them manually.
For a universal node, first choose an action in the base settings: what to do with the object — for example, create an item, change fields, or change the stage. After you choose an action, its fields appear — fill in the required ones, or the node won’t save.
You can add base settings only once per channel — this action doesn’t depend on conditions; it runs every time the node receives data, before the condition groups are checked. If you need more complex logic — different actions depending on which data arrived — use the Action card inside condition groups instead of the base settings.
You need an object if the item isn’t in the incoming data. Click the Object button at the top of the tab if the node needs to look up an item on its own because it isn’t in the incoming data. For example, a trigger passes data about an employee but doesn’t pass the specific deal to work with.
Specify the CRM item type — deal, lead, company, SPA, and so on — and the condition the node will use to find it: field, operator, and value.
For example, to find deals where the stage equals Approval and the amount is greater than $1,000, specify two conditions and combine them with AND — only deals that match both conditions at once will trigger. If you combine the conditions with OR, any deal that matches at least one will trigger.
If the needed item already arrived at the node from a previous step, you don’t need to add an object — go straight to the conditions.
Condition groups route the workflow into branches. Click Condition to create a rule workgroup. A workgroup combines the condition that triggers it with the actions to run. To add a condition, click If inside the workgroup — a card appears where you specify the field, operator, and value to check.
For example, to make the workgroup trigger only for deals from ads, specify the field Source, the operator equals, and the value Ads. If you need more than one condition, combine them with AND — only items that match all conditions at once will trigger — or with OR — an item that matches at least one will trigger.
For example, Object can find all deals at the Approval stage that a specific employee is responsible for. Then the condition checks the amount of each deal found: deals over $5,000 go down one branch, the rest go down another.
Give the workgroup a clear name, for example New clients — this way you can read the rule on the General tab without opening each workgroup separately.
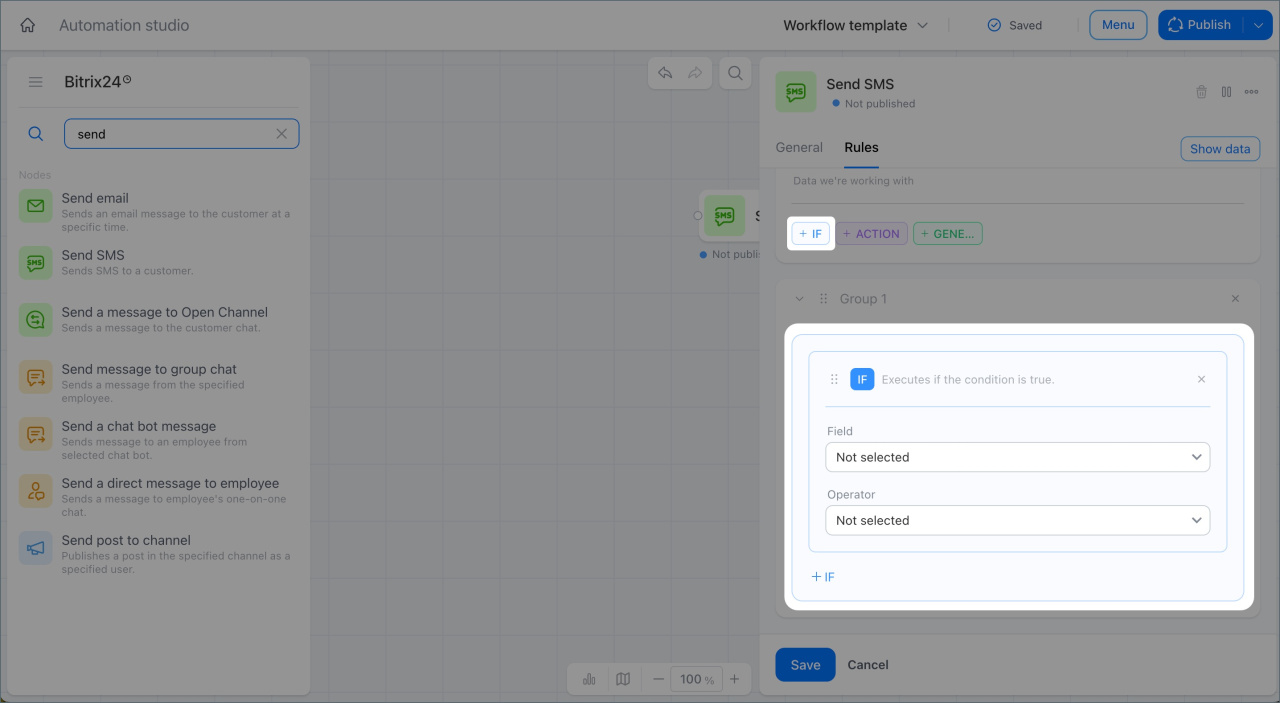
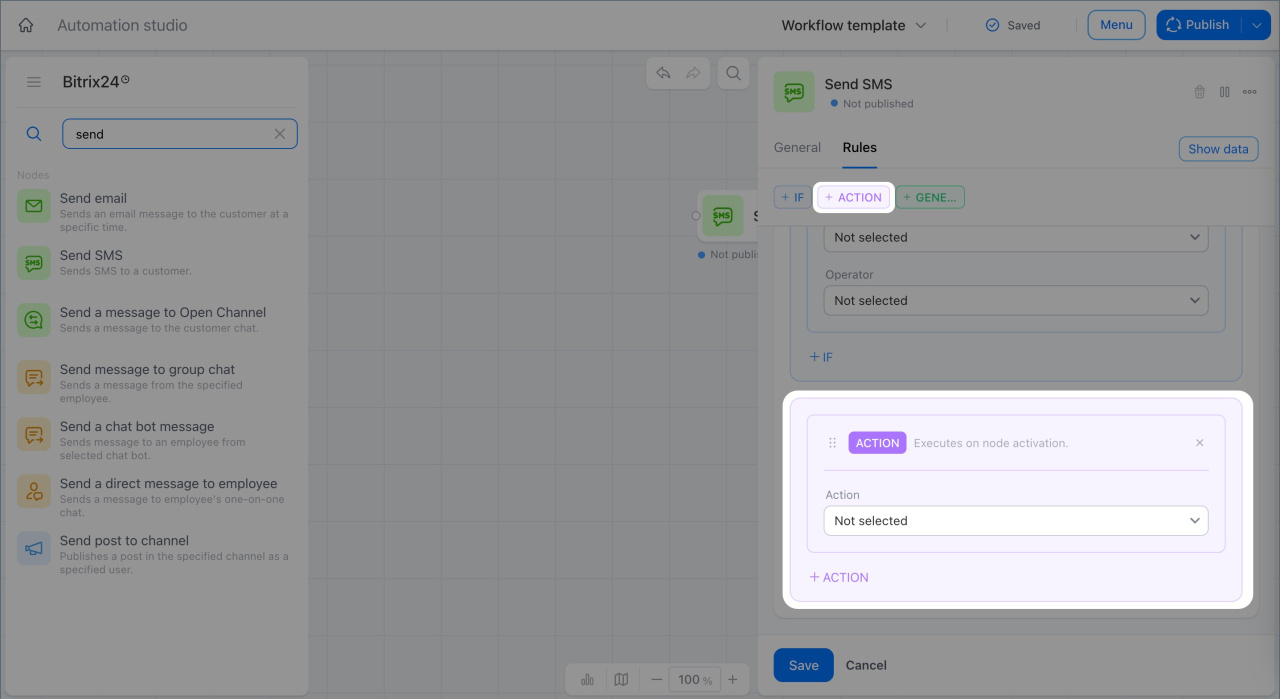
Click Action inside a workgroup to add an operation that runs only if the workgroup’s conditions are met. For example, in the Deals from ads workgroup, add the Create task action — it creates a task for the manager to contact the client. A workgroup can contain several actions — the node runs them in the order you added them.
If a rule has several groups, the node checks them one by one, from top to bottom. As soon as a workgroup’s conditions are met, the node runs its actions and doesn’t check the remaining groups. So place groups with narrower conditions first, and put the group with the general condition at the very end.
If you need an action for cases when an item doesn’t match any workgroup, you don’t need to create a separate workgroup for it. Click the Action button on the tab’s top panel — an action card without a condition is added. It runs if none of the groups above matched.
If no such form exists and the item doesn’t match any of the groups, the node doesn’t perform the activities from the rule.
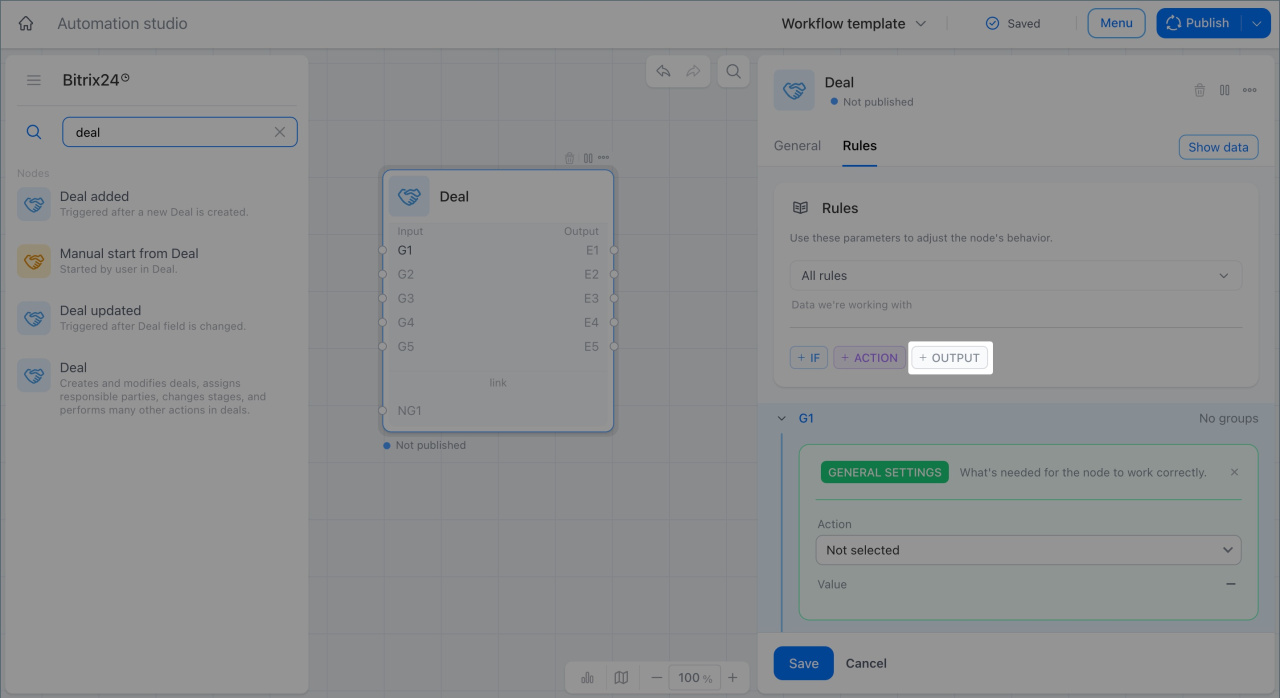
The exit passes the result forward. Add an Exit form at the end of the workgroup and connect it on the canvas to the input port of the next node. For universal nodes, exits are labeled E1, E2, and so on.
If you select an exit in the settings but don’t draw a connection on the canvas, the flow ends there — the next node won’t receive data. Before publishing, check that each exit you need is connected to the correct next node.
How does data move between nodes?
A node doesn’t need to enter the same data again at each step — it takes data from the previous nodes in the chain. For example, if the Deal created trigger received the client’s phone number and name, the next node doesn’t need to look up this data again — it pulls it from the data panel.
A node receives an object in two ways: through a connection from the previous step, where the ID and other data arrive automatically, or through an Object form, if the node looks up the item itself. If there’s no connection between nodes, data from the previous step won’t reach the next one — use the Object form or check the connections on the canvas.
Separately from these two methods, a node has access to the process’s global data — for example, constants set in the template. This data doesn’t depend on connections between specific nodes and is always visible in the data panel.
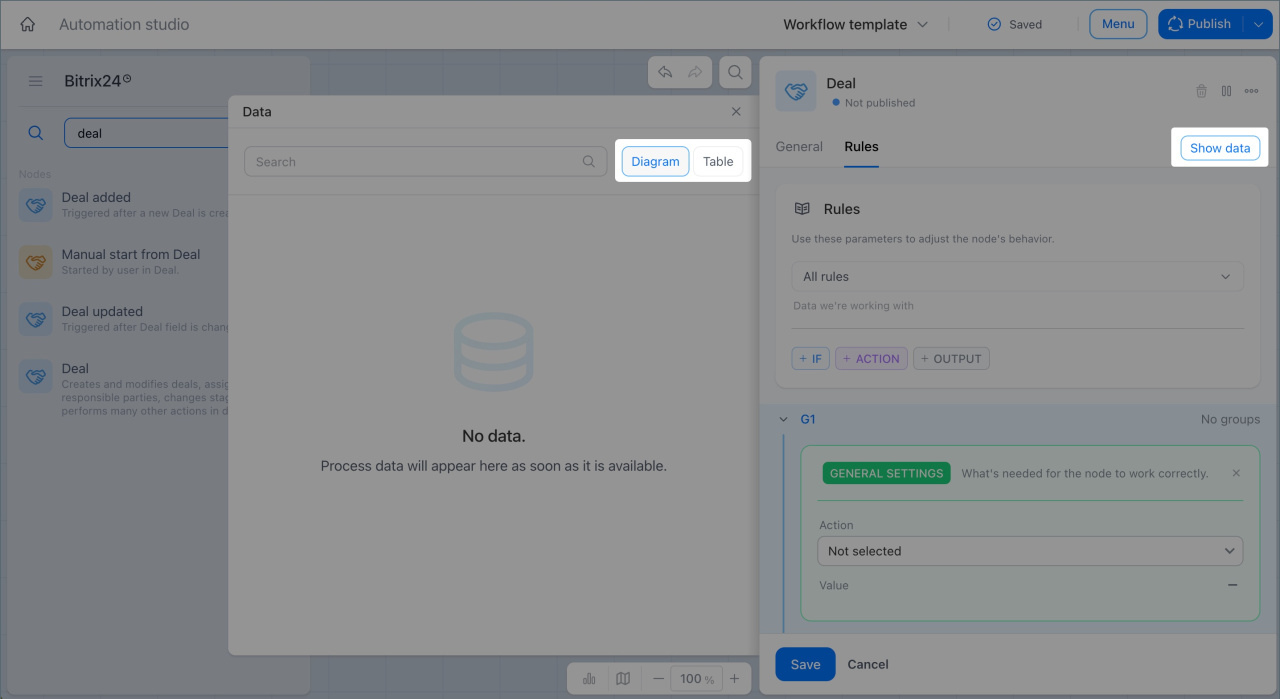
To see what data is available to a node, open the Data button in the right panel.
The panel supports two modes: Schema — a tree-like list of sources, nodes, and fields, and Table — a flat list of fields, convenient for quick searches. Next to each field, you’ll see the value type: string, number, date, user, file, and others.
To insert a value into a setting field, open the data panel, find the field you need, and drag it into a field that supports insertion — marked with a curly brace {} icon. Not all fields support insertion: a condition operator or an exit number is selected from a fixed list.
As the chain progresses, data accumulates — a node uses data from the previous step and from earlier related nodes.
Common mistakes when setting up a node
Mixing up channels. If a node has multiple inputs, check which channel is open on the Settings tab before changing any settings. Edits in G1 don’t cancel or duplicate the settings in G2 — you need to make changes separately for each one.
What to do: before each change, check the channel number in the dropdown list against what you see on the node’s input diagram.
Using an object instead of a condition — or vice versa. Object finds the item the node will work with. Condition decides whether to continue down a branch.
What to do: first figure out whether the node actually needs an item that isn’t already in the incoming data — if so, add an object. If the item already exists and you just need to select a branch, add a condition.
Exit not connected to a node. An exit that’s configured but not connected on the canvas ends the branch — the next node won’t receive the flow.
What to do: after configuring the exit in the right panel, go back to the canvas and check that a line runs from each required exit to the next node.
Groups placed in the wrong order. The builder checks groups from top to bottom and stops at the first one where the conditions are met. If a general condition comes before a specific one, the builder never reaches the specific one.
What to do: arrange groups from the narrowest conditions to the broadest — place the general option with no conditions, if you need one, last.
Forgetting to publish the template. Changes save to the draft automatically, but they don’t take effect until you click Publish.
What to do: after each round of edits, check the status in the top panel — if it shows Not published, click Publish before closing the editor.
In brief
- A node is a building block of an AI workflow: it tracks an event, performs an activity in Bitrix24, or checks a condition.
- A node’s rule consists of basic settings — what always runs — and groups with conditions, activities, and an exit, which trigger only under certain conditions.
- An object finds the item the node will work with, while a condition decides which branch to run next — these are different tools.
- Data passes between nodes through connections and accumulates as the chain progresses — you can insert it using the Data panel.
- Changes save to the draft automatically, but they take effect only after you publish the template.